iOptron iEQ45Pro – PE measurement

First try of a new iEQ45Pro mount from iOptron. It is quite simple to measure a PE curve using PEMPro. I guess the PE is what people want to know. I wonder why it is so hard to find a real PE curve measurement on the Internet when every astroimager owns some kind of mount. Guys, it is so simple to do it even for a first time (even a dumb head like me was able to proceed within few minutes of reading the guide tool). Due to a total lack of time (my free / leisure time equals zero) I simply cannot write any detailed technical article of testing new equipment free of charge. Therefore I will only post some output assuming the reader’s capabilities of understanding technical stuff :-)

Rubriky: Articles in ENGLISH, Technika, recenze | Napsat komentář

SW Esprit 100/550 Triplet APO Refractor – first sight

6 months ago – purchased, this month – first light :-) . After selling my Borg 77EDII I started to miss some smaller (meaning still easily portable) refractor. I wanted 100mm of aperture and something not slower than F/4.3 like my previous Borg. With Riccardi reducer I may reach F/4.15 rendering nice 415mm focal length. Should be a double factor „win“ on behalf of weight – Esprit is much heavier and notably bigger.

Therefore I started with weighting parts of it right after unpacking the nice triplet out of inconvenient-size-case it came with.

Esprit100-Weight

As you can see, just the dew shield weights about 865g and the tube rings and mounting plate adds additional 1254g while the rest of the scope is just 5.9kg i.e. below 6kg exactly as advertised. But, unfortunately even the smallest setup I intended to use with the telescope (AtikONE + OAG + QHY5L-II guidecam) weights almost 9kg which is much more then I would like to put on my small and portable iOptron iEQ30 Pro mount. Therefore I replaced the mount for iEQ45 Pro later this year.

Since, next time out with the scope under a half-clear sky, I had issues with the iEQ45Pro, I focused on testing the Strehl of my new telescope using a software called WinRoddier. I managed to capture intrafocal and extrafocal images which is enough to feed the software with in order to get some basic parameters calculated. My quick test case (using Atik ONE with UV/IR filter) showed Strehl ratio of 0.97 ! That is a hair bigger then real (true) measurement on the optical bench performed by Tommy Nawratil from Teleskop Austria. BTW if you want to get any of the Esprit family telescope, the best purchase point is HERE. Tommy measured 0.945 which is great enough.

Esprit100-WinRoddier

I am still in the process of finding correct back focal distance for Riccardi 0.75 reducer that I got for this „baby“ to bring it to a reasonable optical speed (shooting at F/5 is way tooo slow for me because I am really happy with F/3.6 ASA Newtonian – who tried, never wants to go back to use any slowish refracting telescope with fast changing focal point during a typical night moreover having to focus manually). Therefore following output from CCDInspector is just a first (or second) light attempt to focus somehow, somewhere… this will require lot more time to settle.

CCDI_curvature-firsttry-Esprit100

Vignetting with my first light setup (in the end used with MII G3-16200 that is a new camera based on OnSemi’s latest KAF-16200 CCD of size 27,2 × 21,8 mm) is roughly about 13-14% in the very corners. I plan to test this with all cameras and focal length reducers I have at the moment at home in order to give this highly acclaimed information to the public :-)

As a last image for this first sight report I’d show a star picture (center focused).

Star Test

Maybe I could also show a real first light of this telescope:

http://astrofotky.cz/~Konihlav/thumbs/1451070677d.jpg

Stay tuned! :-)

Rubriky: Articles in ENGLISH, Technika, recenze | 1 komentář

iOptron iEQ30Pro review – PART#2 – first night out

While I purchased this mount on 26th May 2015, the first light (night out) happened on 6th July 2015. What I really had to do is to read the user’s manual concerning Polar Alignment as that’s different at iOptron from Sky-Watcher, Losmandy and Gemini/Pulsar systems that I am familiar with. To do PA, you need to power on the mount, connect polar scope illuminator and its cable to turn the lit on (brightness is adjustable from the Hand Controller’s menu – I have set it to lowest possible value) unlock RA axis and rotate it so as the 12 hour indicator is at the top. Users’ manual says that the additional bubble level fixed on polar scope could be used for this task while I am not so sure about it when I do not precisely level the mount as that’s not needed unless you want to use some aid / tool for PA using hand’s controller’s advanced PA routine (have never really used yet).

The Polar Scope Dial has couple of concentric circles while those outer-most three are used for PA in southern hemisphere and those in-the-middle three are used for PA in the northern hemisphere. These circles serve for somehow compensating for precession that is expressed as ‘r’ parameter from the mount’s Hand Controller after MENU->Alignment->Pole Star Position was dialed. Provided you have correct time zone set and GPS status says ‘OK’ the data displayed are correct for doing PA. That is – hour angle (hour/minute) for Polaris position and mentioned ‘r’ value. You now need to put Polaris on the correct hour angle position and at the same time on the correct concentric circle matching the r value. That’s simple and surely more precise than polar scope on Sky-Watcher’s mounts. In spite of that, if it’s up to me, I would still prefer Losmandy’s style of PA with 3-star reticule – that system is best ever from my point of view.

Then, after PA procedure, if your mount/telescope is in the so called ‘zero position’ which typically means counterweight down and DEC 90 (telescope pointing to north) you dial MENU->Alignment->One Star Align the mount slews somehow close to the selected star for alignment. This is as nice as on Sky-Watcher mounts (I lack this behavior in Gemini/Pulsar where I have to manually slew to selected star). Aligning on one star on the same side of meridian for astrophotography and GoTo functionality is enough. I do not use more than one star alignment any more (since few years back). Therefore you center the star in the FOV of your CCD camera and confirm. Alignment successful.

Now is time to connect from PC (laptop) to the mount using COM (RS-232) adapter. Locating the COM port number from Device Manager manually may not even be needed as the iOptrons’ utility can search for correct port. I managed to make this connection on 2nd attempt, only issue I faced was with old firmware so I had to upgrade it. Then I connected from my favorite guiding and imaging software over ASCOM platform/driver. I discovered one bug though – when clicking on mount slew buttons (RA/DEC) twice or doing a quick double click there and in reverse, the mount went crazy (did not stop as it should). But it’s not a big deal, maybe WinXP is not so well tested as other Windows.

Surprisingly, on my first night out, I was able to easily do PA, I was able to do GoTo Alignment, I was able to connect from computer, I was able to calibrate guiding camera, I was able to take couple of 10 minutes H-alpha shots using 135mm lens so as my typical test object (NGC7000) fully fits into the FOV of my Atik ONE (ICX694) 16mm diagonal CCD camera. And the mount silently tracked… the night was very short, only about two and half hours. But anyway I found this first night out as very successful.

For reference – check other tracking graphs of different mounts using my setup

Even though I haven’t measured periodic error of the mount (PE) yet, I am using, for couple of years the same (or similar) guidescope setup having almost identical image scale for years (nowadays it’s about 3“ [arcsec] per pixel) and judging only from this guide chart I can say the mount is quiet without any notion of big backlash or tracking problems. So far it looks well and smooth.

During the dawn I made one more simple test of the mount – GoTo test :-) Slew to Moon and then to NGC281, Pacman Nebula both at different side of meridian.

Talking about meridian and flips, the mount shall be able to do flips. The only problem I expect is that it can only track two hours after meridian :-( I need to check this closely next time as the User’s manual doesn’t describe full options of the HC, only ‘Set Position Limit’ (2hrs) and ‘Set Behavior’ will tell the mount if a meridian flip will be performed – nothing else. I think that when I browsed this menu option the allowed options were stop and flip.

The HC does have heating(!) so in the winter freezing temperatures this mount could be operated easily using the HC which is another cool feature apart from others, e.g. integrated GPS.

CONCLUSION

+ very silent movement, smooth slews and tracking
+ integrated GPS module
+ handbox has heating for low temperature operation
+ nice fit and finish (looks good)
+ surprisingly easy to learn and use handbox
+ innovative flashlight on handbox

- limited clearance around latitude adjustment know and bubble level (because the mount has compact size)
- polar scope illuminator as extra tool requiring extra cable with power plug prone to humidity
- seems the mount can’t track more than 2 hours past meridian
- a minor thing: the power supply (12V) cable is 5 meters long! (replaced for 1.5m one)

References

iOptron iEQ30Pro review – PART#1 – initial impression
iEQ30 Pro GEM # 3000E
Firmware for iEQ45 Pro and iEQ30 Pro

Rubriky: Articles in ENGLISH, Technika, recenze | 4 komentáře

iOptron iEQ30Pro review – PART#1 – initial impression

This little mount caught my attention right away from its first appearance on the market some year (or two) ago. I simply love small but powerful astro-toys. But that time I was still using my old HEQ-5 SynScan from Sky-Watcher for occasional airline travel to dark (and mainly clear sky) locations to do some astrophotography. Also, I wanted to wait for first users’ experience – what a contrast to today when I am the first owner of this mount in Europe. Simply put, the mount has been there for a while and this „Pro“ version is the second generation so hopefully it would be mature now. I’ve been waiting for it for over 6 months.

The mount arrived in two, rather small boxes (weighting 8 and 12kg). The first one contained the iEQ30Pro’s head (6.9kg) and counterweight shaft (666g) while the second one contained the tripod, one counterweight (4.5kg), cables and standard accessories (RS-232 cable, handbox cable, DEC drive cable, power cable (12V), power cable (110/220V), polar scope illuminator cable, extension shaft and a printed copy of quick start guide). Full user’s manual is available from iOptron’s website as well as ASCOM drivers and firmware updates. Because I must always have something non-standard, my delivery was missing the Hand Controller (Go2Nova 8407+) and Tripod Support which was delivered to me in a separate package later, right after I claimed these missing parts.

First impression. The mount head is really small and lightweight and therefore easily portable. The color is not exactly white as I expected from pictures, but rather light-grey, the counterweight is black. Surprising was that the mount head is not fixed on the tripod’s top by the center screw as that doesn’t have any threads – it has smooth surface, just like the alignment peg. The mount is attached and secured via two AZ locking screws on side of the bottom plate of the mount. The bubble level indicator on the mount head is harder to use due to not enough (comfortable) clearance below the polar scope. The latitude adjustment knob is somehow difficult to use too due to limited clearance around the knob (but it’s not a big deal as the minor adjustments are fine and easy, just major adjustments are a harder task).

Connecting the cables is easy and straightforward though I advice to really carefully read the instructions manual (at least the short quick start). It’s very nice to have again a mount that only requires power supply cable, handbox cable, DEC drive cable and optionally (in my case mandatory as I never ever used ST-4 guide port at all) the RS-232 cable to connect the mount to the computer over ASCOM platform. When I first time powered on the mount and press RA/DEC buttons to play with it, to slew in both axis, I was very well surprised of a nice sound from the motors. It’s also very silent and looks very smooth and precise. Compared to my previous HEQ-5 (not taking into account that I owned a Losmandy and currently own a Gemini 53 friction mount as my main mount) the fit and finish and “manufacturing quality” looks very well.

As I was lazy (and too busy at work) to read carefully full user’s manual, it took me a little time to figure out why the mount, after powering on, doesn’t track even though the controller says SDRL which stands for sidereal rate of tracking. The trick is to press button 0 (zero) to toggle between Tracking and Stop (initial) mode. The keys 1-9 change the slewing speed (64x after powering on). Menu, Enter and Back buttons are self explanatory and I must admit it’s really easy to learn how to operate it and navigate through the menus. Really nice. Additional nice feature is the light-bulb button (symbol of a Sun) which turns on red flashlight on the back of the Hand Controller. This deserves a praise to iOptron (on the other side, the reticule (polar scope) illuminator power will be prone to water-damage from condensing dew as it’s located on upper surface next to power on button which is definitively not a good design).

First thing that I advice a new owner to do is to make a firmware upgrade. This is really well documented on iOptron’s website in the support section. Interestingly there are 4 various firmware (.bin) files needed (apart from the FW upgrade utility) which is rather uncommon. I managed to upgrade successfully without any problem. The reason to do so is that this procedure of upgrading FW changed my previously set time zone and therefore affected my local time. Thus, do a FW upgrade first, then set your time zone. The rest is set automatically by the integrated GPS feature which is very handy and one of the reasons why I purchased this mount. The GPS status is ‘ON’ after powering the mount on, but in few minutes it changes to ‘OK’ to indicate successful GPS time and location update. Obviously it works in the field, not in-house. Another reason, why I had to upgrade the firmware was that I was unable to connect from PC to the mount over RS-232 cable (COM port). The driver was claiming old FW.

TO BE CONTINUED…

References

iOptron iEQ30Pro review – PART#2 – first night out

Rubriky: Articles in ENGLISH, Technika, recenze | 1 komentář

CCD Cameras – Calibration Process

I would like to share this appendix chapter to my talk (All you need to know about CCD cameras) given at CEDIC 2015 here as I believe it might be useful for many beginning CCD astrophotographers. The 40 minute slot of my lecture was obviously too short to tell the „full story“ as I like to give all the details and relations among them in this very complex topics. Let’s go to the story now :)

Rubriky: Articles in ENGLISH | Napsat komentář

QSI vs. ATIK Sony ICX master bias example

This is just a quick and actual/current (19th November 2014) comparison of a master bias from a QSI 660 mono camera versus Atik 460 EXM camera. Both cameras feature famous/great Sony ICX694 CCD detector known for its low noise and high QE being most suitable for narrow band imaging. This is not a random/single example of a „defect“, more samples from more cameras were showing exactly the same issue of amplifier glow [OK, it might not be exactly amplifier glow issue, but it is very similar issue - noise is added by thermal heating of some electronical components/parts located on the circuit board close to the sensor and therefore the longer dark frame the user takes the bigger visual appearance of the "defect" shows]. For more information on AmpGlow issue please check THIS article.

Let’s look at the images, stretched in PixInsight (my new software tool for viewing FITs files under Linux). All images are taken at -10 degrees Celsius in bin 1×1 mode and were 10 minutes long.

QSI660mono-masterdark

QSI660 masterdark

Atik460exm-masterdark

Atik460EXM masterdark

Atik460exm-masterdarksubtractedmasterbias

Atik460EXM masterdark with masterbias subtracted

The world of CCD manufacturers and their current offerings on the market changes/evolves as well as bugs are being fixed and new ones are introduced. Therefore any statement of who makes better cameras must be done at some fixed point in the timeline.

Currently, if you are about to purchase a Sony ICX based camera, the best is to go with Atik even though Atik has readout noise around 5e- [we are talking about ICX-694 cameras, the ICX-814 are by 1 to 1.5e- "better", but what you gain here you loose in the final SNR due to smaller pixel size of ICX-814] while QSI reached a readout noise around 4e- only. BTW FLI shall now make a very nice MLx694 camera with even lower readout noise then QSI, but I cannot confirm that at the moment and could not afford/justify to pay more than twice as much money for a 1e- lower RN camera being an european customer.

On the other side, if you wonder what’s better choice whether Atik 383L+ or QSI 683 when it comes to most popular KAF-8300 detector, then the QSI is currently better choice (after last 3-4 years QSI finally makes a great 8300 cameras) if we compare these two makers only (because currently best Kodak/TSI based cameras are produced by Moravian Instruments, from my perspective).

Talking about makers, all of them had issues in the past with some of their camera production lines. There is no general-truth and black-white vision. I will put AmpGlow test [thermal noise accumulation test] on the list of performance tests that I do with every CCD camera that comes into my hands :) I shall do it with my newly acquired Atik ONE, but as I was told, the electronics is the same as in Atik 4xx line so I do not expect any problem (but will test it anyway!).

Update

atik1

Atik ONE 6 masterdark


Yes, the Atik ONE behaves exactly the same way as Atik 4xx and that’s fine :)

Another update (11th December 2014)
After reading QSI letter to customers I decided to spend last few minutes more on this topic. They are probably right about the issue name, it should not be called amp glow, it shall be called glow or simply other way [from my perspective, the problem exists no matter how you call it but also the solution exists]. They are right that proper dark frame calibration (same binning, same cooling temperature, same subexposition duration matching light frames) takes care of it. They are right about their focus on low readout noise cameras (which is fine, I am the same type of guy, chasing ghosts). They are right that they had to make some decisions on the design (every maker had to do it, someone better someone worse) and they are right that the master dark frame calibration works.

What I do not like in the article apart of the fact that it is tendentious (to hide their amateur design)? The table data and chart. It is misleading and done on purpose to demonstrate something that only confuses normal, ordinary users who have no chance to understand it. There is no reference light frame used for calibration test? From where did they get the numbers and how? It is explained in the last paragraph and whoa they calibrate a single dark with a master, funny. The result is obvious and same with every correctly working camera on the market – that stacking multiple subs lowers noise is obvious. Just visually guessing the table and chart looks OK on first look because the longer subexposition the higher accumulated thermal noise (their „defect“) and therefore the higher demand/need to subtract it and obviously then „better“ ratio of correction. They simply correct for something they introduce into the image! But it is „foolproof“.

They are also not right about „subtracting a bias and a zero second dark results in an increase in image noise by 0.71, as expected…“. There are at least 3 errors. First, you either subtract bias or you subtract a dark, but I guess it’s just a wording issue as they speak about zero second dark – an equivalent of bias so they should only have put the latter into parenthesis. If you correct for both bias and zero second dark then you obviously do it a wrong way and „noise“ (without adjective) would be increased. If you say you increase noise by 0.71 you say that the final noise is lower! An increase is with multiplication and therefore with a floating point number higher then 1. OK, this was just a side note on the text quality. I think it makes no sense to comment more (last paragraph tells the reader that stacking multiple frames (whatever it is, light frame, dark frame) lowers the final noise in the frame, but that is obvious, every CCD beginner knows this rule).

AN EXPERIMENT
To not talk „bullshit“ I made a very quick experiment with a single Light Frame of my recently taken Sh2-249 and IC443 Jellyfish Nebula image. The single Light Frame has StdDev of 467.641 ADU . Now we have two options to calibrate the image:
(A) with a Dark Frame. Here you end with resulting StdDev of 462.678 ADU (5 ADU levels difference from uncalibrated image).
(B) with a Bias Frame. Here you end with resulting StdDev of 467.645 ADU, but do not forget to get rid of the hotpixels by using a hot pixel map removal, after BPM and after this common calibration process for every Sony ICX based camera [calibrating with master bias and using bad pixel mapping] you end with resulting StdDev of 462.608 ADU.

Can you see the difference? :)

Conclusion
In my personal opinion, it is a big shame and bad advertisement for QSI. But the dark frame calibration would work just fine, it is just an ugly tradeoff having to calibrate with darks where other brand cameras with the same chip doesn’t suffer from this „defect“ and can be calibrated with usual, common way of using master bias and hot pixel mapping only as it makes life much, much easier. On the other hand, QSI cameras really have about 1e- lower readout noise (it all depends on chip as chip variance is 1 to 1.5e- from my extensive testing experience) then say Atik, my favorite brand [just got another Atik recently and a price tag and ease of use was my decision point].

Another update (3rd May 2015)
From now on, QSI fixed the issue.

Rubriky: Articles in ENGLISH, Pokusy, Technika, recenze | 1 komentář

Atik ONE 6 review – PART#1 – unboxing, initial tests

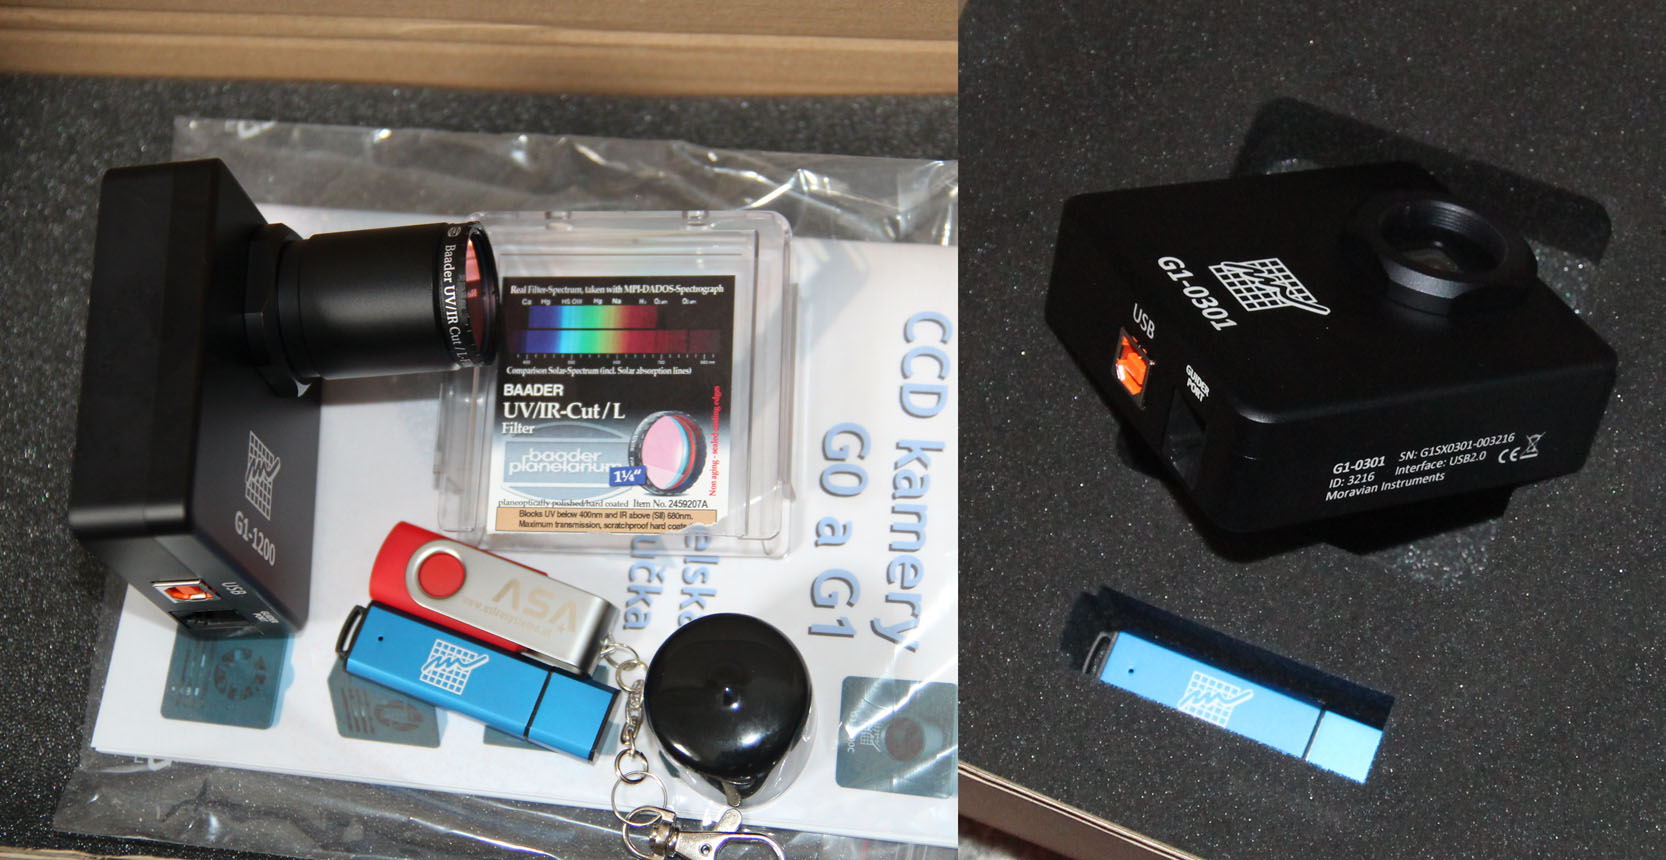
29th August 2014 and 17th September 2014 two important dates in my CCD camera life. The former is when I sold my beloved Atik460EXM and the later is when I pulled the trigger and ordered Atik ONE 6. I simply cannot imagine a life without SONY ICX-694 even though I moved from a keen narrow band (Ha/OIII/SII) astrophotographer into a keen broad band one (LRGB) using a big full frame size chip. I would very much miss the opportunity to combine a nice HST images. My motivation was to have some kind of integrated filter wheel in place and possibility to add some OAG and therefore I purchased the Kit version which comes with a replaceable OAG and Atik GP guidecam.

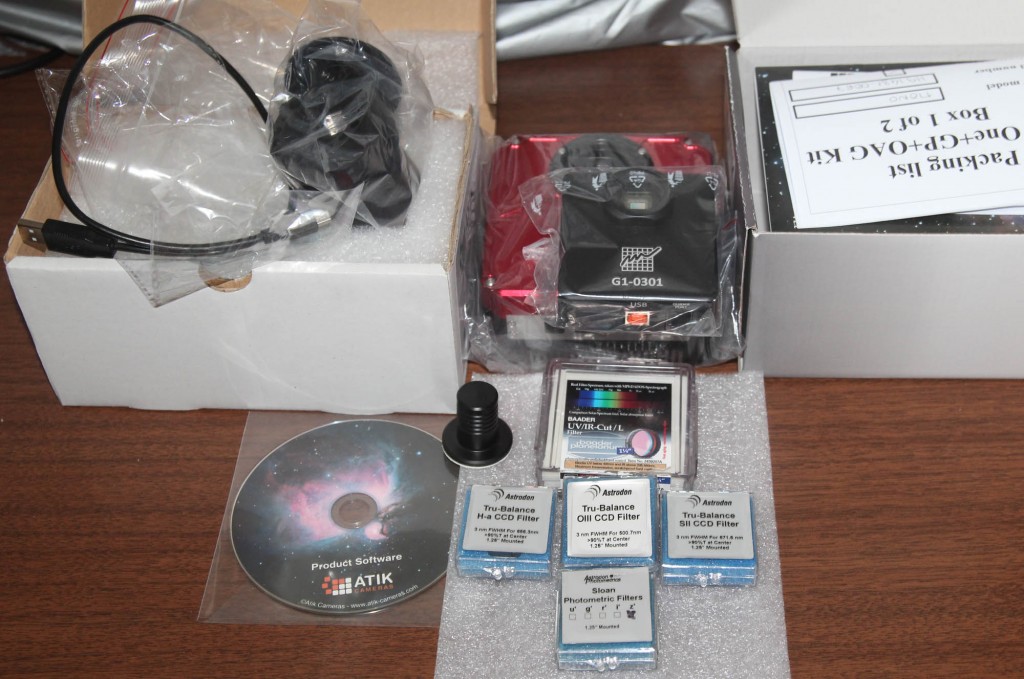
Let’s check what you find in the box, OK two boxes:

1-Box1Of2-Camera

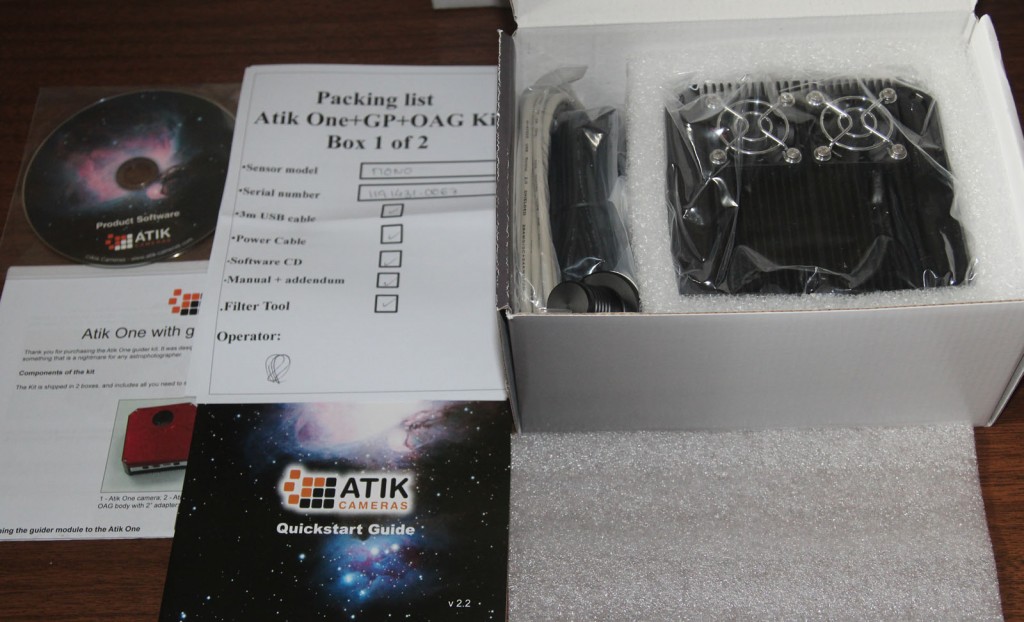
Box 1 of 2 - Main Camera Body in standard Atik box

2-Box2Of2-OAG

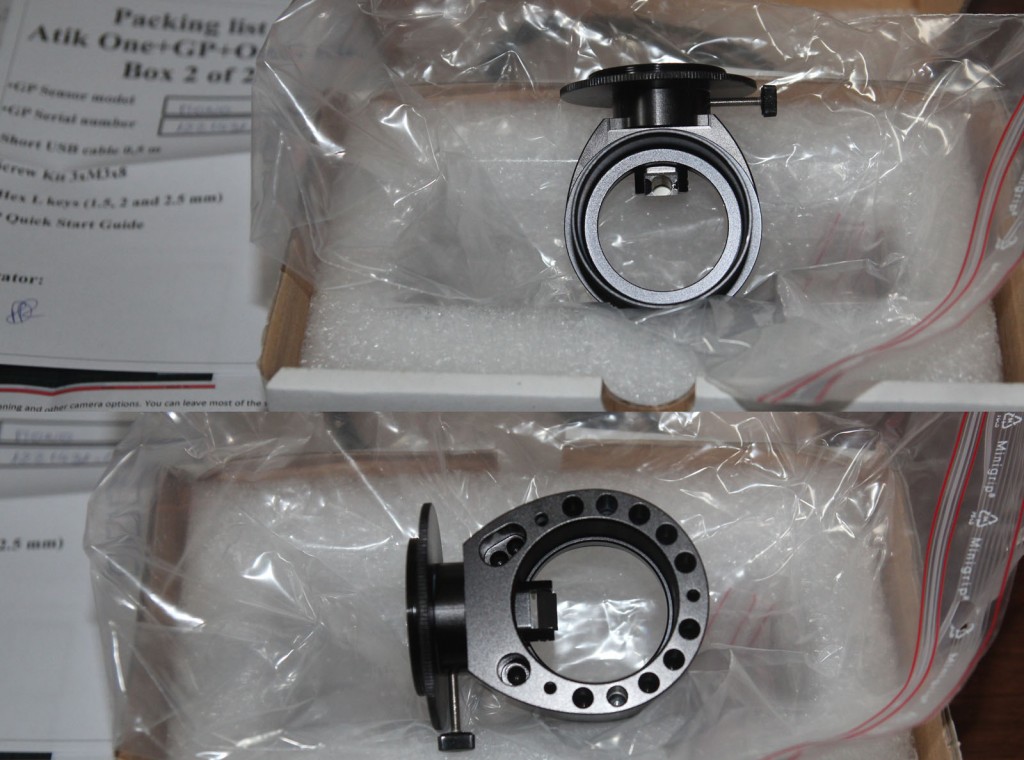
Box 2 of 2 - OAG with focusable guideport and AtikGP

In the first box you find the main camera body, 3m long USB cable, little shorter – 1.8m only power cable (with 12V socket), CD, manual, quick start guide and filter replacement tool. In the second box you find the OAG with mounted (could be unmounted) 2″ nosepiece and focusable guideport (for T-thread equipped guidecam) along with the small Atik GP guidecam body and short mini USB cable to be used to connect the guidecam with the main Atik ONE camera which possess a USB hub and some three hex tools (keys) and three replaceable screws (long ones) to mount the OAG on the camera body. The camera body comes with standard T-thread adapter which can (and must) be unmounted (three short screws) in order to (i) insert filters inside the internal filter wheel and (ii) to mount the OAG on the camera body. But, obviously, you can choose wheter to install the OAG or not, I still haven’t mounted mine and will do a first light without it as if I purchased Atik ONE 6 in the non-Kit version.

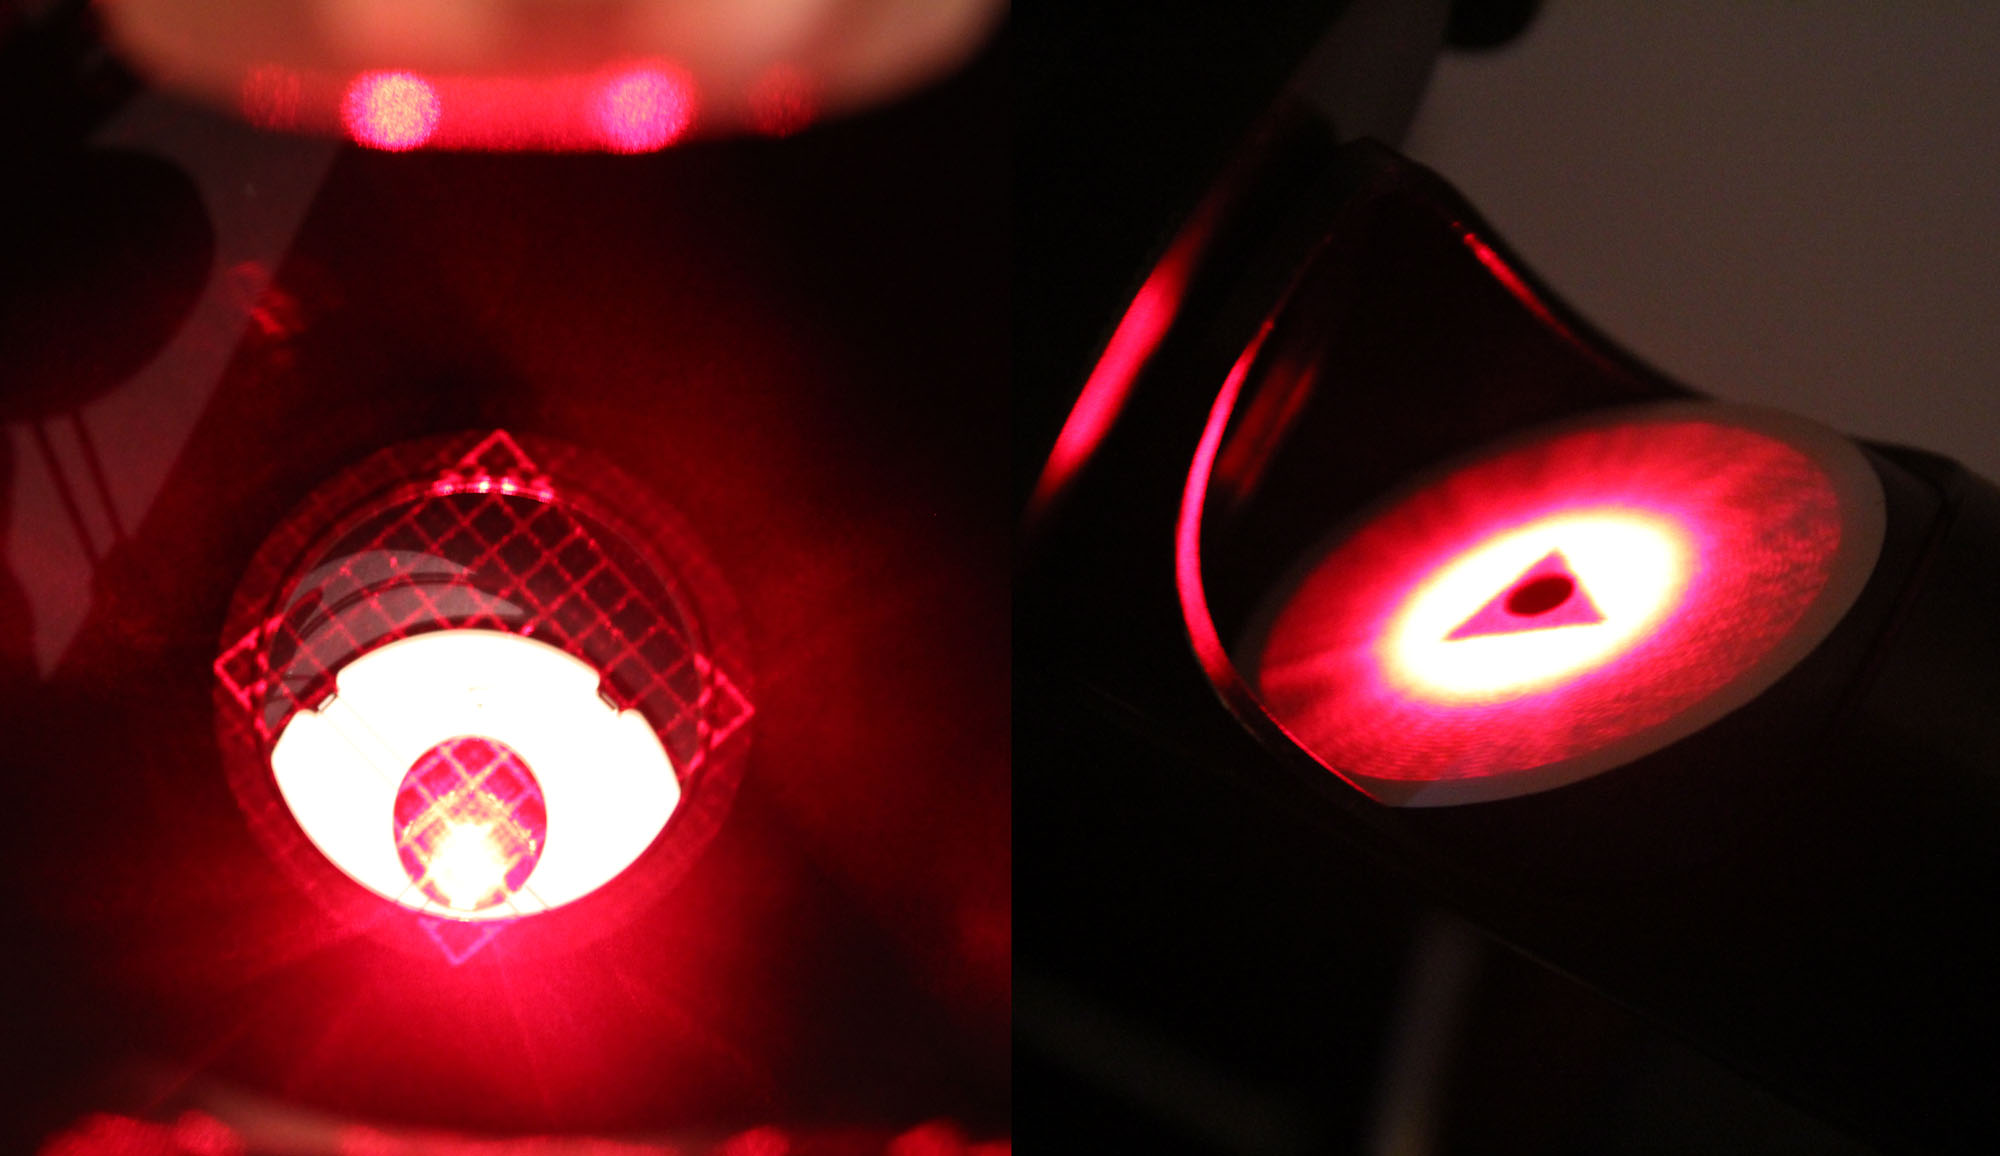
Since I haven’t used the OAG yet I give a brief comment only. It looks well built. The focusing seems just fine with the big focus ring, smooth and solid enough just as it is. The focus lock knob is kinda small and therefore ineffective as you can easily overcome it with just little force applied on the big focus ring, that’s simple physics. But anyway, the smooth focus (supposed travel 5mm) is NON-ROTATING which is great and as I said, seems solid enough. One downside, if I could afford to tell without actually using the device, is that the „sight-hole“ for the OAG camera is small (although the prism mirror is reasonably sized and could be put deeper or shallower inside of the OAG)! It is only 6mm in diameter which is suitable for only 1/4″ sized chip guide cameras! For my new G1-301 with 1/2″ chip and 656 of 9um pixels it won’t be usable without severe vignetting (knowing that prior purchase I got the non-Kit version and save $$$ for other OAG). Therefore I will probably use it with QHY5L-IIm (alccd5L-IIm) which I decided to keep for this other imaging setup or as a spare guide cam. From the backfocus-point of view, the Atik GP has 7mm of backfocus while QHY5L-II has plenty of variability based on which adapter you use – in the worst case I will have a custom adapter built.

What to say about the main Atik ONE camera?

3-AtikONE-body

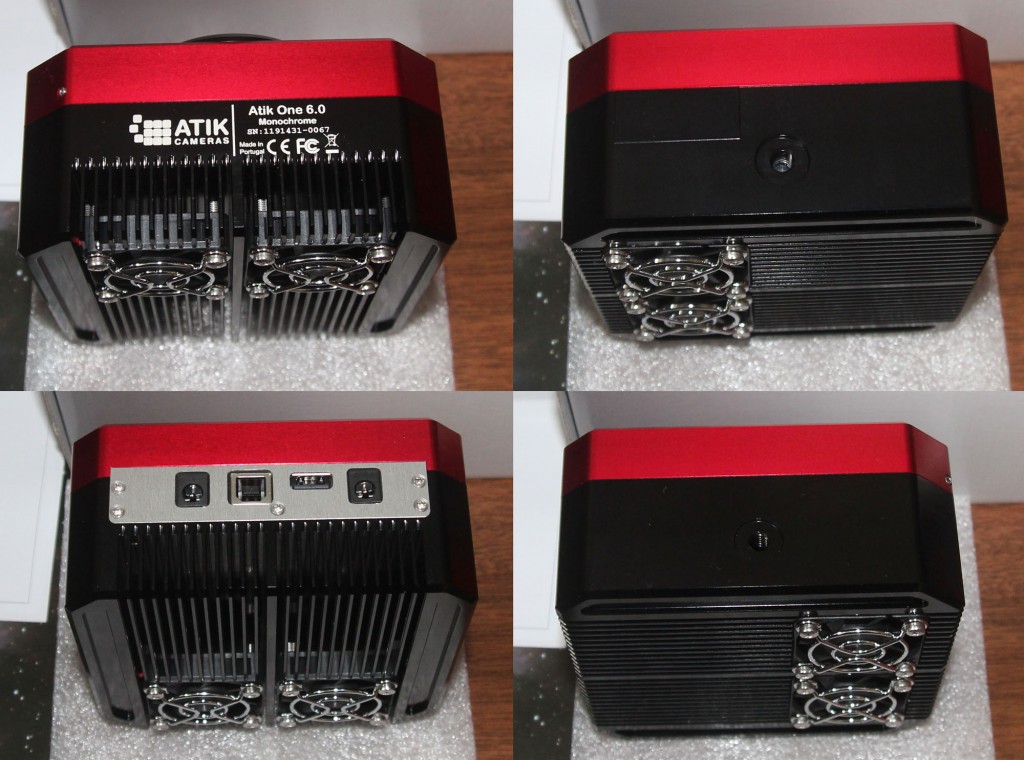
Atik ONE 6 Camera Body

Apart from it’s brother platform-4 family of Atik cameras (round body) it possess an integrated filter wheel which makes the square body of the camera bigger – 12 x 12 x 6 cm WxHxT. It has two standard 1/4″ tripod attachments (deep enough roughly 6-7mm), but unexpectedly on the side of the body. It has bigger (finally a good improvement for a field use / non-permanent setups) USB-B port and integrated USB hub. The downside is, it looks so, that the USB hub is somehow limited and supports only Atik GP camera. I tried to attach a MII G1-301 or QHY5L, but did not succeed. Maybe it is me (high probability as my stupidity doesn’t have a fixed boundaries), maybe it is the same (not-smart) decision from Atik like with their proprietary Dawn post processing software that was able to open only FITS frames from an Atik camera (not sure if this limit is still valid in the actual version of the SW). My personal opinion is that it is a silly decision.

4-AtikONE-dimm

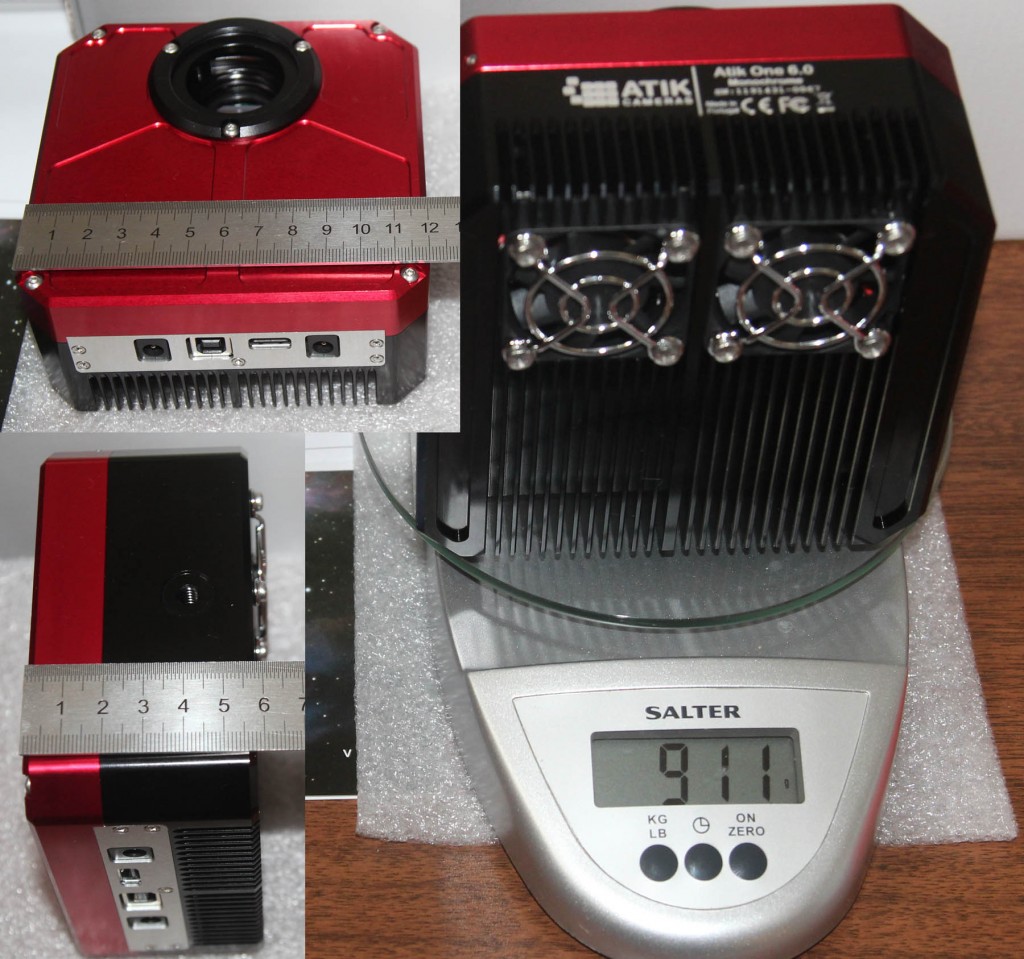
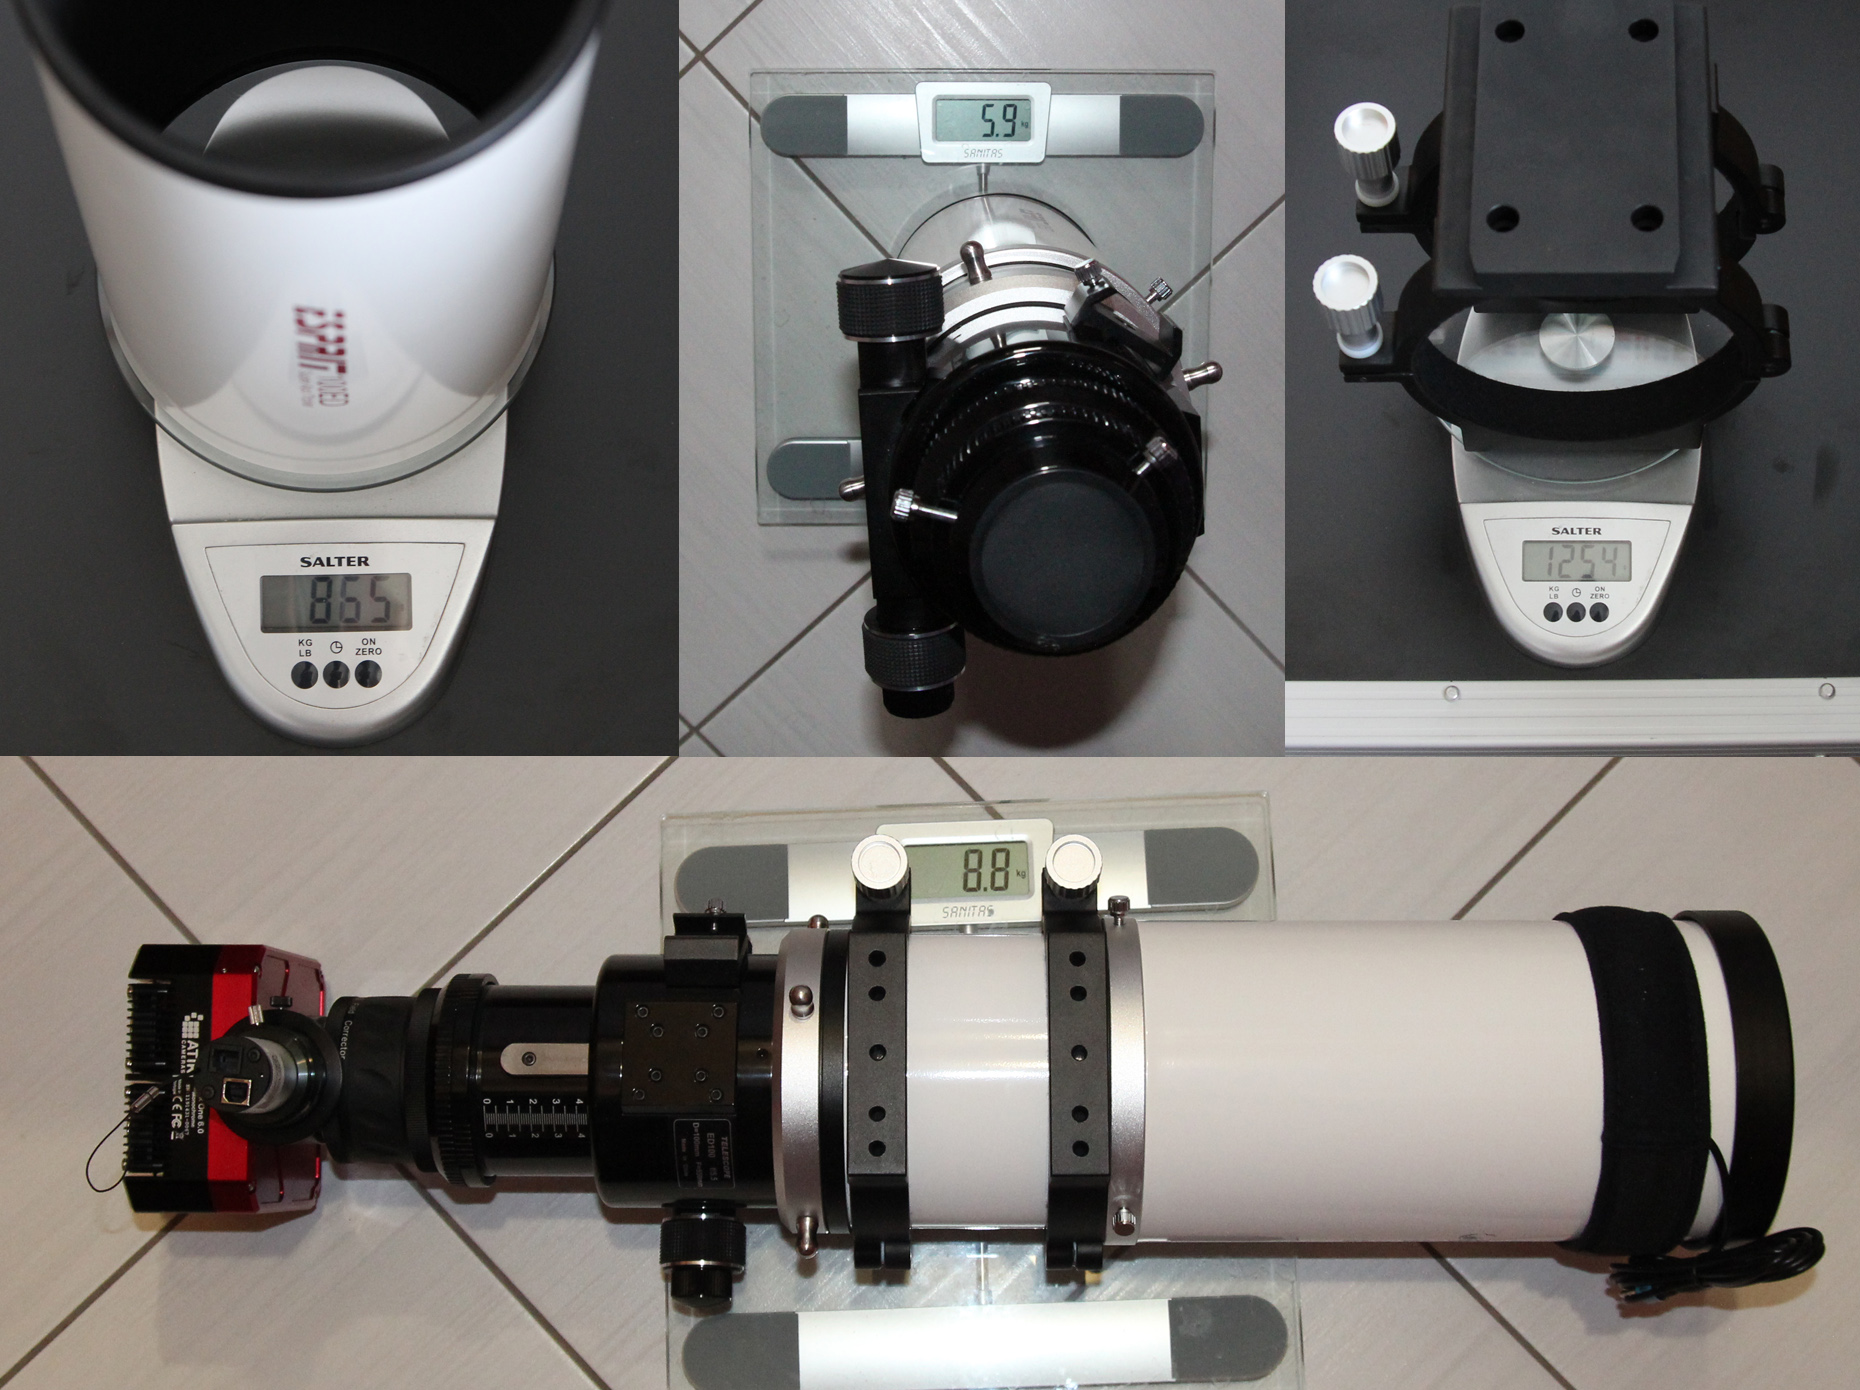
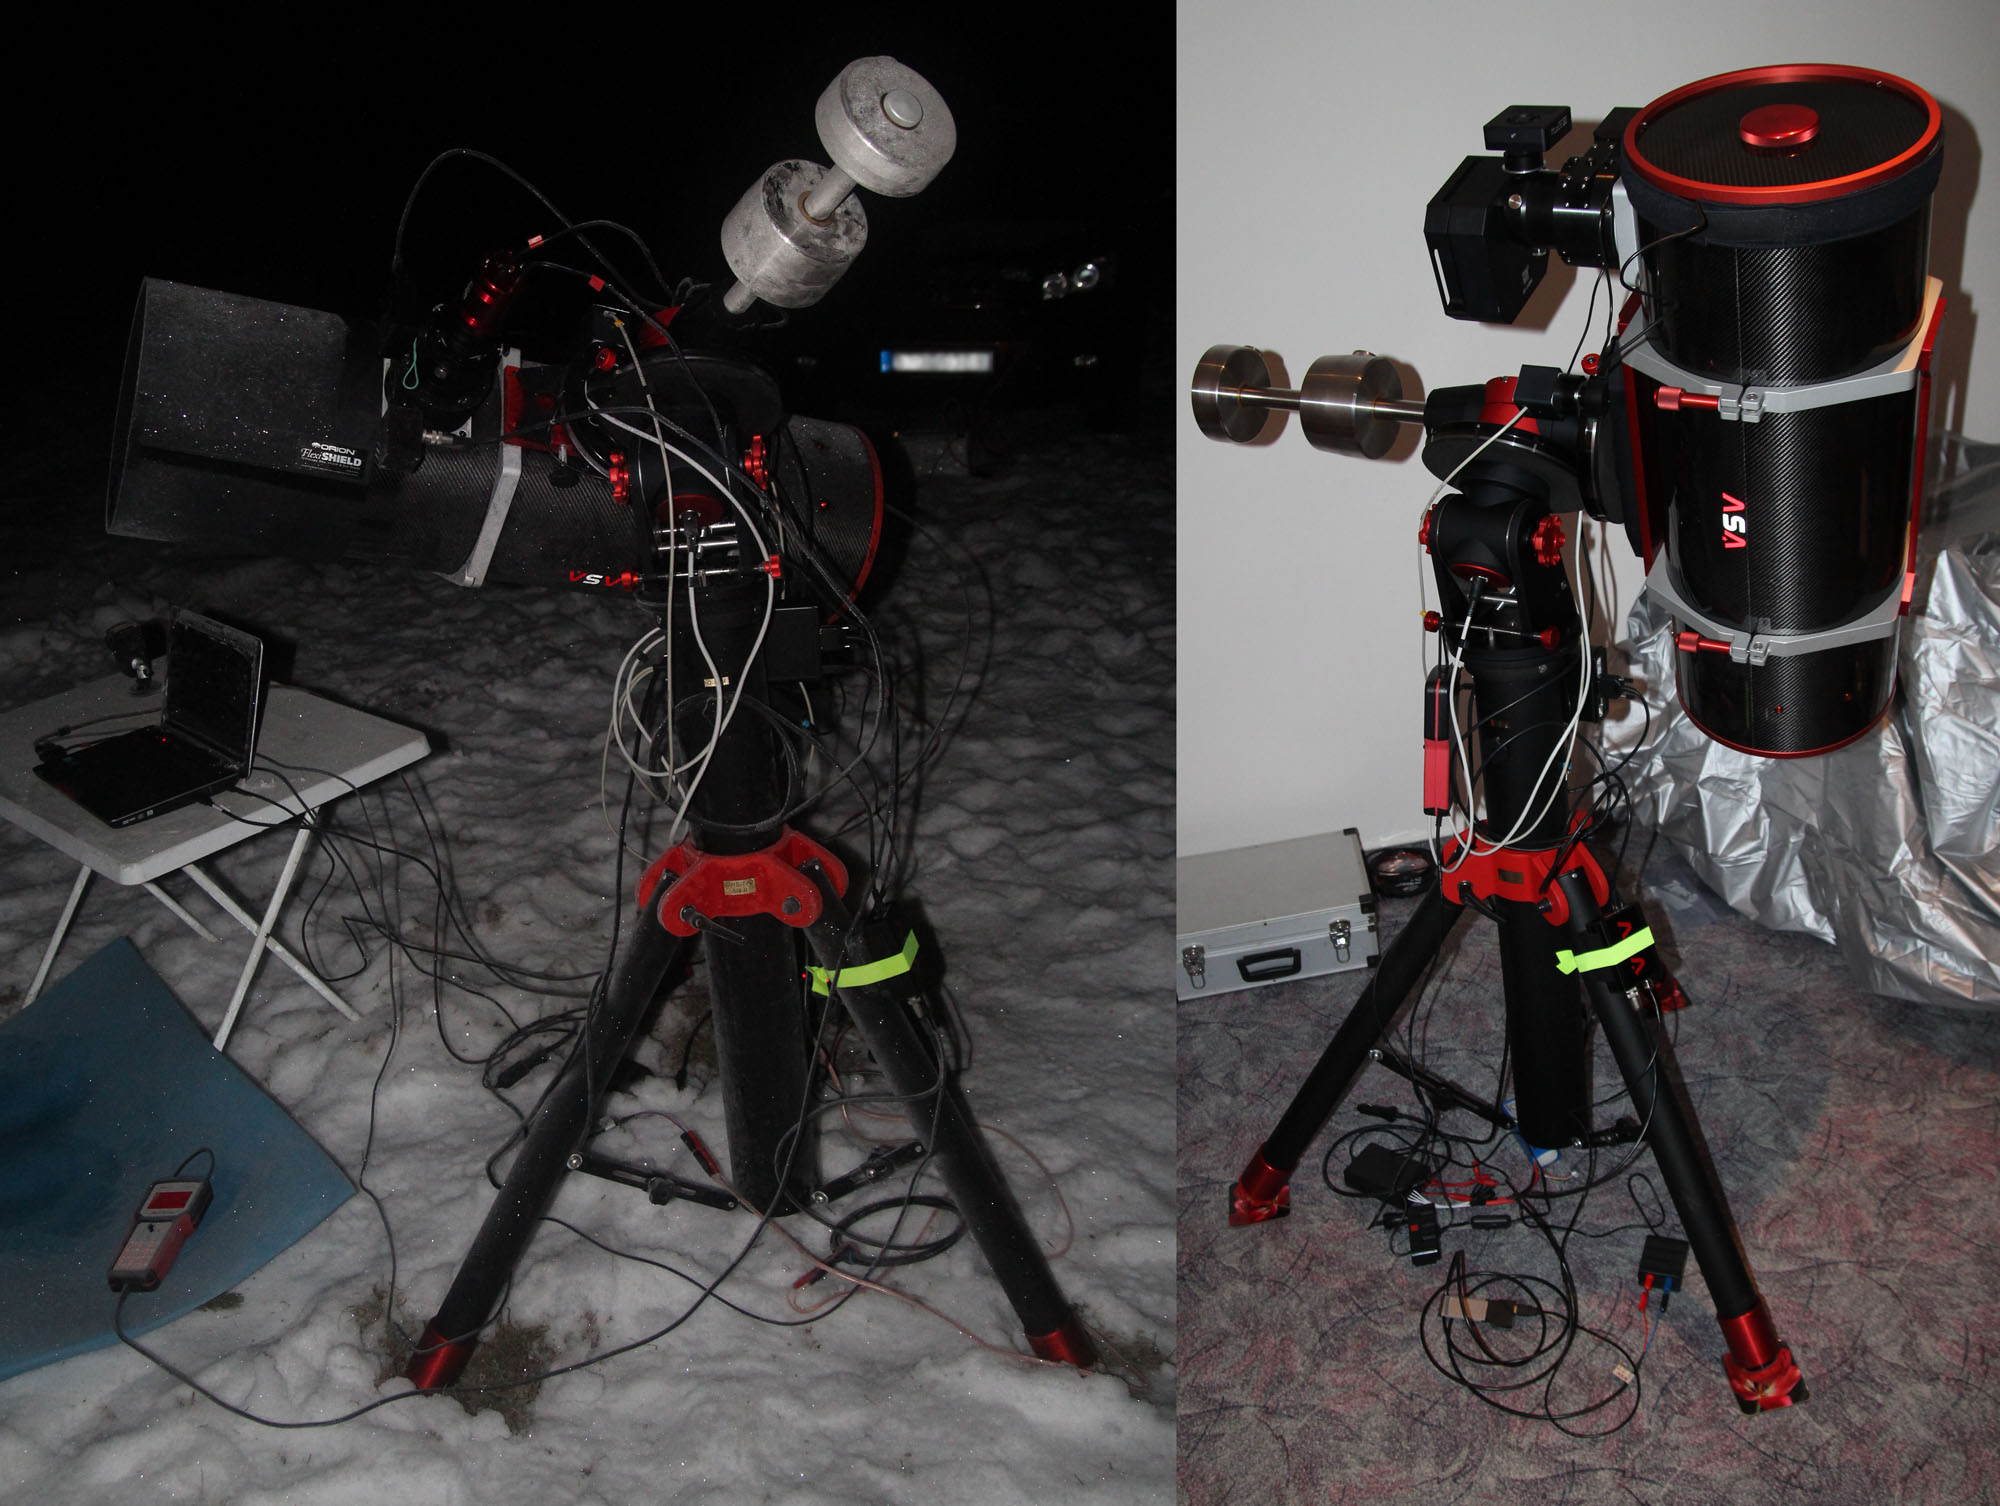
Atik ONE dimensions and weight

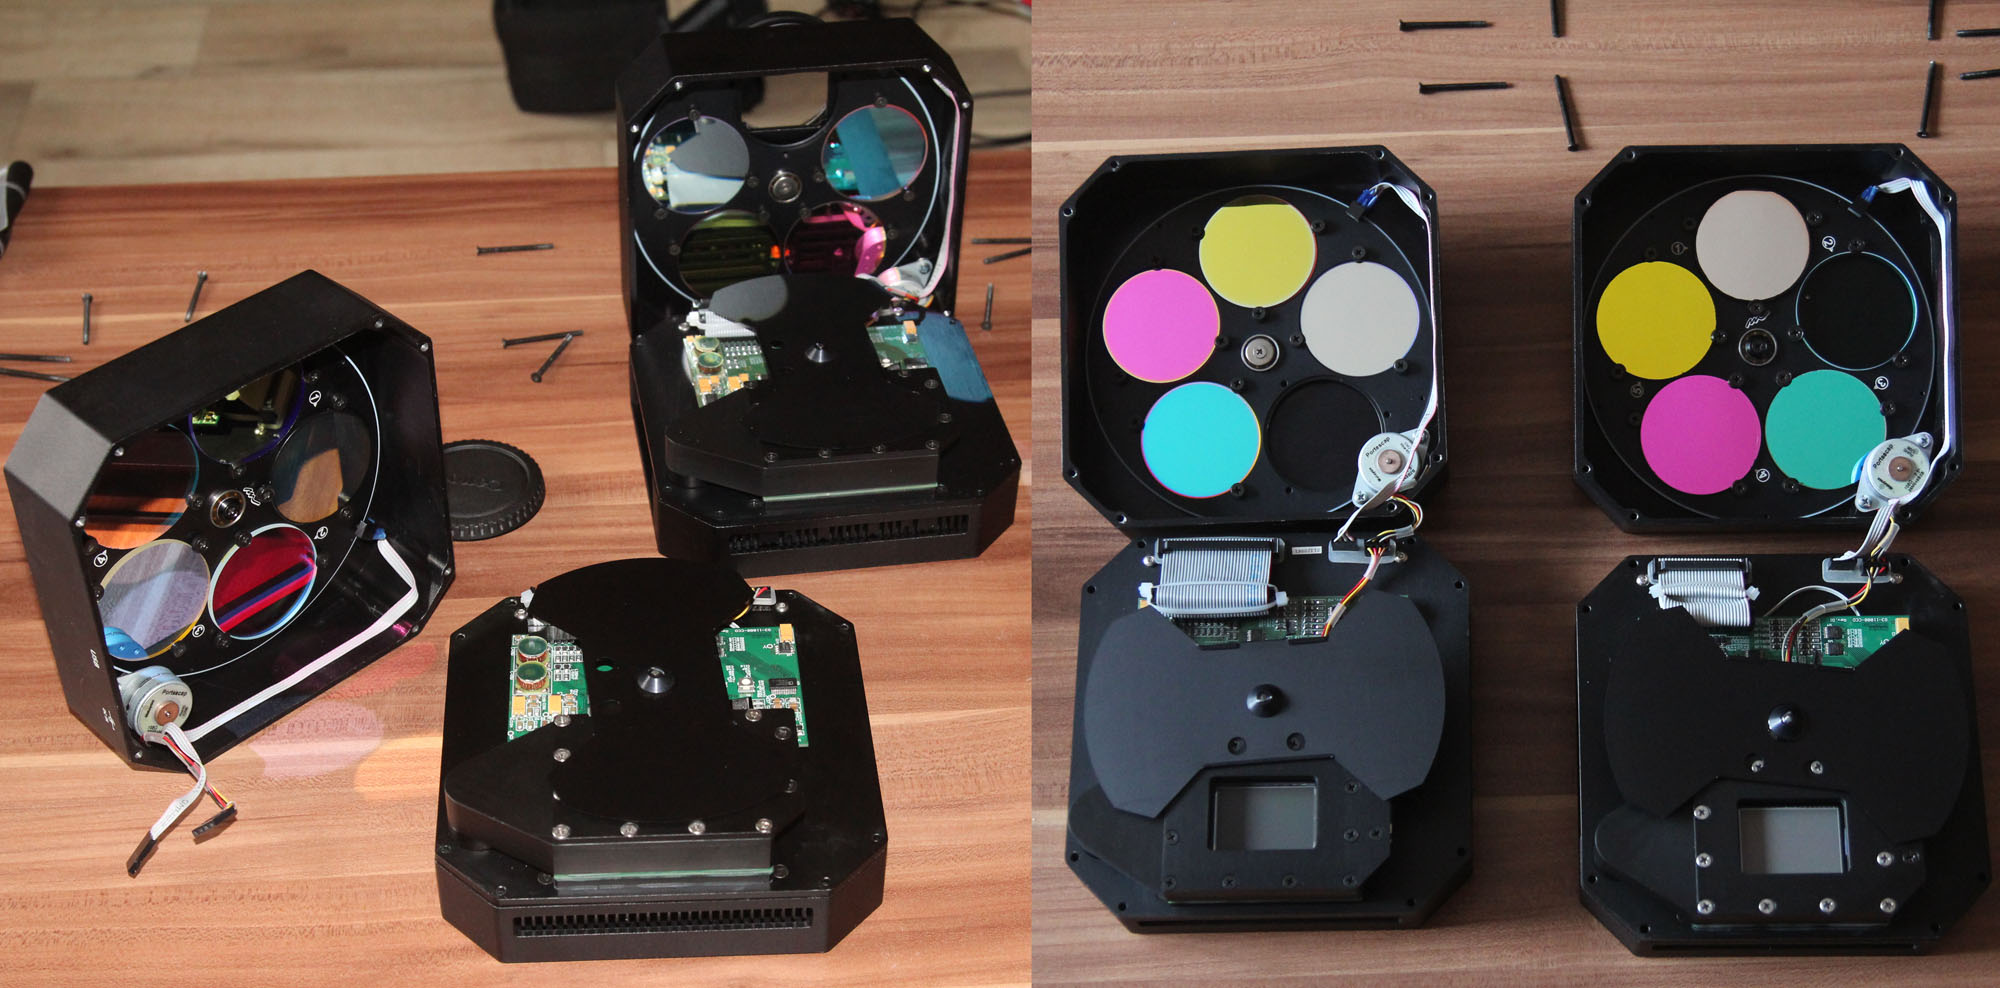
Everything is a compromise. An ideal CCD camera would come with a 8 pos (at least, 7 isn’t enough – at least for me) filter wheel, but you can’t have it in a compact form. I like small and compact but extremely powerful cameras. Since shooting LRGB with a tiny pixel (4.54um which on the other hand yields nice resolution and detail) is „wasting of time“ for me and since the ICX 694 „sings“ in narrow band imaging due to the very low readout noise (and overall noise) of the chip (and camera) as well as with high QE in the desired wavelength (extraordinary OIII, very high Ha and SII) I am quite happy with 5 positions in the integrated filter wheel which keeps the camera compact (weighing 911 grams without filters, with T-thread adapter).

5-NewStuff

Astrodon Filters 3nm Ha, OIII, SII, infrared (Sloan z') and Baader UV/IR L

6-ComparedToG1andG3

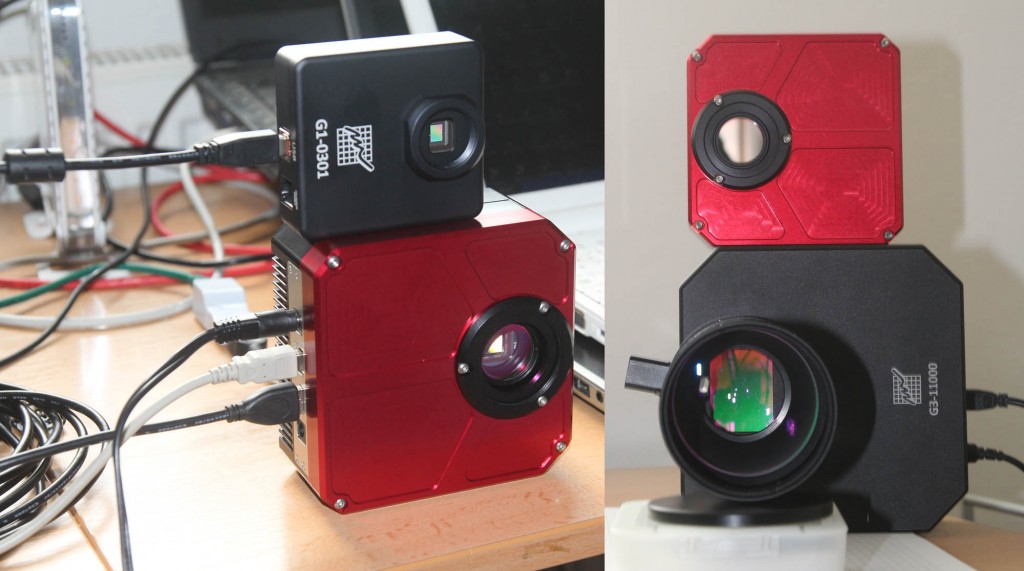
Atik ONE 6 camera size compared to Moravian G1 and G3 cameras

Quick initial tests of a new camera
Installation of the drivers, plugging camera in and finding correct driver, shooting biases, testing cooling, checking out readout noise, testing filter wheel etc.

Installation of the drivers was smooth and OK as long as you had ASCOM 6 (or 6.1) installed. I did not have so I had to reinstall my ASCOM platform 5.5 along with all other drivers. The main driver works fine for Atik software, but for everything else ASCOM is the way to go. It is interesting that the main camera body must be selected as „Atik 2″ while the guidecam must be choosed as „Atik“. Would be wiser to choose better naming convention I guess. Anyway the cameras work.

One of the initial tests comprises of a TEC cooling test:

7-AtikONE-coolingtest

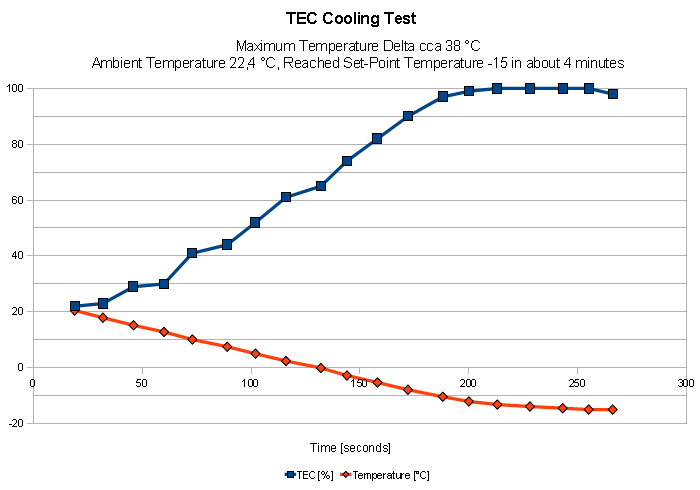
Cooling Test - Max TEC delta 38 degrees C in about 4 minutes

From ambient temperature of 22.4 degrees Celsius I got to my set-point temperature (-15) in about 4 minutes using 95-96% of TEC power. This shows the maximum delta to be around 38 degrees Celsius which is perfect even for hot weather countries. I forgot to measure the current draw though (but let’s assume the spec will be correct as it is with everything else I tested in order to confirm the facts).

Next quick test is download speed. For 1×1 binning I got the image downloaded in about 8 seconds. This seems little strange to me. I can recall that my former Atik 460EXM was downloading faster, I believe in some 4-5 seconds (not 100% sure at the moment as I can’t verify it now having my 460 sold). In bin 2×2 mode I got the image downloaded in roughly 3 seconds. Anyway, I never plan to bin unless I start to shoot small planetary nebulae with 2+ meter of focal length.

8-AtikONE-typicalsinglebias

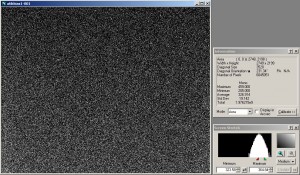
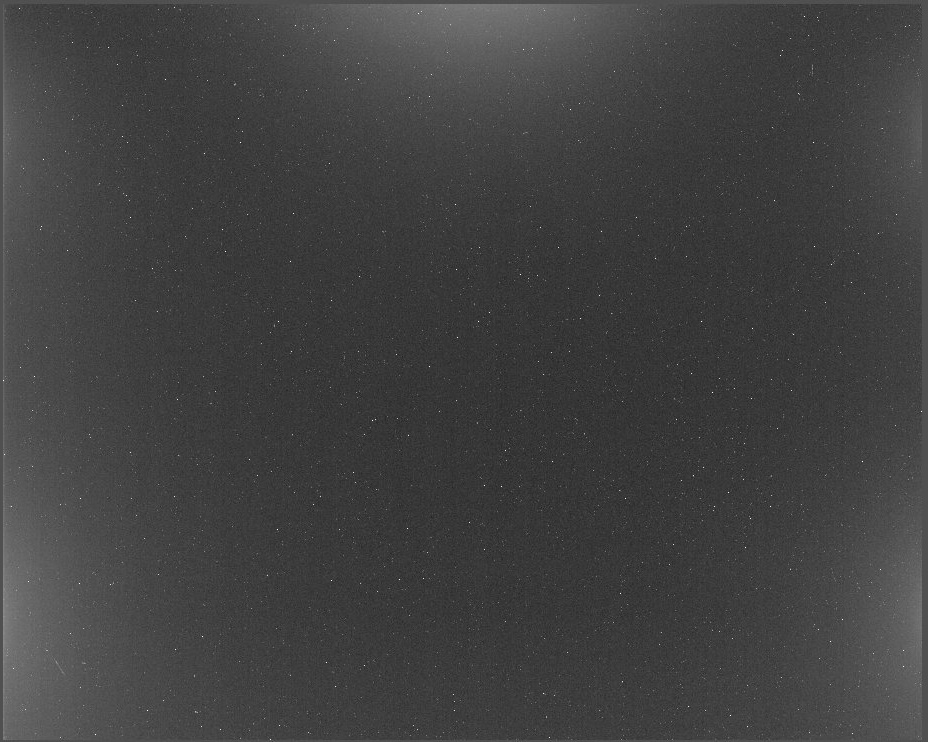
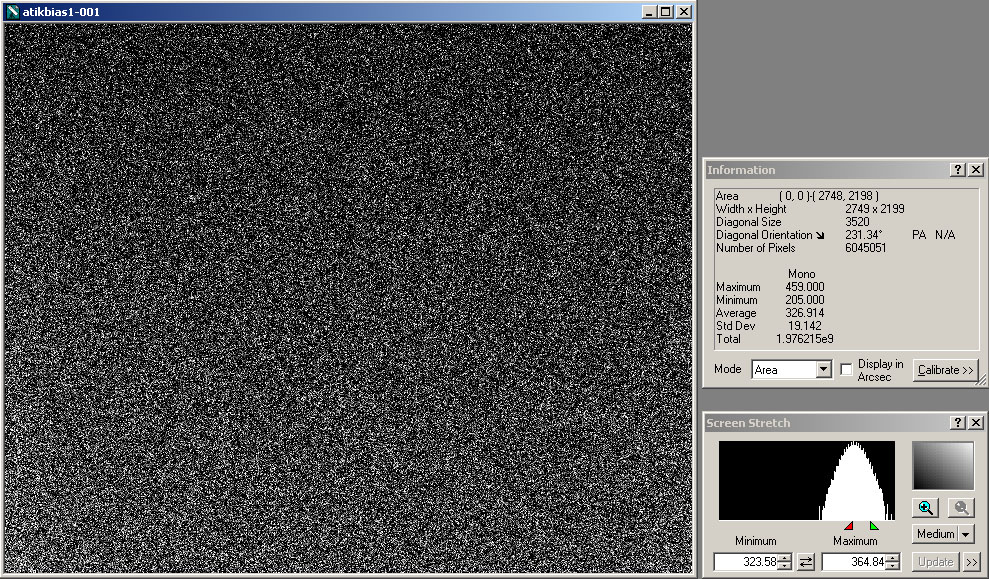
Atik ONE 6 Typical Single Bias Frame

Another quick test is the readout noise test that I base on my Octave (Matlab) script I use for camera noise comparisons.

Here are the results from Atik ONE 6:
CCD Camera Measurement:
-----------------------
Gain = 0.26
Readout Noise = 4.71e-
Total System Noise = 5.06e-

and here are the results from Atik GP:

CCD Camera Measurement:
-----------------------
Gain = 0.08
Readout Noise = 5.78e-
Total System Noise = 6.17e-

The filter wheel looks fine, it produces some „click“ sounds when positioning the filters and according to images of the wheel (disc) internals it looks very well built. For mounting or replacing filters in the wheel you have to (the easiest way) unmount the camera adapter which is kinda inconvenient, but I won’t replace them frequently.

So far so good :) For a real first light test we’d have to wait until I get my other (2nd) setup up and working, now I am finishing some LRGB shots done with ASA and G3-11000 which has top priority.

References
http://atik-cameras.com/

Rubriky: Articles in ENGLISH, Technika, recenze | 5 komentáře

Miscellaneous Equipment Images 2013/2014

As an enthusiast in astrophotography I like to document various equipment that I had in my hands. In this brief post I would like to share with you couple of such images.

1-newASA10inchgeartestinandout

2013 - New ASA 10 inch Newtonian setup in the field vs. getting ready in-door

2-CollimationTable

Custom made collimation table

3-ASAmountingWynneOAGcams

Mounting ASA Wynne 3 inch with OAG for G3-11000 and Atik CCD

4-HowieGlatterTuBlug

Howie Glatter TuBlug laser game - Actually I prefer using CatsEyeCollimation!

5-newMIIG1guiders

New G1 guiders from Moravian Instruments, G1-1200, G1-300 and the overall winner is G1-301

6-newMIIG3cameras

With a G3-series CCD from MII you simply can't go wrong (for LRGB imaging)!

7-Atik460SXFWAstrodons

Atik + SXFW + Astrodons, my setup before I got Atik ONE 6 with integrated FW

8-Atik460testingbeforesellingit

Testing Atik 460EXM before selling it to check that everything is OK

9-newELpanelAspike

New 16 inch Spike-A Flat Fielder

A-AAAtikOOOne

The more Atik cameras the better.

B-AtikGPoag

Quick test of Atik GP camera

:)

Rubriky: Articles in ENGLISH, Technika, recenze | 1 komentář

Sightron nano.tracker quick test

nanotrackerAs a 100% mobile astrophotographer I like to test and review portable mounts and portable tracking units (I owned AstroTrac TT320X in the past). Since my ultra-mobile setup (for catching all sky timelapse videos and possibly meteor showers) weights only about 135 gramms including lens (!) I decided to give a Sightron’s nanotracker unit a try. Another reason was that unlike from AstroTrac it doesn’t have a 2 hour tracking limit. Since the purchase on 6th December 2013 I have used the unit 3 times, once on 13th December 2013, once on 8th August 2014 and for last time on 28th August 2014.

Here’s what you find in the box:

nanotracker-box

Sightron nano.tracker tracking unit package

First quick test took place on 13th December 2013 (Friday) using Canon EOS 600D with 50mm Zeiss lens. The tracking unit was VERY ROUGHLY polar aligned (just guessing).

060secTEST-50mmLENS-APSC

50mm LENS, center crop, very rough PA, 60 seconds

Second test took place on 28th August 2014 using Canon EOS 600D with 17mm Tamron lens. The tracking unit was, this time, better polar aligned through the „sight hole“ only.

360secTEST-17mmLENS-APSC

17mm LENS, center crop, sight-hole PA, 6 minutes

In the meantime, on 8th August 2014 I have used it for some all-sky timelapse testing:

session-2014-08-08

Sightron nano.tracker IN ACTION

As I prefer not to worry about running out of power during a night I have improved the hand controller by adding an ordinary „jack“ connector instead of using 3×1.5V batteries (that possibility was preserved).

nanotracker-power

power input from a DC to DC step down converter

For an easier polar alignment I have let a friend of mine to build me a custom made holder for the nanotracker unit. It looks exactly like depicted on following image. The idea is to use it along with stronghold tangential assembly from Baader that serves like an ALT/AZ wedge.

nanotracker-holder

custom made holder for nanotracker placed between the wedge and nanotracker body

Summary

  • nice, small, compact and reasonably precise tracker
  • not for higher payload, the Canon 600D with a simple lens weighing over 1 kg (without ball head) is quite a lot!

References
http://www.sightron.co.jp/

Rubriky: Articles in ENGLISH, Technika, recenze | Napsat komentář

ALccd5L-IIm / QHY5L-II mono

Well, I said, that I will not buy any QHY camera any more. But I could not resist. I was so much interested in the performance of the new Aptina MT9M034 CMOS chip that is said to have high QE and that could be also found in other „planetary“ CCDs (CMOSes) cameras like ASI/ZWO, but QHY (or astrolumina) offers something like „Premium Package“ or „Deluxe Kit/Package“ which includes some wide field lenses (with supposingly 180 degree view) and C-mount/Cs-mount adapter and tripod camera body holder etc. Since I said I won’t go with QHY any more I got the same thing rebranded as ALccd from astrolumina.

alccd5l-iim-1

ALccd5L-IIm / QHY5L-II mono Premium Package

alccd5l-iim-2

ALccd5L-IIm / QHY5L-II mono Premium Package

I always wanted to capture the whole sky at once as it is so beautiful when you are in the country-side enjoying the silence at some quiet place with completely clear sky and freezing temperatures :)

alccd5l-iim-3

AllSky Setup with ALccd5L-IIm

alccd5l-iim-4

AllSky Lens with ALccd5L-IIm

First Light Test (with hotpixels included) from 2nd October 2013

30secQHY5L

30sec sub from my home-place

Master Dark Frame

mdark_30sec

30sec Master Dark Frame

Camera Test Report

At some unknown temperature with default settings (gain 12 and 12bit ADC).

CCD Camera Measurement:
-----------------------
Gain = 0.05
Readout Noise = 4.79e-
Total System Noise = 7.17e-

My Results

All Sky Timelapse Movie ALccd5L-IIm 1.25mm F/? lens:
All Sky Timelapse Movie ALccd5L-IIm 1.25mm F/? lens

Tenerife Nightsky Timelapse (February 2014):
Tenerife Nightsky Timelapse (February 2014)

My Friend’s Results

Since I am lazy enough to do all the testing myself (there is one clear sky night per 3 months), I gave the camera to a friend of mine who is talented and skilled enough to squeeze the best out of this lil cam when attempting on some Deep-Sky Object imaging… His results are amazing!

Michal Ringes, QHY5L-II

CONCLUSION

What I liked:

  • the camera is small, lightweight and easy to use
  • drivers installed on 1st attempt (using alccd CD)
  • really powerful camera

What I didn’t like:

  • there was some random banding (horizontal) happening occasionally on top or bottom part of the frame making it useless for timelapse (it looked like there was a thunderstorm around the horizon)
  • the lens are (all of them, all CCTV lens I tested) quite distorted and screwed up – not made completely perpendicular to the CMOS chip when focusing so the distortion changed corner from corner based on the actual focus position (you could focus that or the other part of frame, but not a complete image) – but that seems to be problem with every CCTV lens I have ever tested even on different C(s)-mount camera

References

ALccd5L-IIm
QHY5L-II

Rubriky: Articles in ENGLISH, Technika, recenze | Napsat komentář