
WO132 version 4.0: Upgrading to a ZWO ASI2600MM-Pro Camera!
Dates: May 26, 2023 - Now

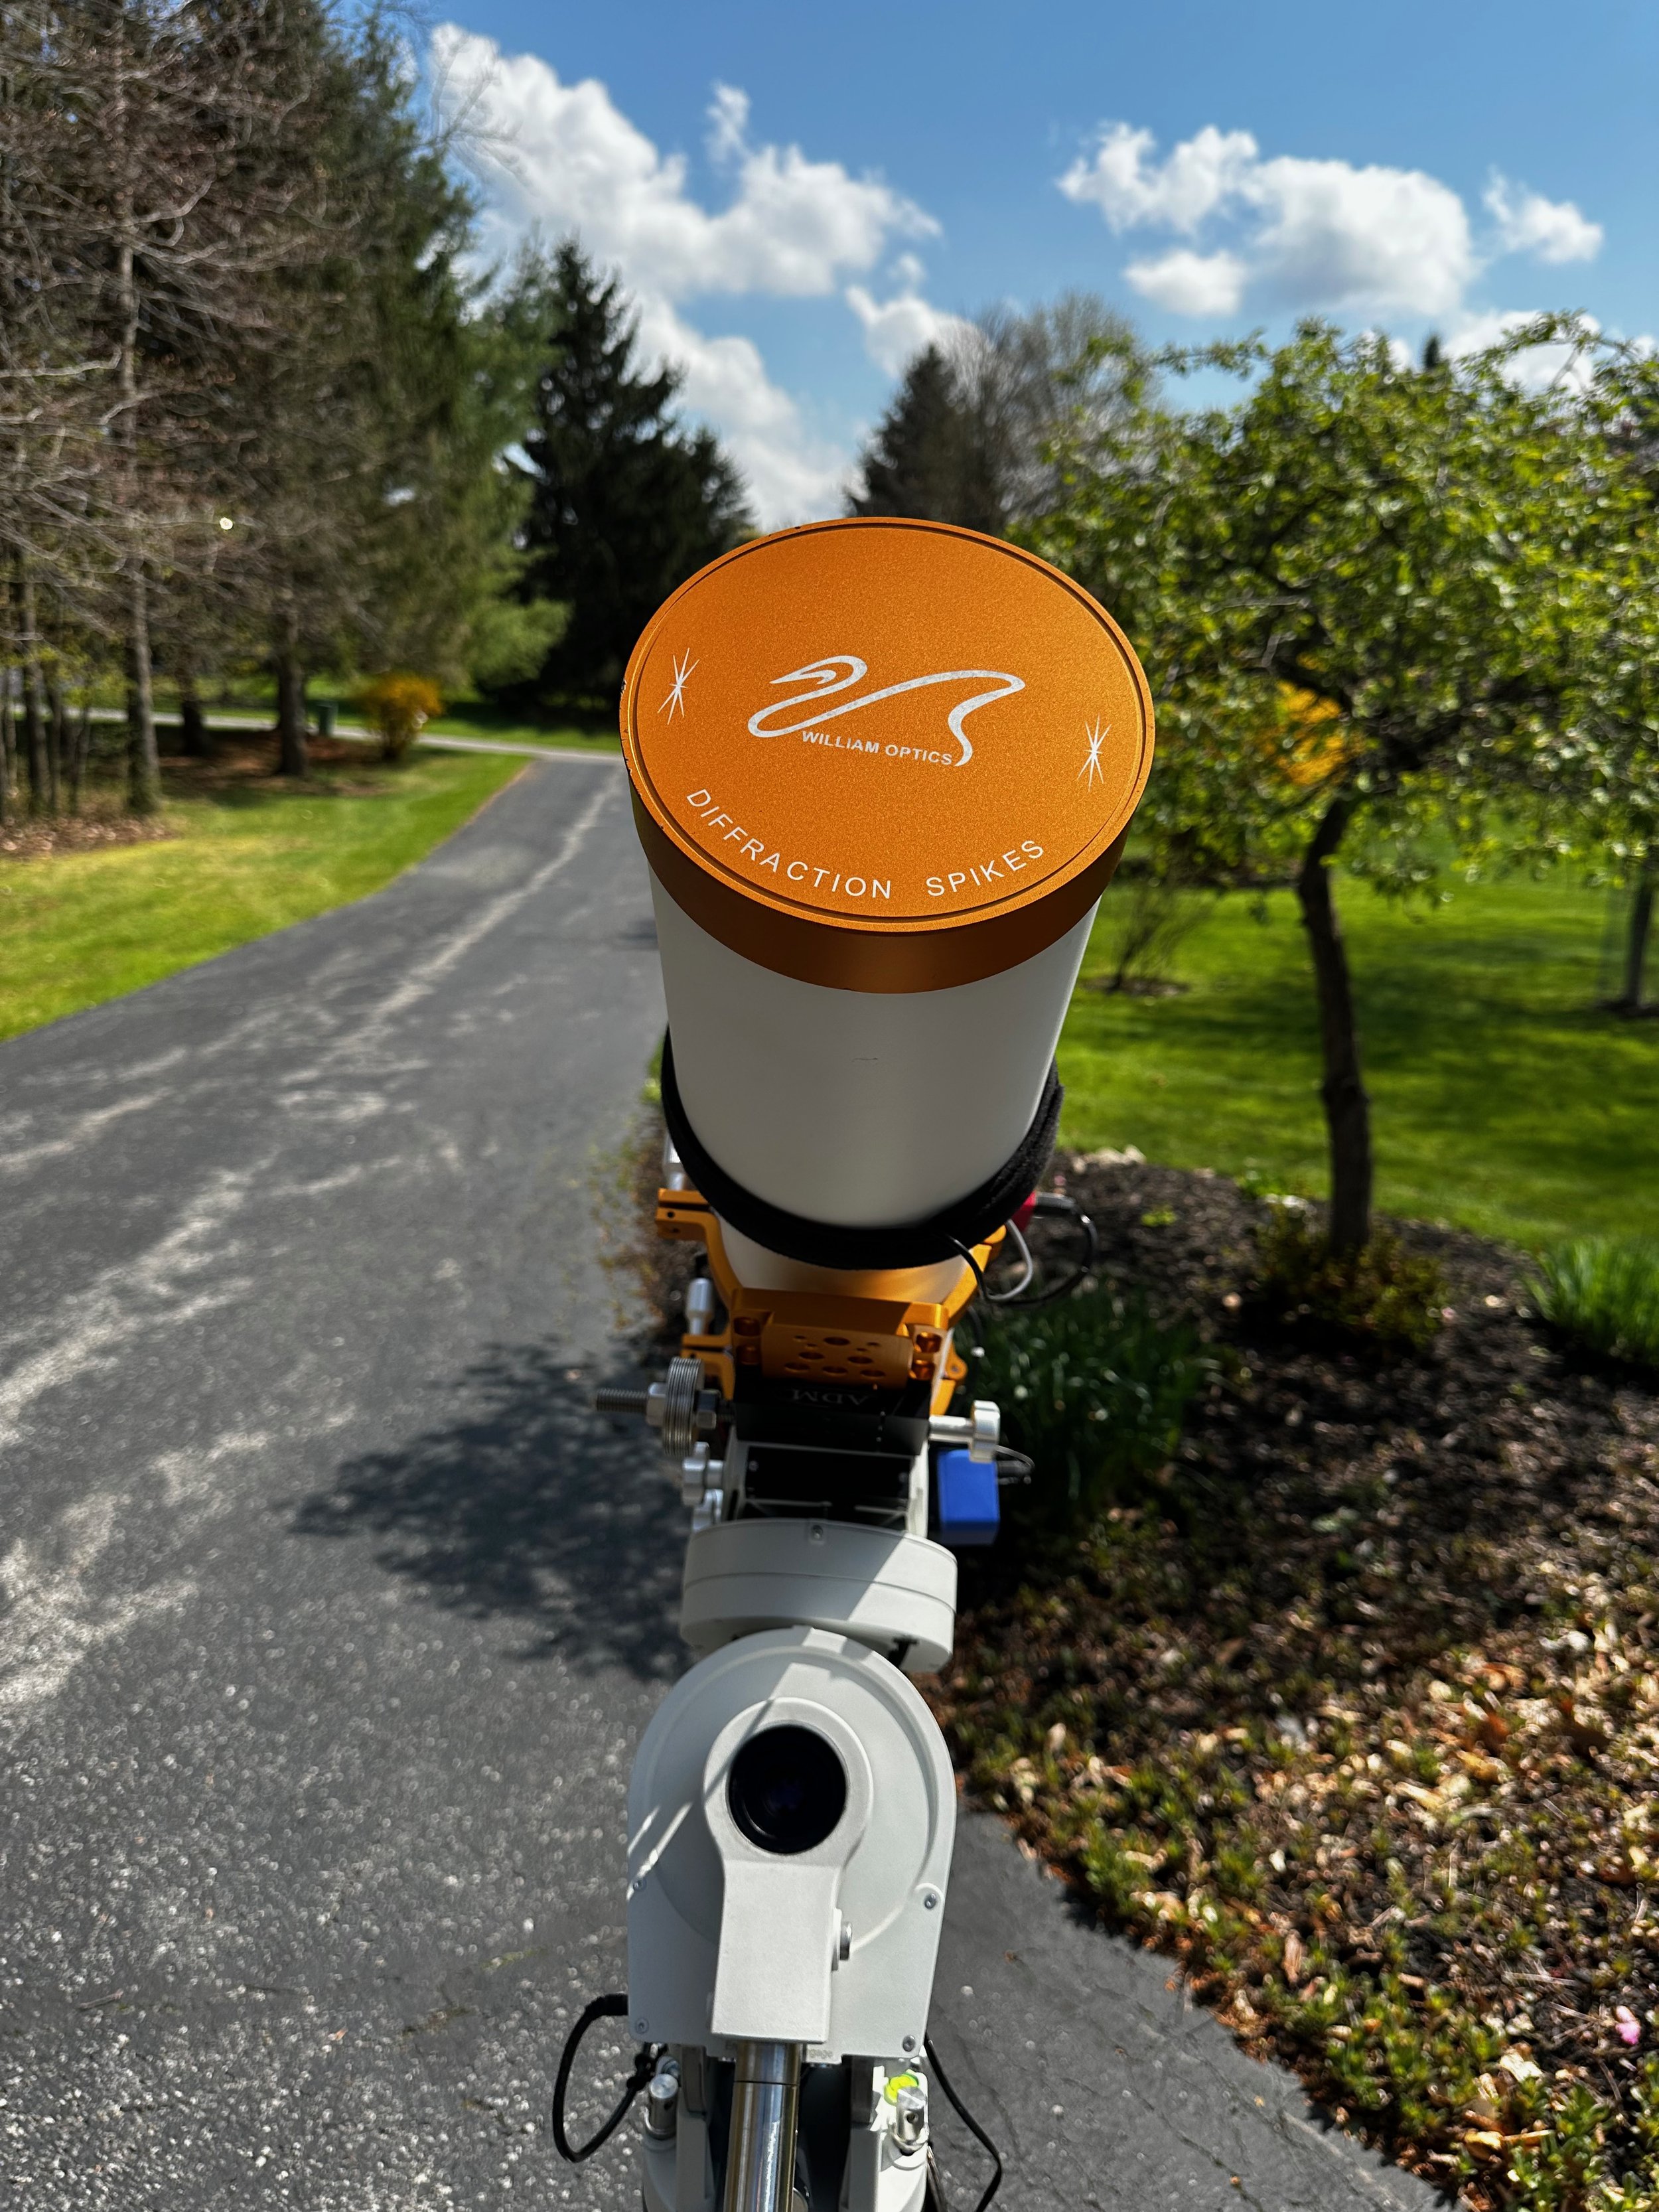
The upgraded WO132 Platform - Sporting a new Flattener/0.8 Reducer, a ZWO ASI2600MM-Pro Camera, and a new EFW 7x36 II!
Table of Contents Show (Click on lines to navigate)
Video
Below is a video version of the Upgrade Project that shows the step-by-step process used to implement the upgrade!
Background
I have been using the ZWO ASI2600MM-Pro APS-C format camera for a while now on my AP130 platform - and have been very impressed with it.
Excellent noise characteristics, a deep well, no Amp Glow, able to handle bright stars in the field much better than the 1600 series - it has just been a great performer!
On April 3, I underwent surgery for a partial nephrectomy - and with that was a recovery period that required some physical restrictions to allow the Kidney to heal. No bending and twisting - no jolts or jostling, no lifting anything heavier than 5-10 pound items, and no straining - for an entire month!
So, I could not set up my gear and collect new photons during this time.
Instead, I wrote some technical articles for this website and created a slew of new videos for both this website and my YoutTube Channel.
I also started to think about what I could/should do to improve my gear so that when I could start capturing again, I would be in the best possible position to do so.
The most obvious thing I could think of was to upgrade the camera on my William Optics 132mm Platform to the ASI2600MM-Pro!
Planning Out the Changes
The 2600 camera has the same pixel size as the 1600 series - but there are many more of them. This means that the sensor is larger and covers a greater percentage of the light cone from the scope:
ASI1600MM-Pro: 22.18mm
ASI2600MM-Pro: 28.26mm
This has several repercussions:
The filter wheel would have to have larger filters, or I would be vignetting the incoming cone of light
At f/7, and with the smaller sensor of the 1600, I could get away with not having a flattener. This was no longer true with a larger sensor.
If I was going to add a flattener - should I also add one with a reducer? This would lower the f/ratio of the system, which would be very advantageous!
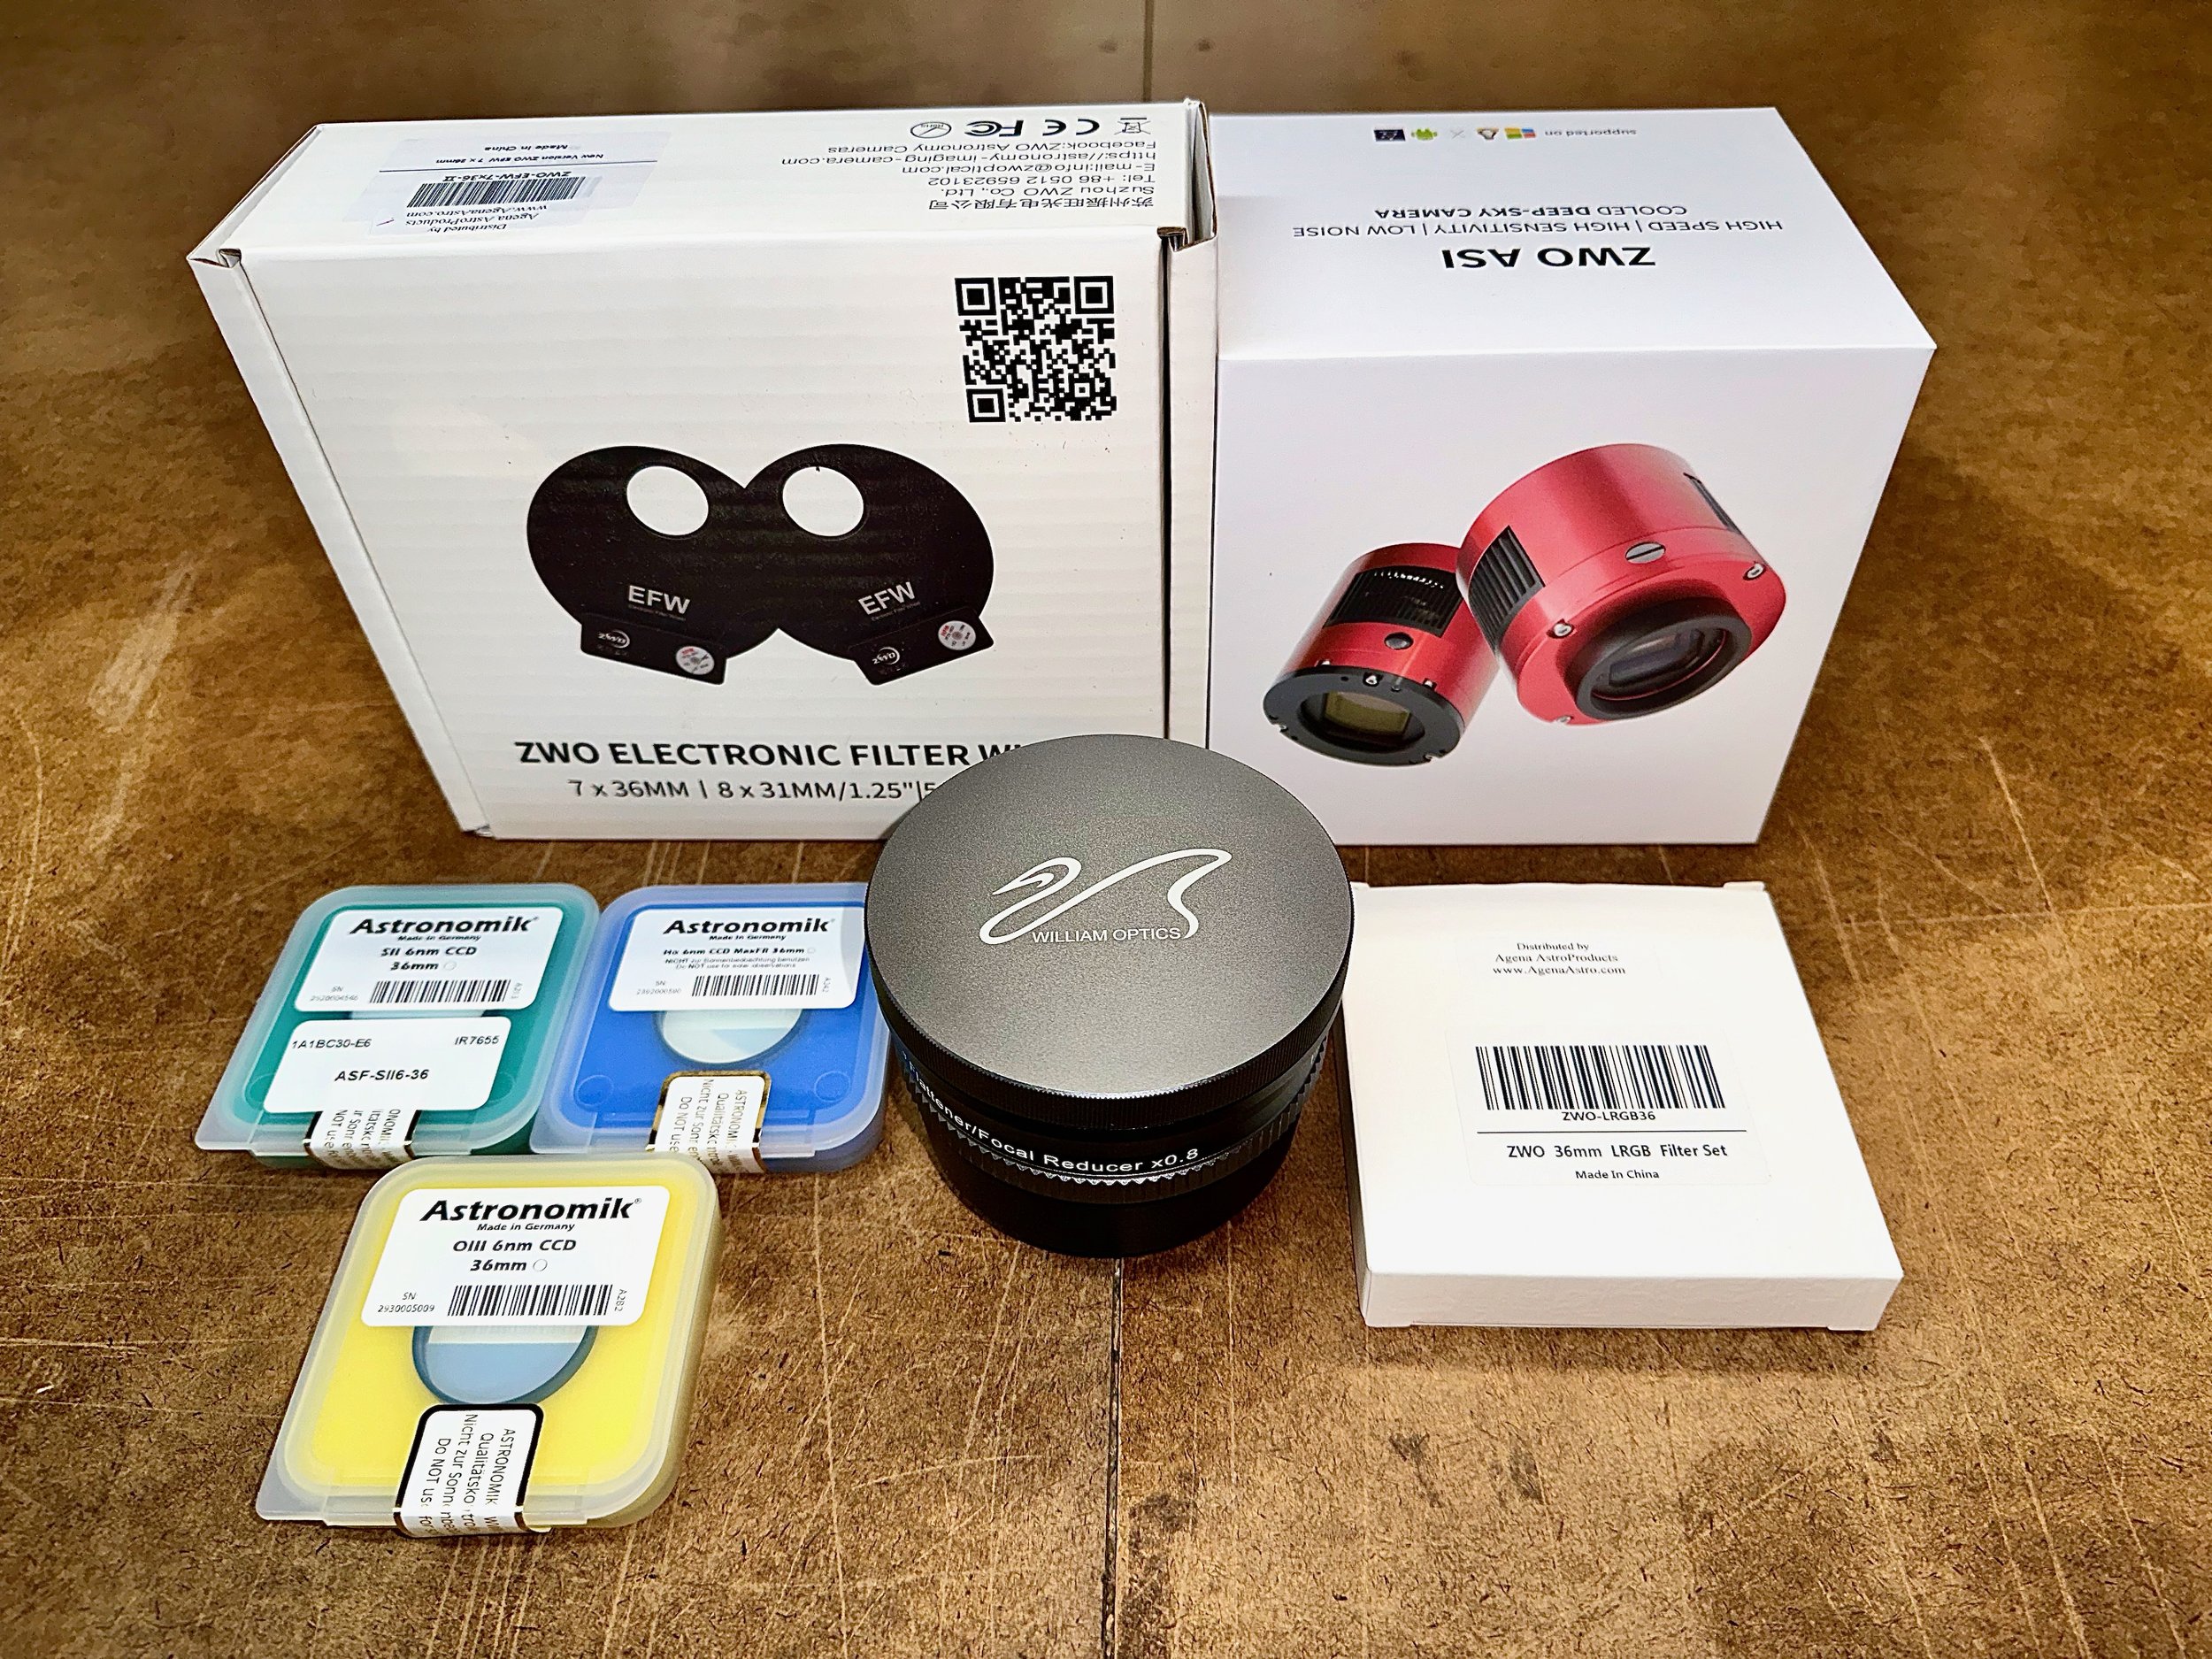
The gear for the upgrade all ready to go!
The Filter Size Issue
Let’s look at the filter size issue first.
Using Astronomy Tools Filter Size Calculator, we can see that a 32mm unmounted filter would just barely work:
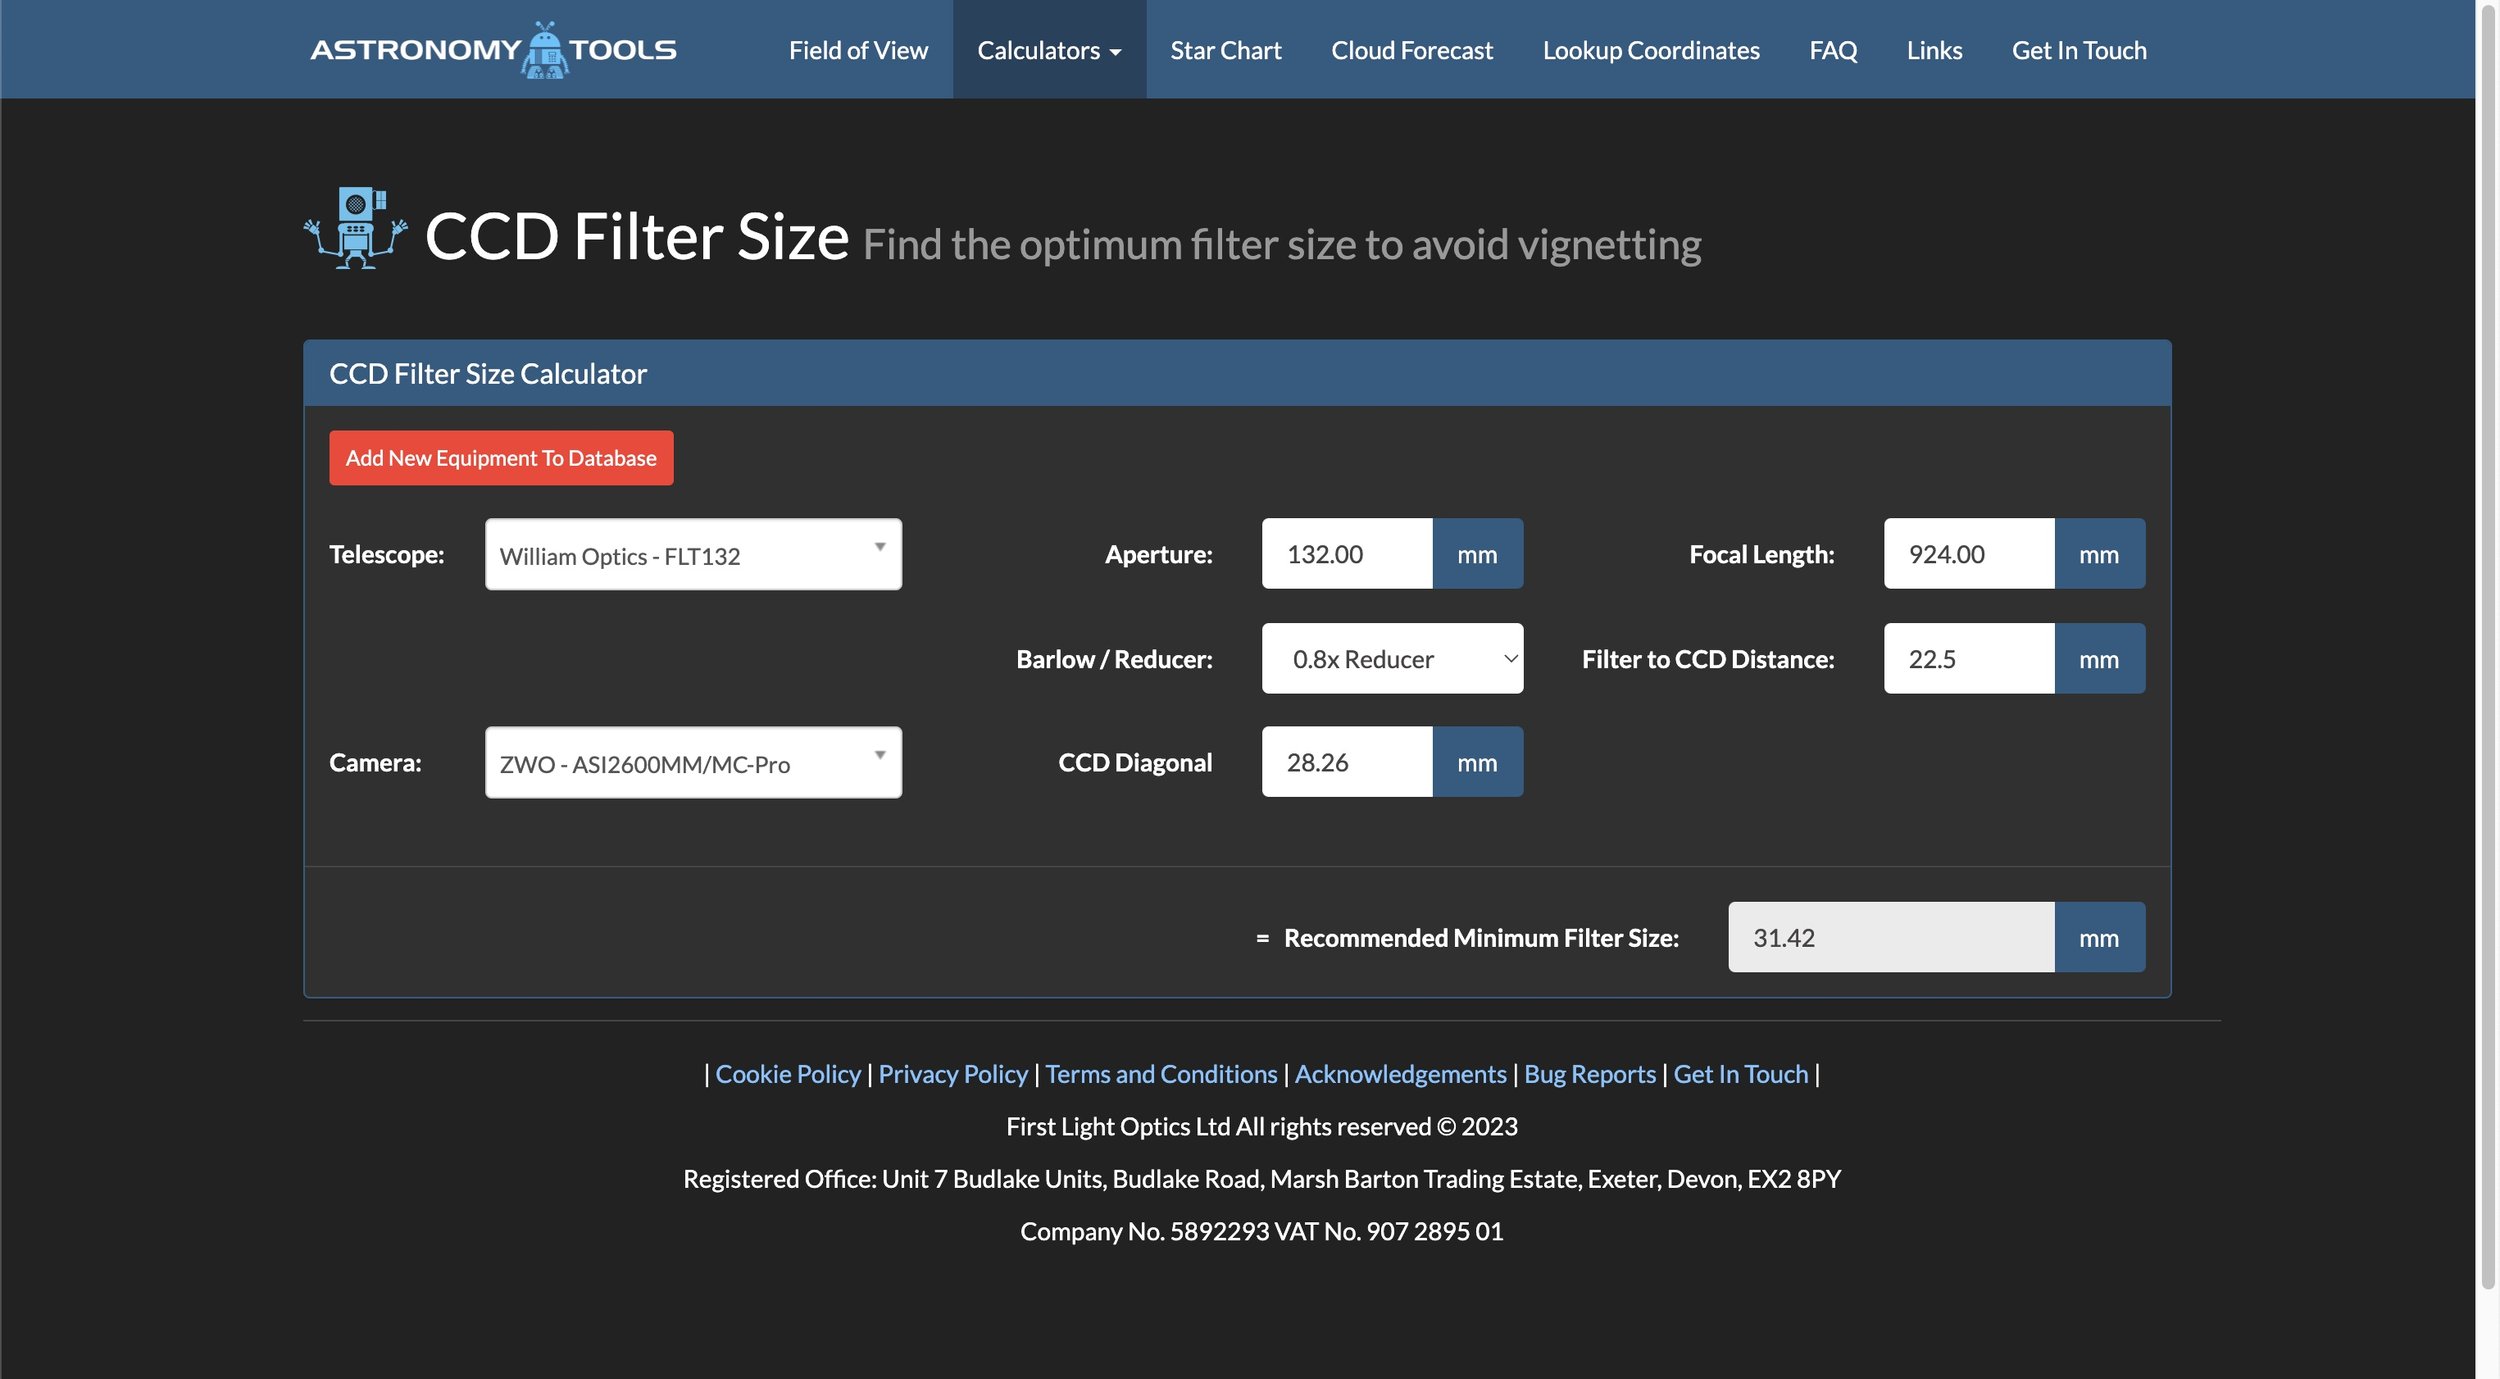
This calculation suggests that a 32mm unmounted filter might work.
However, I wanted to ensure I had plenty of elbow room, so I decided to use a 36mm filter size. This is larger without incurring the costs an even larger 2” filter size would impose.
This solution does have a downside.
Installing unmarked and unmounted filters into the filter holder would now be necessary, and this can get a little tricky:
The filters would have to be positioned in the holder and then held in place with a ring mas which is attached with three very tiny screws - for each filter!
Some filters have to be positioned with a very specific orientation. Determining this orientation and getting the filter installed correctly can be a challenge.
Also, note that the distance between the filters and the sensor is listed in the calculation above as 22.5mm. This assumes that I mounted things such that the filter is as close to the sensor as possible. To accomplish this, I would need to:
Remove the tilt plate adjuster from the camera. This reduces the camera back focus distance to the sensor from 17.5mm down to 12.5mm.
Bolt the EFW directly to the Camera rather than using any adapters, which would only add to the distance between the filter and the sensor
The Flattener/Reducer Issue
In the past, I tried an inexpensive Hotech flattener on the system and had some problems with it. Removing it, I recognized that with an f/7 system and a smaller sensor size, I really did not need a flattener. So I just eliminated it from my configuration.
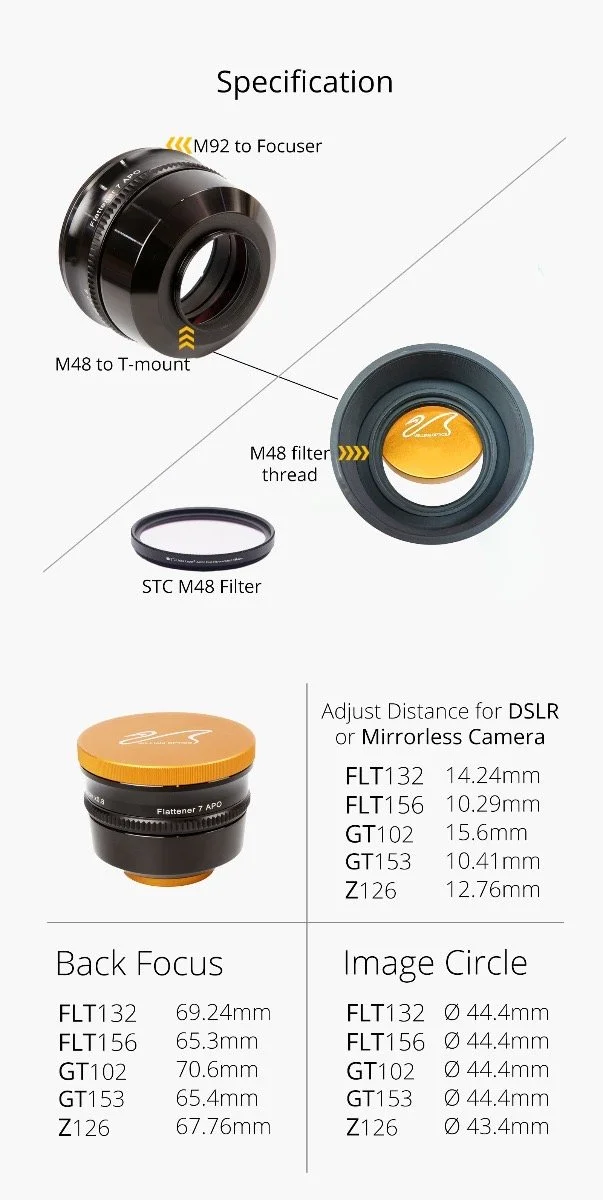
Now that I will be going with a larger sensor size, I would most likely need a flattener. I decided to get a William Optics offering - designed to be compatible with this particular scope. These units have reputations as being built like tanks and offer very high performance.
When looking at the Flatteners offered, there are three versions:
A dedicated Flattener - This would leave the system unchanged at f/7
A Flattener with a 0.8X Reducer - This would change the system to f/5.5
A Flattener with a 0.72X Reducer - This would change the system to f/5.0
A faster optical system is a good thing - especially for me, where I have limited access to a target of about 3-4 hours because of my tree lines.
After going back and forth, I finally chose the 0.8X reducer. It would provide for a faster system while not giving up as much in focal length.
But would there be any benefit to this arrangement? I used the Astronomy Tools CCD Suitability Calculator to check this out:

Here is the CCD Suitability Calculation for the Starting Configuration with the 1600 mono camera and the f/7 scope.

Here it is with just swapping the camera. Since the pixel sizes are the same, there is no real change.

Now here it is with the Flattener/0.8X reducer. This puts the system right in the middle of the sweet spot!
The bottom line was that a move to a Flattener/0.8X Reducer would be a better-optimized system!
installing the Filters
To install the filters, we need to open the EFW by removing the screws on the top plate:

Using a small power screw driver to remove the screws from the EFW top plate.

Once the plate is removed, you can see the filter wheel inside.
Then we need to remove the interior filter wheel by removing the three screws holding them it in:

Removing the three tiny screws holding the filter wheel in. Don’t loose them!

With the screws out, the filter wheel lifts right out.
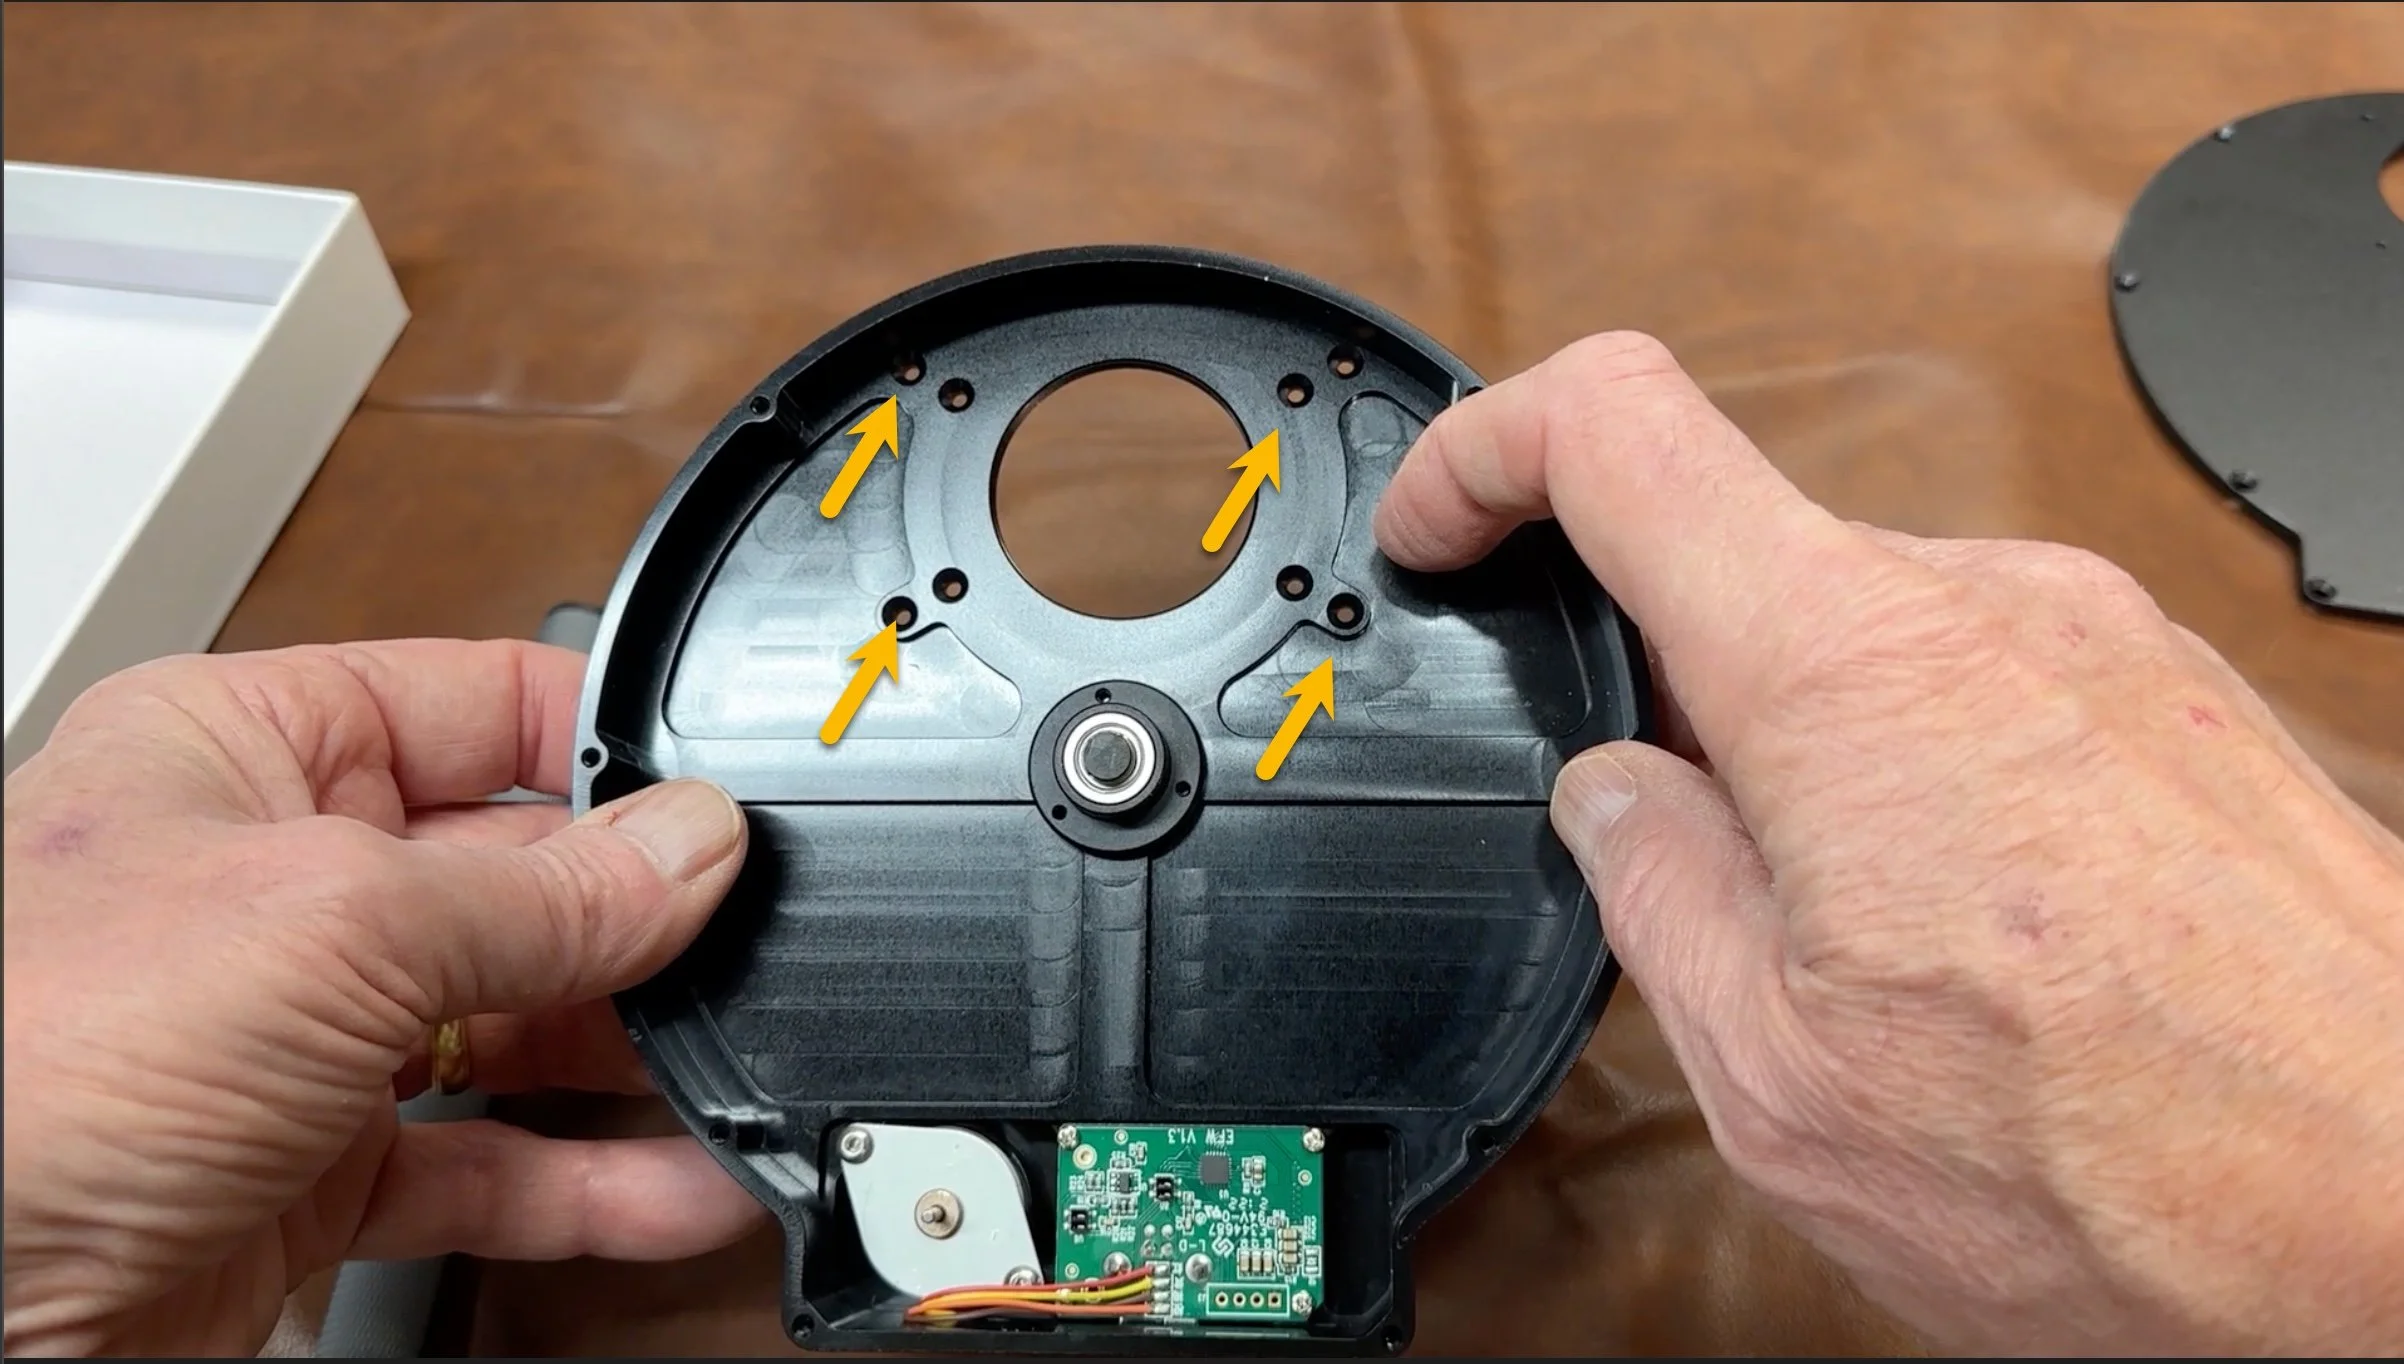
With the filter wheel out of the way, you can see the mounting holes that are used to mount the camera directly to the EFW. For our EFW, we will be using the outermost set of holes.
Next, we need to remove the Tilt Plate from the camera. This will allow the Filters to be located closer to the sensor. This plate is removed by removing the three larger hex screws on the face of the camera.
Before Removing - mark the position of the tilt plate by applying a small piece of tape that rolls over the top of the plate and down the side of the camera. Cut the tape at the seam between the camera body and the plate. If you ever have a tilt issue and need to replace the tilt plate, this will ensure it goes back on the same way it came off.

The Tilt Plate can be removed by taking out the three larger hex screws from the plate.

With the screws removed, you can Lift off the Tilt Plate.

This is the dark gasket that will go between the camera and the EFW.
Now we can mount the EFW directly to the camera with the screws provided. Note that there is a black plastic gasket that goes between the EFW and the Camera Body.

Screwing the EFW to the Camera face.

The mounted EFW!
Now we can mount the filters into the Filter Ring. The following mount sequence was used:
Slot #1: Lum Filter
Slot #2: Red Filter
Slot #3: Green Filter
Slot #4: Blue Filter
Slot #5: Ha Filter
Slot #6: O3 Filter
Slot #7: S2 Filter
Before opening filters, you must try to ensure a dust-free environment:
Clean the area
Wear a hat
Wear gloves
Have toothpicks to move the filters
Have a blower and dust brush
Open the filters and place them in the appropriate slot.
The ZWO LRGB filters have a antireflection coating that must be facing the camera - which mean placing them face down into the filter ring. Determining which side is the anti reflection side is tricky at best. ZWO offer qguidence about looking at the reflections of an object like a pen in the filter (see chart below). Also one side will look more reflective than the other. THis was trick to do but I think I have them right!

The Astronomiks Filters are very simple and convenient to deal with. Since they are coated on both sides, orientation does not matter! Got to love that!

Each filter is placed in the correct slot with the appropriate orientation.
Next, you need to apply the filter masks over each filter and secure each filter in place with the provided screws. I used a pair of needle nose pliers to hold the crew in place for screwing it in. Be careful not to touch or scratch the filter while doing this!
Once the filter are mounted, blow the off to remove any dust and replace the filter holder in the EFW cae and remount with the screws.

Using Needle-nose Pliers to position screws.

The filters mounted and the filter holders reinstalled back in the EFW housing.
Now the top plate of the EFW can be replaced. Finally, block the Off-Axis-Guider mount holes (since we are not using one) with back tape to prevent light leaks.
the Camera/EFW Assembly is complete and we can now move on to assembling the entire back focus stack!

Blocking the unused mounting holes with black electrical tape.
Determining the Back Focus Stack
The Flattener is specified for having a back focus of 69.24mm.
The camera, after removing the Tilt Plate, has an offset to the sensor of 12.5 mm
The EFW, bolted directly to the camera, has a thickness of 20.0 mm
I added an adapter that went from the M42 to the M48 with a spacer of 10.0 mm
The Falcon Camera Rotator is 18mm but with 1mm adapters on each side: 20.0 mm
The Flattener was dialed to have an offset of: 6.7 mm
The Total comes to: 69.2 mm

The components that form the main stack to active the specified back focus.
To make this all work, I needed a couple of specific adapters:
M42-male to M48-Female with a 10mm spacing
M54-Male to M48=Female with 1mm spacer
So where did I find these? Well after you’ve played this game a few years, you tend to end up with drawers full of adapters. There be gold in them thar hills!

My two drawers filled with misc adapters!
Once everything is assembled, we end up with a camera stack that looks like this:

The assembled camera stack.
Mounting the New Camera Stack
This is a shot of the old camera stack. It is mounted by connecting the 2” “eyepiece” now from the Falcon Rotator to the ROTO Lock eyepiece mount on the WO 132mm FLT:

The original 1600 camera configuration.
To remove it, we only have to loosen the ROTO Lock and disconnect the cables. Next we have to remove the ROTO Lock itslef. This can just be screwed off.

Unscrewing the ROTO Lock.
In its place, we can now screw on the backend of the Flattener/0.8X Reducer. Then we can re-attach the cables.

Screwing the new camera stack onto the back of the scope.

Reconnecting the cables.
Re-Balancing the Platform
Since we have changed the components at the end of the scope, it is necessary to rebalance things. The scope was now camera-end heavy, and I needed to slide the OTA forward in the rings to re-achieve my balance point.
Still Needed
At this point, I am not yet done. I still have to change my Sequence Generator Pro setup on this platform to use the new camera and filter wheel assembly.
I also need some time with the night sky. While I have pretty much achieved the specified back focus - I don’t really believe this is the optimal position for the Flattener. The optimal position will be achieved by doing an adjustment series, moving the offset on the focuser forward and back through its range, and capturing subs at each position. Analyzing the star images - especially at the outer portion of the fields, will determine its final position.
Once this is done - the upgraded scope is ready for serious capture business!


The updated Configuration:
Scope: William Optics 132mm f/7 FLT APO Refractor
Flattener/Reducer: P-FLAT7A 0.8X Reducer - new
Focus Motor: Pegasus Astro Focus Cube 2
Cam Rotator: Pegasus Astro Falcon
Guide Scope: Sharpstar 61EDPHII
Guide Focus Motor: ZWO EAF
Mount: Ioptron CEM 60
Tripod: Ioptron Tri-Pier
Camera: ZWO ASI2600MM-Pro - new
Filter Wheel: ZWO EFW 7x36mm II - new
Filters: ZWO Gen II 36mm Unmounted LRGB - new
Astronomiks 36mm Unmounted 6nm Ha, O3, and S2 Filters - new
Guide Camera: ZWO ASI290MM-Mini
Dew Strips: Dew-Not Heater strips for Main and Guide Scopes
Power Dist: Pegasus Astro Pocket Powerbox
USB Dist: Startech 8 slot USB 3.0 Hub
Polar Align Cam: IPolar