


Intricate geometric compositions created on a base of a circle, known as mandalas, have a deep spiritual meaning in Hinduism and Buddhism. They represent the whole of the universe, and they can be used as an exercise or for meditation. Recently, the basic idea of drawing a radial pattern has been also adopted by the Western world, as a tool for therapy or simply relaxation.
Drawing a mandala (or what is widely considered as a mandala in Western civilization) can seem very strenuous and difficult at first, but it's actually the opposite. The intricate look of a mandala comes from following a rhythm, which turns a little effort into a stunning result. Doing the same thing over and over, and advancing despite it, is very relaxing and lets you stay in the moment. You can read more about drawing as a therapy in this introduction to the series:


You can follow my steps directly, use the same techniques for your own mandala, or simply read the whole thing just to learn about drawing mandalas.
What You Will Need
As with most personal art therapy activities, you don't need any professional art supplies. You can get these tools even in supermarkets!
- sheet of paper (even copy paper will do)
- pencil
- drawing compass
- ruler
- protractor
- fineliner/thin marker/pigment ink pen (any color you like)
- (optionally) thicker marker
You can draw a mandala with a pencil only, if you want, but dark markers make the pattern cleaner and more definite. A pencil has some uncertainty in it; you never know when the line is done. With a marker pen, you have a sense of stability, and the lines seem more real.


There's one more thing you need to draw a mandala: a proper mindset. Sure, you can treat it as a normal drawing, with a certain goal in mind, but you can gain more than just the satisfaction of a pretty artwork if you do it properly. Treat it as a meditation session. Sit comfortably, in quiet or with some pleasant music, and focus on this one activity.
Don't think about how it's going to look when you finish, or how people will react when they see it. Don't make it about yourself, and don't treat it as a test of your drawing skill or self-worth. Let the rhythm take you around each circle, and let the mandala become your whole world for now. There's no good or bad—just the rhythm, lines, and contrast.
Don't scold yourself for mistakes; it's natural that they happen. Ignore them or make them a part of the rhythm, so they stop being a mistake and become a part of the pattern you could never imagine before. This is your mandala—nobody should care what it looks like, and nor should you care about them.
Let yourself be creative. Don't restrain yourself from drawing something experimental, just because there's a risk it will not look good in the end. There should be no shame in drawing a mandala. No matter how you do it, no matter how it looks, it's good, because you have created it. A pretty mandala won't change the world for the better, neither will an "ugly" one make your life worse.
So sit down, and take a breath. Smile and draw your soul out. Make this mandala yours, without any attachment to the outer world, and see how much joy you can take from this simple activity. Make these words of David Mamet your motto for this session:
Art is an expression of joy and awe. It is not an attempt to share one's virtues and accomplishments with the audience, but an act of selfless spirit. Our effect is not for us to know. It is not in our control. Only our intention is under our control.
1. How to Plan a Mandala
Step 1
It's possible to draw a mandala without any plan, but it has two disadvantages:
- You have to switch from pen to compass all the time, which breaks focus.
- The risk of losing the rhythm is high.
If you draw a plan for the mandala first, later you can focus on drawing without worrying about keeping the rhythm. You just follow it and see the pattern emerge as if by some kind of magic!
Take the compass and stick it in the center of the sheet. Draw a small circle, then a bigger one, and another, using various distances between them. Making the circles concentric is the only rule here.


Step 2
Take the ruler and draw a horizontal line across the center (tip: place the ruler slightly lower to make space for the pencil).


Step 3
Take the protractor and place it along the line, pointing directly at the center. Draw a mark every 30 degrees: at 30, 60, 90, 120, and 150. This will give us 12 sections. You can use fewer or more, if you want—there's no rule for this!


Step 4
Take the ruler again and draw a line between the center and every mark, across the whole plan. Again, be careful to save some space for the line over the ruler.


2. How to Draw the Center of the Mandala
Step 1
OK, let's start right from the center. We need to fill that smallest circle with some kind of repetitive pattern. What can be easy to repeat, in this small space and with the guide lines you have there? I decided to draw a little flower petal filling the whole section.


Step 2
Replicate the element until you fill the whole circle. Be slow and methodical—there's no hurry! Focus on the movement of your hand, on the noise made by your tool, and think only about what you're drawing at the moment. Leave the future for later!


Step 3
Darken the circle to enclose the pattern within clear boundaries.


Step 4
Let's go to another circle. To continue with this flowery theme, we can draw more interesting petals. Draw one side of it...


... and copy it all around the circle.


Step 5
Now draw another side of the petal.


Step 6
You can create another clean boundary of this circle before going to the next one. Here let's try another trick: you don't need to follow strictly the guide lines of the plan—you can add more! For example, you can cut every section in half to create another rhythm.


Step 7
Let's create a leaf on this base.


Step 8
Not every circle must be enclosed with a dark outline. You can freely go straight to another one and derive your new pattern from the previous row.

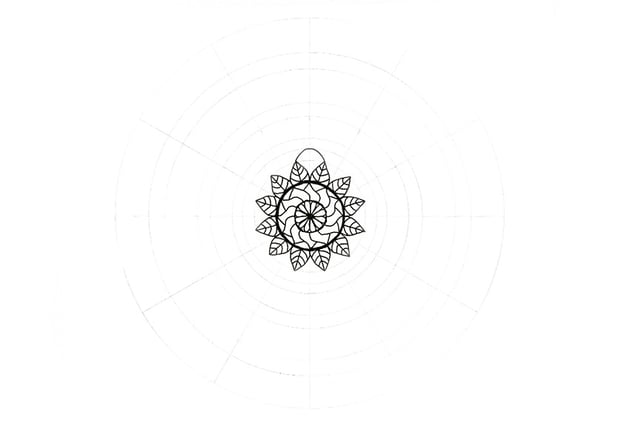


Step 9
Too simple? Fill the shapes with more shapes!


Step 10
Dark circles can beautifully fill the space and add some appealing contrast.


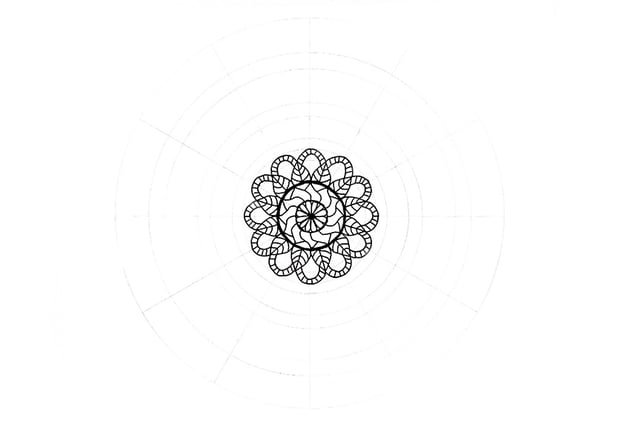
Step 11
Still too empty? You can add something else. No matter how simple and weird it looks in one section, it will be turned into a beautiful pattern by the rhythm. So don't be afraid to experiment!


Step 12
A boundary between one row and another doesn't need to be dark and boring. You can make it more detailed, if there's enough space.


Step 13
If the new pattern becomes very detailed, the earlier one may appear empty in comparison, but nothing stops you from going back to it and adding more detail!


3. How to Draw the Outer Part of a Mandala
Step 1
There's no requirement for the size of the mandala—you can go as far as you like! However, the further from the center, the bigger each section. So it can be a good idea to divide each one into more sections, for example thirds—whatever is easy enough for you to measure.


Step 2
You can create interesting patterns by using contrast. If you have a thicker pen, this is where it can be useful, but filling a small section with a thin pen can be quite relaxing as well—unless you hurry!


Step 3
Let's fill the empty space with some lines.


Step 4
Let's try a different shape this time. You can borrow the guide lines straight from the previous row.


Step 5
More triangles!


Step 6
When you draw a big circular boundary, it's easy to make a mistake. Small mistakes are not so visible in the complexity of a mandala, but if you want, you can always fix such a thing with a thicker line.


Step 7
Let's add more contrast.


Step 8
There's a lot of space here that's waiting to be filled! Let's do it quickly.


Step 9
Prepare another row.


Step 10
What else can we draw, that we haven't drawn before?


Step 11
The contrast with the rows below suggests we add more darkness here as well.


4. How to Finish a Mandala
Step 1
A mandala ends when you want it to end, but it's good to finish it in a special way. Let's go back to the big sections now and recreate the petals from the very beginning.


Step 2
To make them a part of the pattern instead of just a boundary of a huge empty space, give these petals a thick frame. A thicker pen can be useful here.


Step 3
One more line will make the space less empty.


Step 4
Maybe it's time for some dots? We haven't added any for a while.


Step 5
I looked at the row below and it looks quite empty, almost merging with the upper row. Let's fix it.


Step 6
More petals! To make them very big, I crossed two rows at once.


Step 7
Let's give them a clean frame this time.


Step 8
Add a simple pattern to fill up the empty space:


Step 9
To make the mandala more open, we can add some elements outside. For example, attach a circle to each petal.


Step 10
Fill it for a better contrast.


Step 11
Each circle can be extended into more circles, to bring attention to the outside, as a balance for the strikingly detailed inside.


Step 12
Not every boundary must be a closing line. To keep it open, make it with circles.


Step 13
Finally, take a look at the mandala as a whole and see if you want to add anything.


Beautiful!
Look at your mandala once again. Try to see it for what it is, not for what it isn't. Don't compare it to something in your mind, some vision of what it was "supposed to" look like. After all, if your goal was to draw a mandala, and you did it, then you succeeded!
There's a tradition in Tibetan Buddhism of creating sand mandalas that are ceremoniously destroyed after they're finished. It symbolizes the fleeting nature of our life—no matter how much effort we put in, no matter what we achieve, it will end the same way for everyone. You can recreate this practice by destroying your mandala, to remind yourself that it's really the process that's important, not the end result. That it's the journey that matters, not the destination. And having that in mind, it's easier to enjoy the process of creation without worrying about the end result.
And if drawing a mandala has put you into a mood for more drawing, you may like these simple tutorials:

 How to Draw a Panda Step by Step


 How to Draw a Cute Bunny Step by Step

 How to Draw a Sloth Step by Step
You may also be interested in our other mandala-related tutorials:

 How to Create a Festive Mandala Style Coloring Book Page in Adobe Illustrator


 How to Draw a Snowflake
 Quick Tip: How to Create a Two Color Mandala with a Pattern Brush

 Geometric Design: The Basics


