
This character was chosen as part of a Masters of the Universe group. I’ll be making the Sideshow Collectibles version, which has beautiful detail and textures, and lessens the need for creative “floating” solutions. I’m entertaining the idea of a hoverboard, but SafetyMe says “nah”.

- Start Date: 7/31/2019
- Due Date: 4/04/2020
- Elements: Inner tunic, under sleeves, outer tunic, scarf/collar, belt & pockets, chest piece, hat, wand, rings, hands, ears, eyes, makeup
- Current Cost: $111.13
- New Adventures: Weathering
8/19/2019 – Now that my summer events are done, I’m ready to get started on the building part of this project. My spreadsheet is in place, and I know which vendors I’ll need to stalk for sales in the coming months. I’ve pulled foam, thermoplastic, and LEDs from my stash for the staff, chest piece, eyes, and ears. After I draft the robe patterns and do those mock-ups, I’ll take a day to seek out fabric, but this week, I’m looking forward to starting the hat.
Theatrical Millinery is fascinating, and I rarely get the chance to make hats from scratch. Orko’s topper will be the most exciting to date. The special considerations here are the brim angle (low and wide to obscure the face but to still allow for shoulder shrugging), the scrunched bend in the cone, and the ear holes.
I started with poster board, drawing the inner and outer circles via chain method. My guide for sizing was the width of the poster board and a widened head measurement of 23″ (accounting for the ear headband and fabric thickness). I marked the front and back seams on the brim and cut the front seam in order to manipulate the brim angle. To do this, I held the top edges together, then overlapped the bottom edges until the shape was close. I taped both edges down, then took the leftover corners of the poster board and taped them at complementary angles to the sides of the brim. This forms the triangle opening at the front of the hat. I marked the new center front seam. There was now a point at the top center front, so I clipped that back down to a circle and moved on to the cone. Using packing paper, I guesstimated and marked along the fold a 23″ tall cone (my previous head measurement), then used the chain method to draw the curve at the bottom. With a flexible curve, I marked 11.5″ along the edge and connected each end point. I taped the back seam and attached it to the brim.
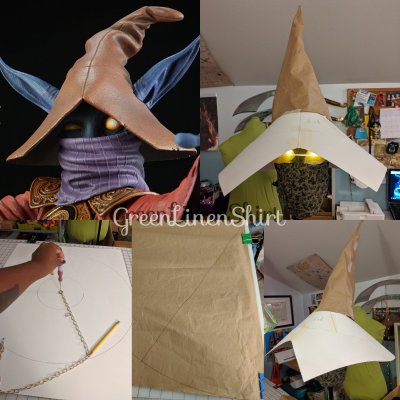
All of the pieces have been noted to remind me to add seam allowances, and I’ll true-up the outer edge into a circle once it’s flat.
8/24/2019 – I whipped up some mock-ups for the sewn portion of the project this weekend. There will be a kirtle/gown/inner tunic garment and an outer short robe – similar to a Jedi. In an effort to keep the base layer construction as simple as possible, I started with a princess dress pattern, McCall’s 5499. It has the appropriate amount of yardage for a gown that will obscure my feet, and it has long, narrow sleeves. I shortened the pattern above and below the waist and swapped in a zipper for lacing since the back won’t be seen. This design has many seams , but the fabric will have stitched striations in the texture to hide those.
The short robe was simply draped over the dress. I’ve made similar garments in the past, so this was a very quick process. At this point, I need to true-up the armscye and adjust the skirting angle. However, I realized that the mock-ups look terribly unstructured. I’ve decided to build a corset that will define the overall shape and create a smooth surface upon which the armor and belt assembly can sit without shifting. Traditionally, Orko is a tiny, floating triangle in a red robe, so that should be the primary focus even with this gorgeous source material.

8/25/2019 – Today I cut the armor shapes, and I’m working on the “O” motif in Krita. My goal is to send the design to Silhouette’s cutting software so that I don’t have to cut the craft foam by hand. The shapes will then be adhered to 4mm EVA foam.
1/14/2020 – So, some stuff has changed in the last few months. I scrapped the mock-ups when I received an old gown for upcycling–great for the project cost and for alteration experience. Note: Alterations are stupid. The undershirt is made from a cotton-linen blend that I picked up from Renaissance Fabrics. I took some panels out of the base gown, added lacing, and stitched the striations with a twin-needle. The outer robe is made from gabardine remnants from an old commission. The sleeves are pieced, which gives a little charm to the garment.

The ears have been cut from 4mm foam and mounted to foam scraps for priming and painting. The hat and large pouch are cut from faux suede. The smaller pouches are patterned and waiting to be cut from more foam. Since I don’t plan on making the tiny pouches usable, I’m considering sculpting them from 18mm foam and adding flap details with 2mm foam. That would take out a lot of adhesive work, joining all of the tiny edges.


The big decision is how I want to construct the armor. Originally, was going to use black Worbla over a craft foam base, but as soon as I sketched out the tiny details that would need to be cut from the 2mm foam, then effectively shrink-wrapped with the thermoplastic, I questioned my resolve. I’m now on the foam clay bandwagon and considering some preset decorative molds to get all of Orko’s wizard-y fanciness on the armor.
For hands, I tested a pair of matte gloves in Royal from We Love Colors. They are wonderful, however, I need to go with a lighter blue, which was not in stock at the time. I went back and ordered Sky Blue tights that I will sew into four-finger gloves. The fake nails have been painted, and I just need to sculpt a false finger tip from foam to smooth the gap between my middle and ring fingers inside the glove. The face makeup is in my possession and will be mixed to match the gloves when they get here.

Additional considerations as of today include the 3D print pieces (wand topper and belt buckle), eyes, and adding light and sound for the wand. I’m pretty sure that I have everything I need to get those bits done, but the order of operations is important. For the eyes, specifically, I need to finish the hat to determine how much darkness I have to work with. For the wand, I’ll need to successfully print the topper, then determine how much remaining space I have for wires, buttons, and a speaker in the shaft, handle, and end cap.

So, yes, the project is at full go, and hopefully it won’t be too long before the next update!
