.png?height=120&name=rockcontent-branco%20(1).png)
What does 404 error mean?
A 404 error is a response from the server where the website is hosted. It informs us that the address or URL we entered is not accessible.
The 404 error can happen due to a user's mistake or a failure in the site administrator's configuration. The main causes are:
- Incorrect URL: when the user types a non-existent address.
- Moved page: when the website editor changes the page URL.
- Page deleted: when the site administrator deletes a page.
There is no way to prevent the 404 error from occurring. After all, a small typo is enough to cause it. Thus, the 404 error can happen on any website.
In both cases, the error is caused by a failure to manage the website pages. The administrator may have changed the URL location or structure and may have failed to redirect it, for example. Also, the address that was still receiving traffic may be deleted.
How to fix the 404 error?
There is not exactly what to fix in error 404. After all, it's nothing more than a message from the server saying something is wrong with the requested address. What we can really correct are the links on our website and provide the necessary redirects. Let's look at this in parts.
Redirecting broken links
If the site has undergone some migration, such as a domain change, you will need to manage the redirection from old addresses to new formats. The same is true if you’ve set up a new URL pattern for your pages.
The most used way to do this is Redirect 301. It is an instruction that tells the server that the A address is now B address. This way, the user is automatically redirected to the new address without having to take any action.
This configuration, however, can vary according to the type of server used. In general, it requires technical deepening - unless, of course, you have a WordPress site. In this case, the SEO Redirection plugin helps you redirect your website's broken links quickly.
How to create a custom 404 error page using plugin?
It's possible to create an exclusive page for your website, to lead lost users back to active pages using the 404page plugin.
What this plugin does is automatically redirect the 404 error page to another address on your website.
Create your custom 404 page
The first step is to create your 404 error page. Access your WordPress dashboard, place your mouse cursor on the "Pages" option on the side menu, and then click on "Add New".

Add images, links, messages and whatever you need to guide your user.

The look is important to get the user's attention.
Download and install the 404page plugin
To add a new plugin, place the mouse cursor on the "Plugins" section in the side menu and click "Add new".

Search for “404page”, locate the block referring to the plugin, and click on “Install now”.

After finishing the installation, click on the same button, which should now be showing “Activate”.
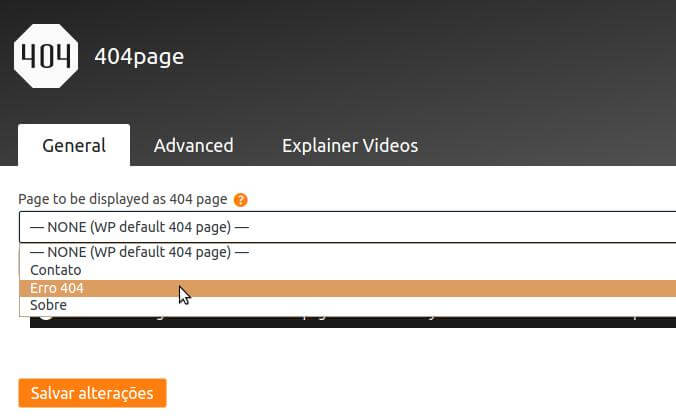
Set up your 404page
If it does not redirect to your website list of plugins, click on "Plugins" in the menu to go there. Then, select "Settings" in the 404page block.
Another way is to position the mouse in the “Appearance” section in the menu and click on “404 error page”.

In the "General" tab of the plugin, select the page to which you want to redirect the users. In this case, we must select the page that we created previously and finally click on “Save changes”.
You can test your new page by clicking on “Test 404 error” in the plugin panel or by simulating a typo in your browser - example: yourwebsite.com/123
Prevent your new 404 page from being indexed
After the page has been created, it will be necessary to configure it so that the search engines do not list it in the search ranking. To do this, just have Yoast SEO installed on your website and your 404 page will be automatically excluded from the system.
Changing the 404 error page by the server
You can set up a custom 404 page by editing the .htaccess file and running some commands on the server. However, this type of editing requires technical knowledge of HTML. The ideal is to have a developer to make these adjustments.
Did I help? Still have any questions? You can contact me on chat or email help@rockcontent.com, and we will help you!