2.5D GameMaker Tutorial
In this tutorial I’ll teach you how to get the 2.5D perspective in GameMaker:Studio!
patreon.com/diest64
Prologue:
I just want to mention a few things before we get started here. This tutorial is NOT aimed towards absolute beginners. Throughout this tutorial I’m going to assume you have a basic understanding of how GameMaker:Studio works, and that you also have some understanding of GML (gamemaker’s language.) Even if you are a beginner, it will probably be alright to still read through and just google things you don’t understand.
If you see anything wrong, or have any problems please don’t hesitate to tell me!
If you readers enjoy my tutorials and would like more, please consider signing up for my Patreon. It would mean the world to me and I would be able to provide even more tutorials and you get some other neat rewards.
You can also download this project from my patreon.
patreon.com/diest64
Setting Up:
Start a new project. Before we start getting into the 3D stuff, we need to do some important setting up before we can get things to work.
Camera:
Go read my camera tutorial. This tutorial uses my pixel perfect camera which we will be editing slightly later on.
Platformer:
Make a simple platformer. I will not be covering how to do this since there are millions of platformer tutorials out there. How our movement/collision works doesn’t really matter in the scope of this tutorial.
I recommend checking out Heartbeast’s tutorial:
All you need for my tutorial is simple movement and collision.
Lets Get Started:
At this point you should have a pixel perfect camera and simple platformer movement/collision.
Now we’re ready to start getting 3D into our game.
Editing Camera:
First thing you have to do is set the depth of your camera to some really high number. This has to do with how GameMaker draws things with 2D/3D, so for things to work correctly make sure the camera has a higher depth than anything that is being draw to the screen. I set mine to 999.
From my pixel perfect camera tutorial, you should have a InitGame() script. Open that up and lets change it slightly as shown below:
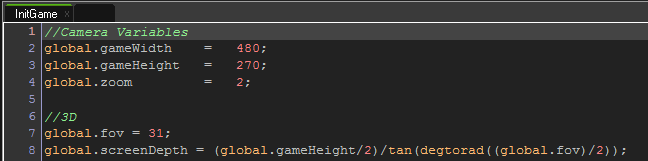
Here we’re adding the global 3D variables we need for our 3D camera. global.fov is our field of view and global.screenDepth is our screen depth.
Now in your actual camera object put another code action in the Create Event and write this in:
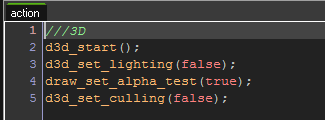
Here we are just telling GameMaker to start 3D rendering with d3d_start(). Check out the documentation for each function after that which explains what they do way better than I ever could.
tip:
middle mouse click on a function and it’ll open the documentation to that function’s page
Now add a Draw Event and write the code below in:
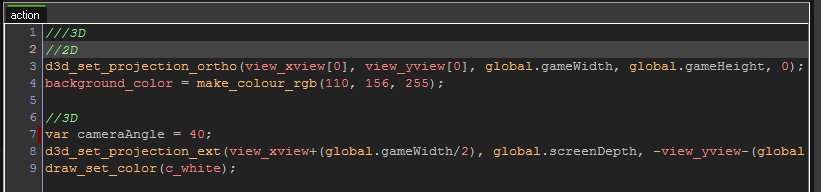
Generally I’m against copy/pasting code but line 8 is crazy long and wouldn’t fit in a screenshot so just copy paste it:
d3d_set_projection_ext(view_xview+(global.gameWidth/2), global.screenDepth, -view_yview-(global.gameHeight/2-cameraAngle), view_xview+(global.gameWidth/2), 0, -view_yview-(global.gameHeight/2+cameraAngle), 0, 0, 1, global.fov, view_wview/view_hview, 1, 1000);
Now let me explain what we’re doing here.
We are basically setting up two different cameras which GameMaker calls Projections. We have a 2D projection, and 3D projection. I’ve labeled which is which using comments.
2D:
If you need to, for example, draw a 2D background, or anything that isn’t in our 3D space, then you can do it here. Alternatively, you can create a separate object and draw something in 2D, but you’d need to set your projection to orthographic, draw in 2D, then set it back to 3D projection. If you decide to take this route, I recommend creating scripts for each projection change. As you can see instead of drawing a 2D image, I just set a color for the background.
3D:
The cameraAngle variable here controls the angle our camera points at. I wanted the camera to point slightly downward at our player rather than a direct side view. Feel free to change this to whatever you want. 0 would be a direct side view and anything below 0 would point upwards.
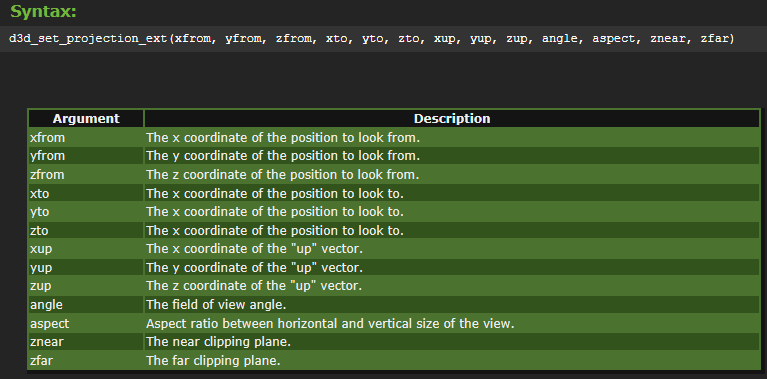
Line 8 is setting our projection to 3D and aligning our 3D projection with our 2D projection. Now I think the rest of the arguments can be explained by looking at the d3d_set_projection_ext documentation page so here is a screenshot of it:
Drawing Levels In 3D:
Now that we’ve set up our camera, we need to actually draw our 3D objects.
Open whatever your floor/collision object is and create a Draw Event. In the Draw Event write this code:
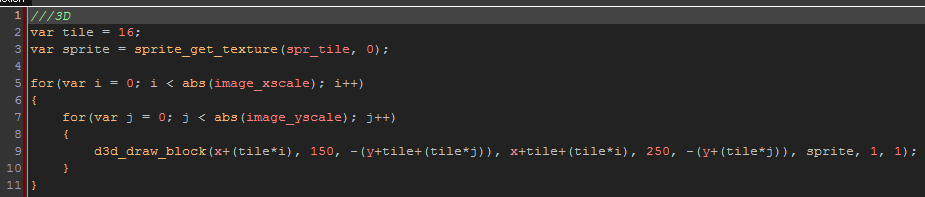
Here we’re drawing one 3D block for every tile wide/high our object is. Adjust the tile and sprite variables to your needs. The tile variable is the size of each tile, for me it’s 16x16.
NOTE: If you want your 3D objects to appear closer/further from the camera, adjust the y argument when drawing in 3D.
Now open up your room editor and place tiles around and drag their width/height to make a simple level.
Here is what mine looks like:

Now if we run our game everything should be working correctly and we can see our 2D level turned into a 3D level.

Drawing 2D Sprites in 3D:
Now the last thing we have to do is draw our 2D sprites in a 3D space.
Open up your player object and add a Draw Event. Add this piece of code (it’s also pretty long so just copy/paste it):
d3d_draw_wall(x-(sprite_width/2*facing), 200, -y+(sprite_height/2), x+(sprite_width/2*facing), 200,-y-(sprite_height/2),sprite_get_texture(sprite_index,image_index),1,1);
Here we are drawing what GameMaker calls a wall. It’s basically a plane or square in 3D space. So we’re drawing this wall and setting its texture to whatever is currently the sprite_index and image_index of our object.
NOTE: I have a variable in there named “facing” that stores what direction the sprite is facing. 1 = right, -1 = left. Change this to whatever variable you’re using to keep track of that, or just delete it altogether if you aren’t tracking that information.
Now run your game and you should have this:
Finished!
That’s it! You now have successfully created a 2.5D game using GameMaker:Studio. Let me know if you have any questions!
please consider joining my Patreon as it would the world to me and I’d be able to write up even more tutorials, PLUS you’ll get some other neat rewards.
You can download this project file from my patreon aswell!
patreon.com/diest64
Additional info:
Loading 3D models:
If you want to load in 3D models, there is a great script/tutorial made by someone on the GMC forums. Check it out here: