Narrowband Astrophotography
Introduction
When most photographers see ‘astrophotography’ they usually think of landscape astrophotography. Combining a terrestrial landscape with the Milky Way can lead to beautiful and dramatic images. My astro passion lies beyond the terrestrial, beyond the lunar, solar or even planetary and into deep space. Deep space astrophotography is about galaxies, star clusters, and nebulae. It is in these nebulae or clouds of gases that I find my inspirations.
However, capturing images of nebulae light-years away goes a bit beyond the standard tripod and remote shutter release. It requires considerable tech, a hefty learning curve and lots of patience. In this article, I’ll give you an overview of what it takes to make deep space images, in particular, narrowband images.
The Sky We Know
Before we begin into the nitty-gritty, let’s take a quick look at the sky most of us are familiar with. In the super-wide image of the sky looking west from California, one can see a faint oblong smudge. This turns out to be the Andromeda galaxy, the closest neighbor to our own Milkyway galaxy. It is visible to the naked eye on a dark night as a faint fuzzy spot.
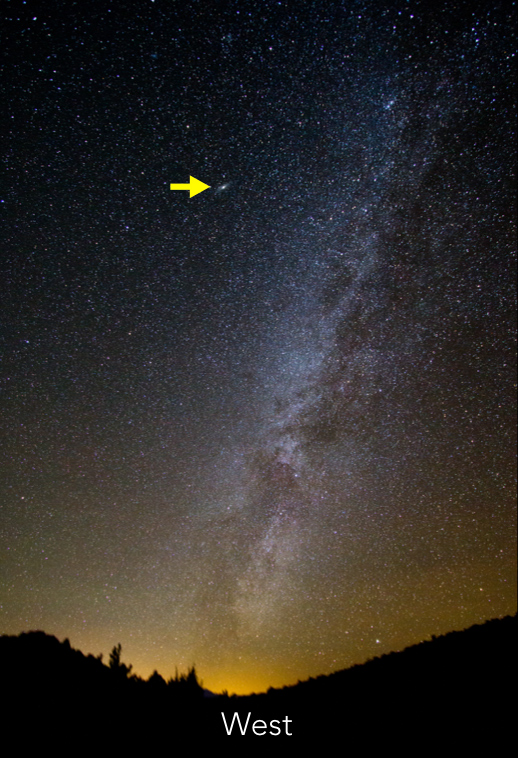
Through a small 80mm telescope with a focal length of 560mm using a basic DSLR, this object fills the frame. The trick is not so much in the magnification but in the telescope and camera’s ability to collect light much better than the naked eye. This is a function of the aperture (width) of the telescope and the duration of the open shutter.

Looking the other direction to the east, we can spot some familiar constellations, Orion, Taurus, and Pleiades. Fun fact: the Japanese name for the Pleiades constellation is Subaru.

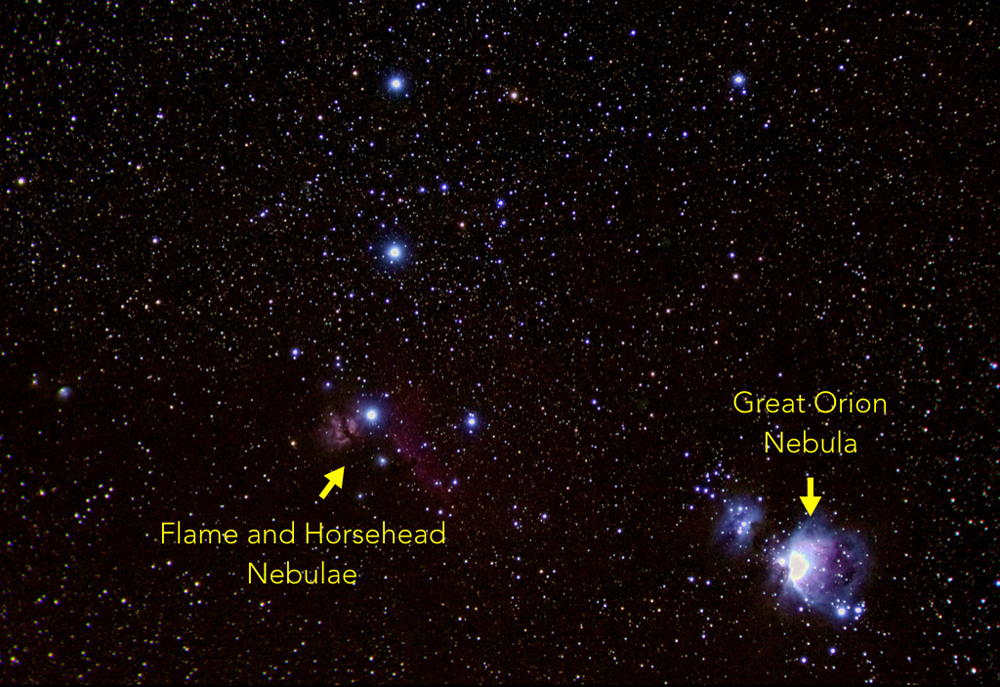
A closer look at Orion with a DSLR and a short telephoto lens reveals multiple nebula.
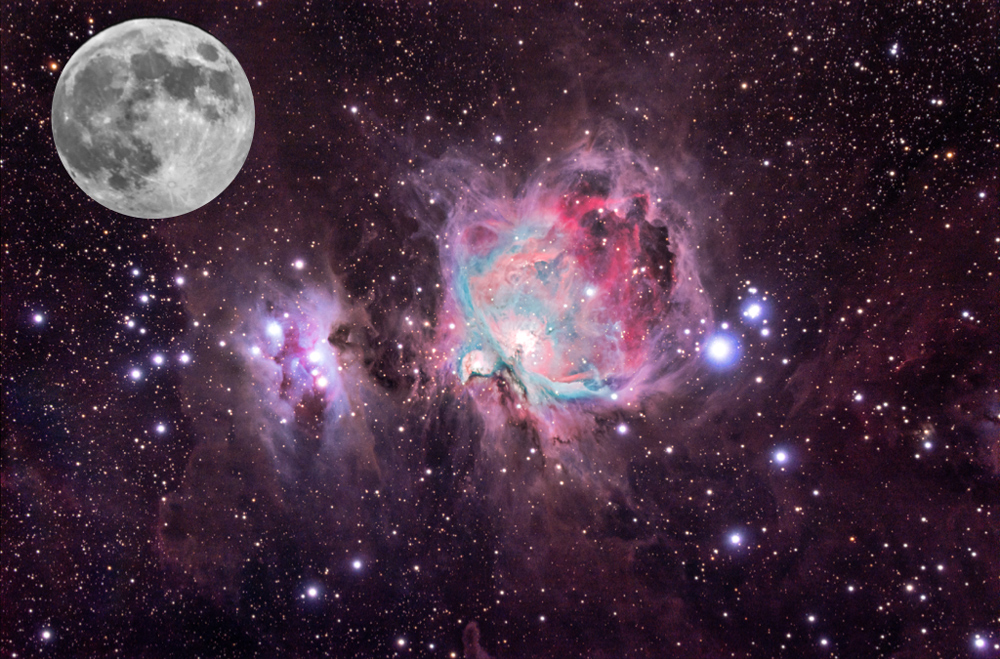
An even closer look through the 80mm telescope shows the Great Orion nebula, shown here in a composite with the full moon for scale comparisons. The moon is about 0.5 degrees of arc across. The nebula is a few times that but it takes a telescope and camera to collect enough light to make the larger object visible. Fun fact: this Great Orion nebula image was made with a DLSR using exposure blending so as to not burn out the center like it is in the previous telephoto image.
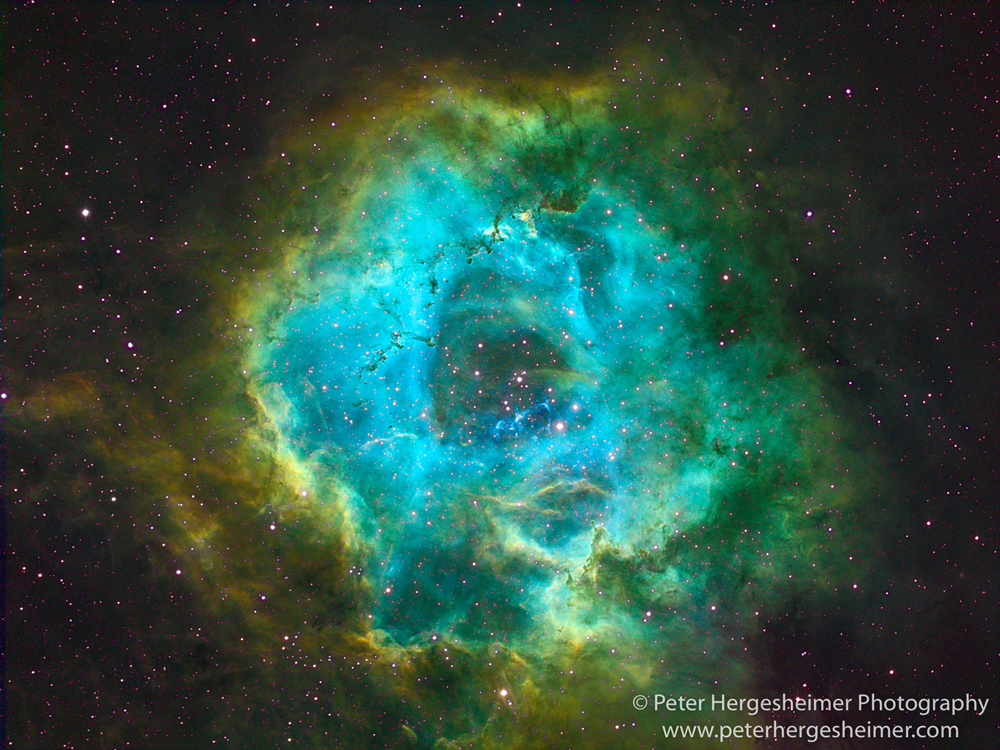
Looking again to the east we see a reddish smudge known as the Rosette Nebula.
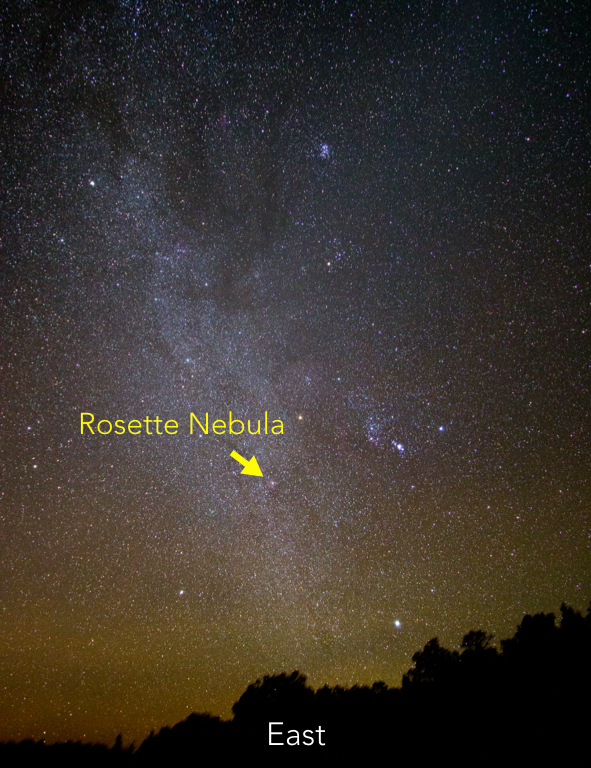
A look through the 80mm telescope shows it as a large doughnut-shaped object, 1.3 degrees across (2.6 moon diameters) made up mostly of hydrogen gas which gives it the salmon color.

Using narrowband astrophotography, the same object takes on a different look.
Narrowband?
With all color cameras, the sensor is sensitive to all visible light and then some. Color filters are placed in front of the sensor to separate the data into distinct channels, normally red, green and blue. In a DLSR these filters are placed on alternating pixels of the sensor so that all colors are captured at the same time in a single image. In other systems, such as my astro camera, the filters are placed in front of the entire sensor one at a time so that three images must be captured to build a color RGB image. With narrowband astrophotography, the normal red, green and blue filters are replaced with narrowband filters that only allow very specific frequencies of light to pass through.
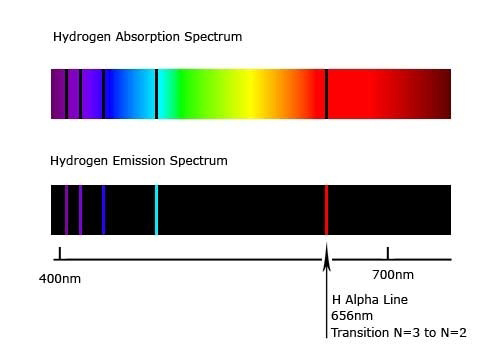
Why do this? Well, the light emitted by nebulae comes from gases that are bombarded by energy from stars. Excited gases emit very specific frequencies that depend on the type of gas. Hydrogen is the most prevalent gas in space. Its strongest light emission is the alpha band at 650nm (far red). With a filter that only allows a specific emission frequency to pass, you can reject all other light frequencies including much of the light pollution found in most night skies. Also, you can attribute the information in the resulting image to a specific gas.
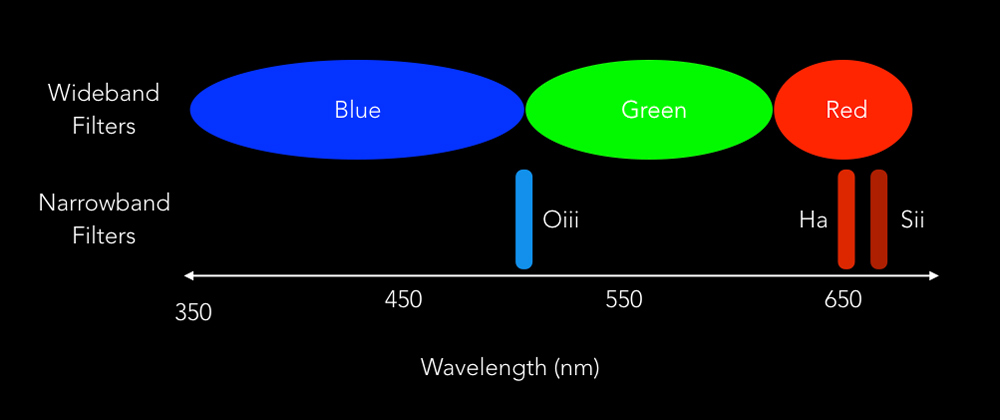
With three narrowband filters designed around the emission bands of three common gases (Sulphur, Hydrogen, and Oxygen), you can create beautiful color images by mapping the gas emissions to the red, green and blue channels. This popular color mapping scheme is named the Hubble pallet, after the space telescope.

Gear
The typical deep-space astrophotography setup includes a telescope, camera, auto-guider, mount, tripod or pier, and a laptop. Here is a quick rundown of my setup which I run from a remote laptop inside my house. Note the 12-inch concrete pier. This and the 3×3 foot underground block of concrete use to anchor it keeps my backyard system mechanically stable. When in the field I employ a sturdy tripod with 2-inch diameter legs as a base.

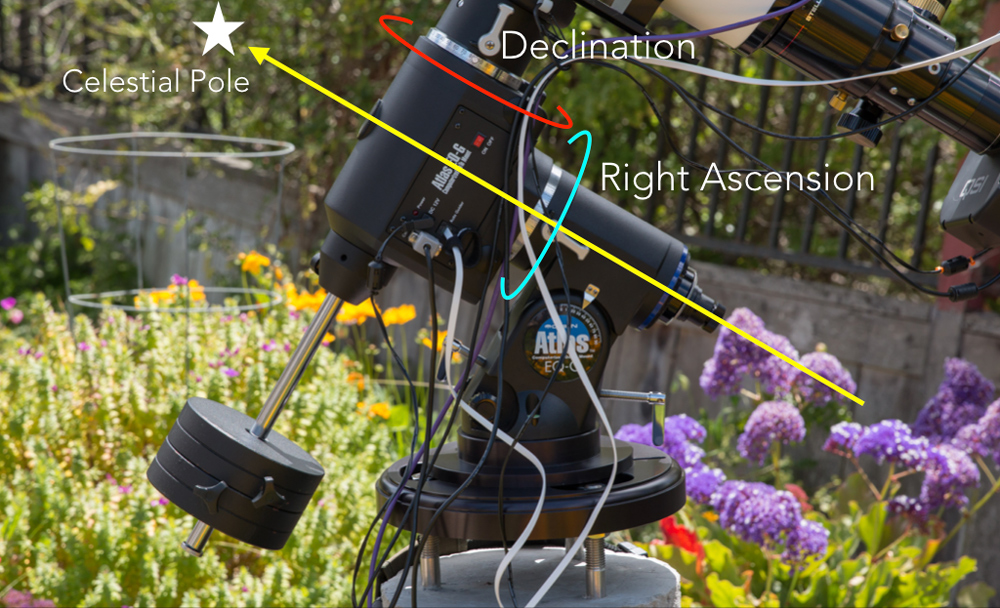
To secure and maneuver the telescope, I use an equatorial mount that has one rotational axis, Right Ascension (RA), set up along the earth’s rotational axis. The other axis, Declination (DEC), is used to position the telescope in a north-south direction. A stepper motor is attached to each axis for automation purposes and to offset the earth’s rotation. This type of mount must be aligned to the celestial pole (North or South depending on where you are). In the northern hemisphere, the north star, Polaris, is used as a nearby marker for this alignment.
As the light travels through the telescope to the sensor in the imaging camera, it passes through a filter mounted on a motorized filter wheel. Some of the light is redirected through a small prism to a secondary camera for the auto-guider system which is used to keep the telescope on target. A stepper motor is attached to the telescope’s focuser for automated focusing between images.

My camera uses a 3326×2504 pixel CCD (charge-coupled-device) sensor. Traditionally CCD sensors deliver a lower noise, higher quality image than CMOS sensors but CMOS technology is quickly catching up. The camera has a built in electric cooler that I use to keep the sensor at -20 degrees Celsius to minimize thermal noise. Fun fact: the noise in my CCD camera doubles for every 6 degrees C rise in temperature.
Collecting Photons
With all the necessary gear in hand, its time to select a target and wait for some clear nights. All known deep space objects are identified in one or more catalogs by a number. A catalog entry usually indicates the object’s magnitude (brightness), size and coordinates (RA and DEC).
On Target – After equipment setup and mount alignment, the first step is to put the telescope on the target. The mount is used to slew the telescope to the target coordinates (RA and DEC). Since no alignment is perfect, the telescope position needs to be dialed-in to frame the image properly. I use some software magic to help here. I capture a quick image of where the system thinks the target is and then have a plate solver program compare this image to a database of stars. When it finds a match, it updates the mounts alignment information and adjusts the telescope position. The process repeats if necessary. I follow this with additional, longer images so that I can compose the object in the frame as desired.
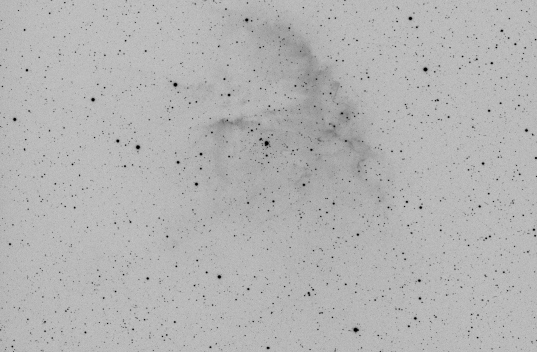
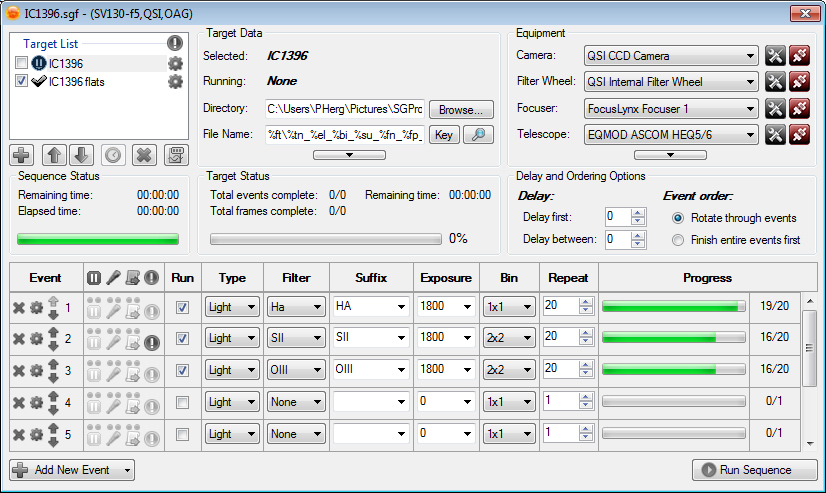
Image Capture – I normally collect about 20 subframes with each of the three filters to build a narrowband image. The subframes are combined in post processing for each color channel. Typically my narrowband subframes are exposed for 30 minutes. That ends up being about 30 hours of capture time over several nights to make one narrowband image. Fortunately there is some excellent sequencing software available that automates the capture process. Once it is up and running, I can go to bed.
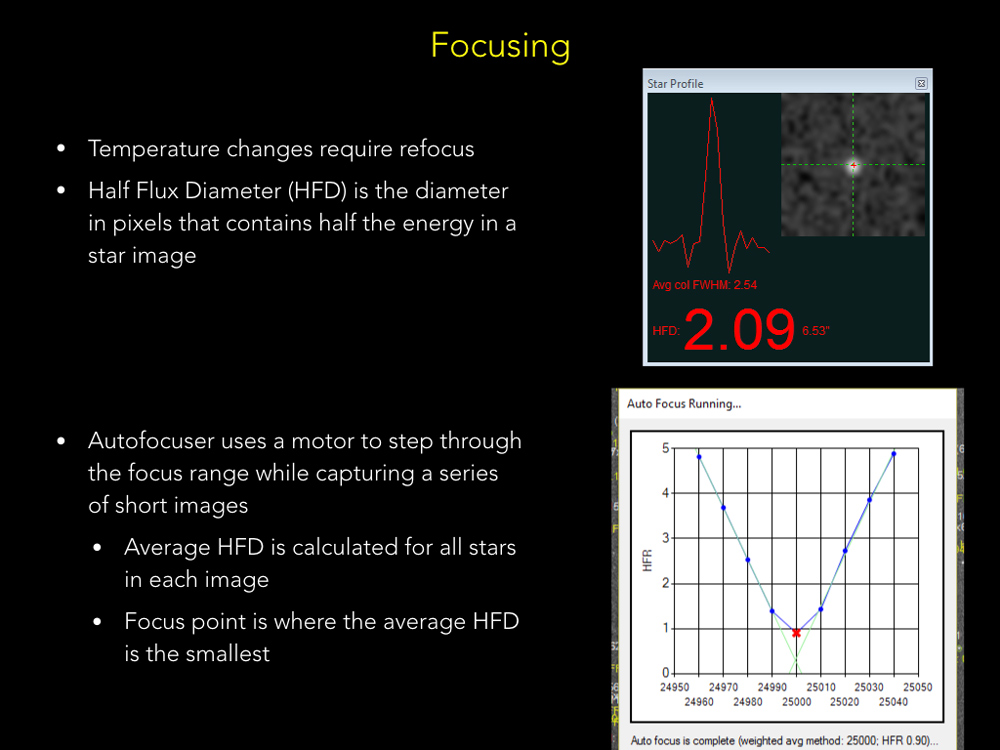
Focusing – As in other genres of photography, focusing is critical. The challenge here is that the focus can change during the exposure due to temperature changes and the resulting thermal expansion or contraction of the telescope tube. While little can be done during a subframe exposure, the system can automatically refocus between subframes if the temperature has changed. More software magic. The autofocusing software uses star image size to determine focus.
Guiding – While a properly aligned mount can keep an object in the field of view over several minutes, keeping the object stationary to within a pixel for a 30 minute subframe requires some special assistance. This comes in the form on an auto-guider consisting of a dedicated camera and more special software. The guiding software receives an image from the guide camera every 1-5 seconds and tracks the pixel location of a single star within the image. Both RA and DEC correction signals are fed to the mount to keep the star position stationary during the exposure.

Post Processing
With all the subframe images ‘in the can’, it’s time to break out the post processing software. Astro image processing software tends to have an extensive toolset designed for digging useful information out of the noise. This is generally application specific software but one can use general purpose tools such as Photoshop with astro add-ons.
The specific post-processing steps used to create the final image varies with the photographer, the type of image and even the target itself. This is where experience, skill and patience are all tested. What is common is that all astro imaging post processing starts in the linear mode, native to digital sensors, and transitions to a non-linear mode where our eyesight operates. The following are a summary of the steps I use for a typical narrowband astro image.
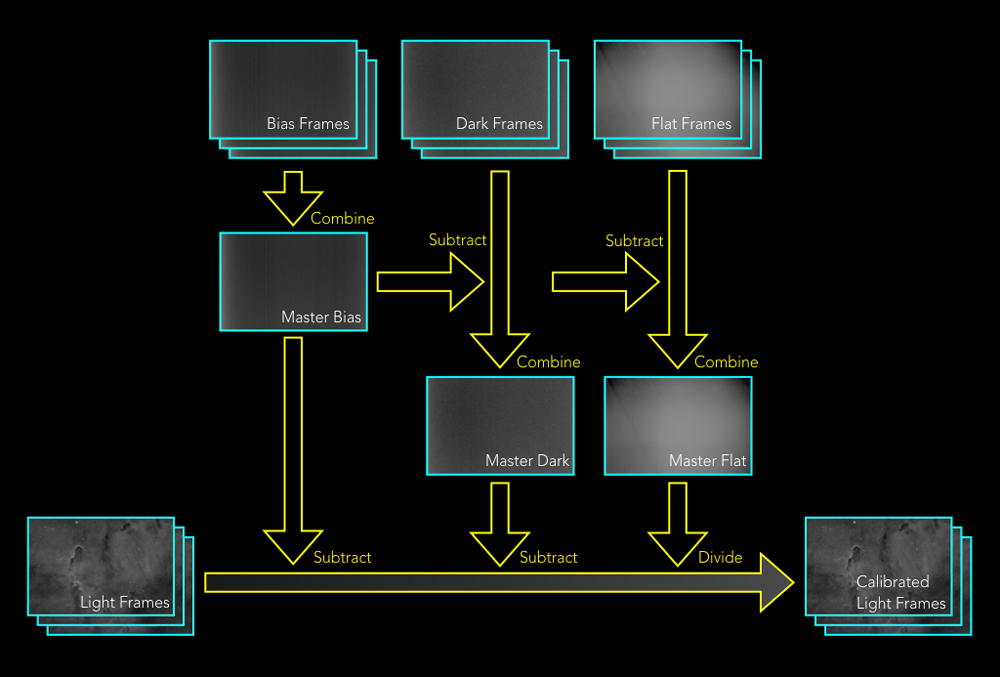
Calibration – Before the collected subframe images are ready for processing, they first need to to be calibrated or corrected for the imperfections of the data collection system. A set of calibration frames can be collected and used to address various system characteristics.
Bias Frames are short dark exposures (lens cap on) that are used to correct for predictable thermal and electronic noise created when reading the data out of the sensor. Fun fact: unlike with a CMOS sensor, data is read out of a CCD sensor after the shutter has closed.
Dark Frames are made using long dark exposures (lens cap on) and are used to correct for the noise that builds over the duration of the exposure. These frames must be made using the same exposure time and temperature as the light subframes made on the target.
Flat Frames are made by exposing the system to something that is evenly illuminated across the frame. This can be an LCD backlight panel or a T-shirt stretched across the telescope during dusk or dawn. Flat frames are used to correct for vignetting, dust shadows and filter imperfections found in the optical system and are collected for each color channel.
The calibration process is applied to each of the ‘light’ subframes in each color channel as shown below.
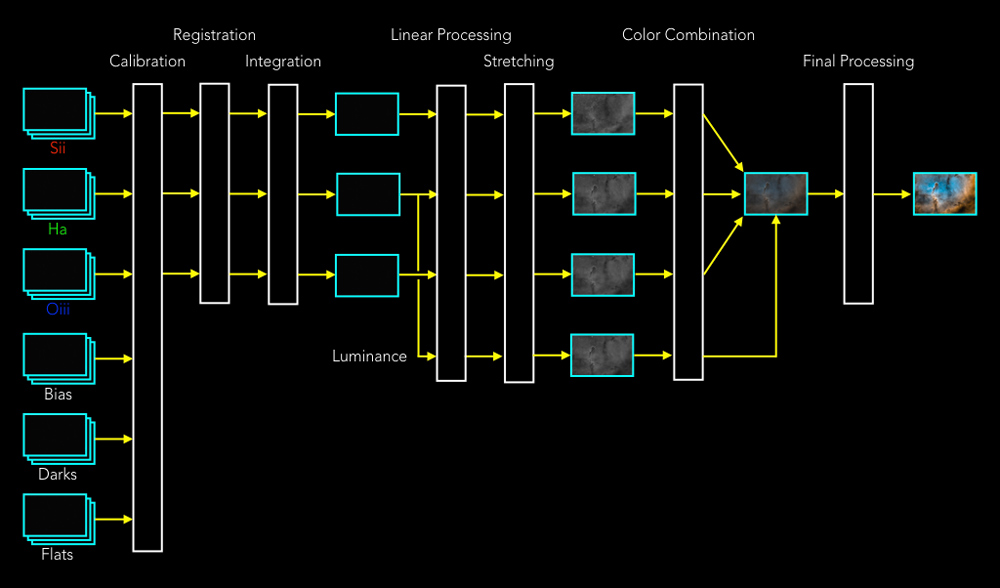
Registration – The registration process uses stars to align all the subframes to a reference subframe. The process uses both rotation and scaling to get the job done.
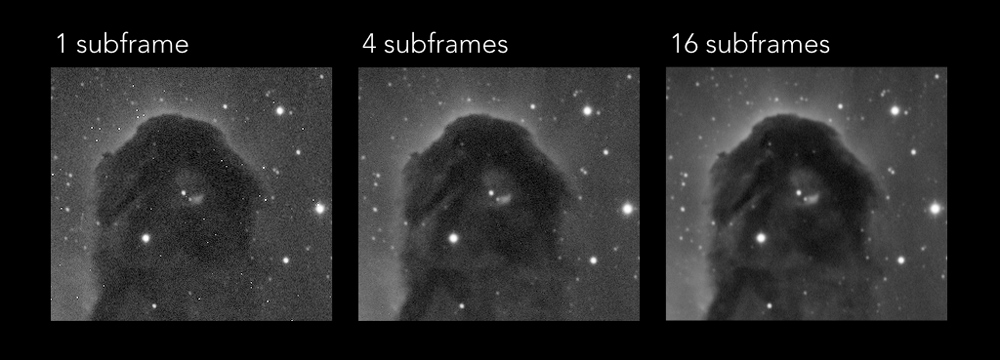
Integration – The integration process, aka stacking, combines the subframes together for each color channel. Various algorithms are used during this process to eliminate noise, bad pixels and unwanted artifacts such as satellite trails cutting through the frame. In the example photos below, you can see some ‘hot’ (always on) pixels in the single subframe eliminated through the stacking of multiple frames.
After the subframes in each channel are combined, a fourth luminance channel is created by duplicating the color channel with the most information. Typically for narrowband, this is the Hydrogen Alpha channel.
Linear Processing – Linear processing is used to enhance the images by further reducing noise, improving detail, and managing stars. Unfortunately stars are not points of light on an image. Their size can be quite different across the three color channels and must be managed to prevent concentric rings artifacts in the final image. This is the last processing performed while the images are in the linear mode.
Stretching – To convert each channel’s image into the non-linear form, a tonal curve stretching process is applied. This spreads the linear image’s information from down in the left side of the histogram across the histogram to where it becomes visible. Up to now, all the editing on the image has employed a temporary stretching tool for viewing the image.
Color Combination – This process maps the three color channels into RGB and adds in the luminance channel to enhance contrast. Getting the three color channels properly balanced prior to the combination is critical to outcome here.
Final Processing – These last steps are similar to what most photographers apply to their images…final cropping, detail enhancements, color correction, saturation tweaks and contrast adjustments. Often times I drop the image into Photoshop or even Lightroom for these edits.
Images
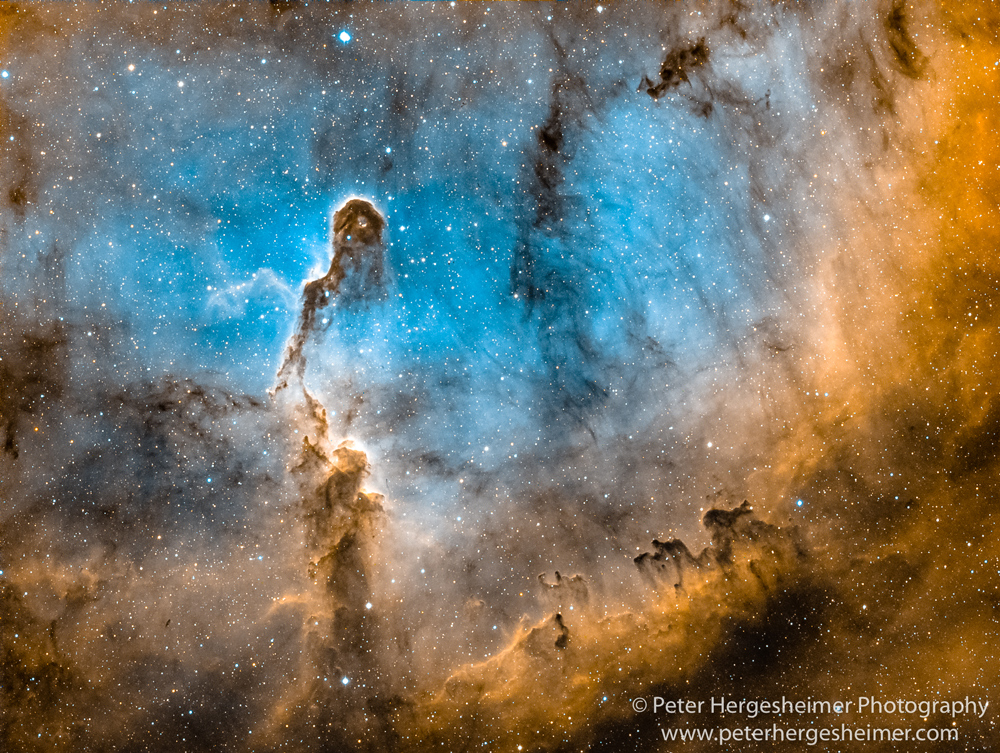
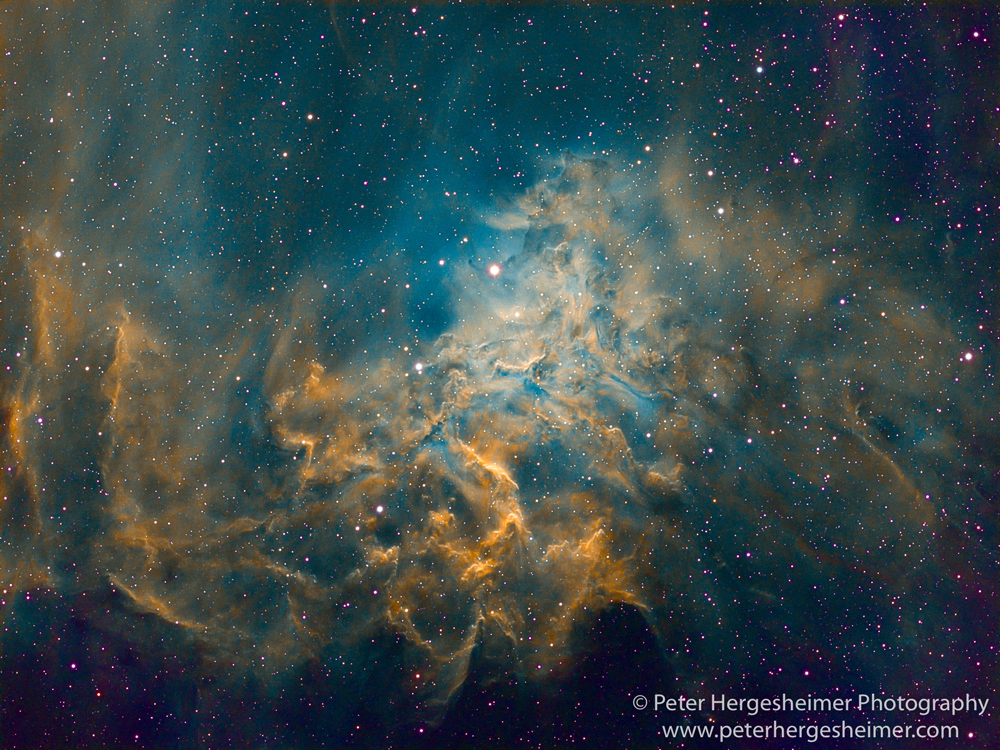
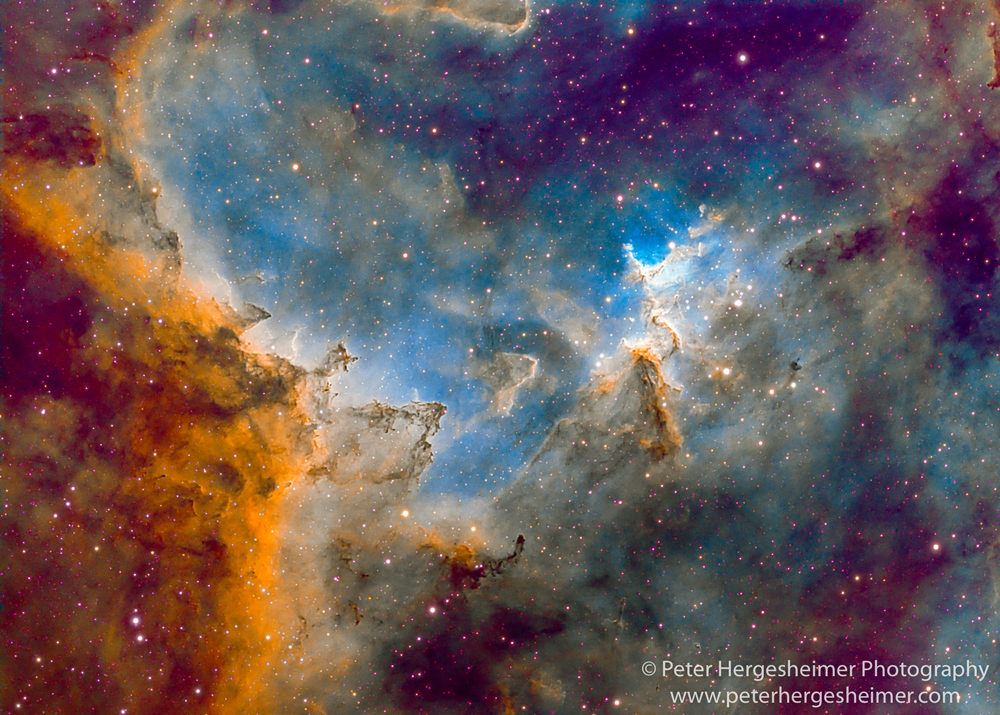
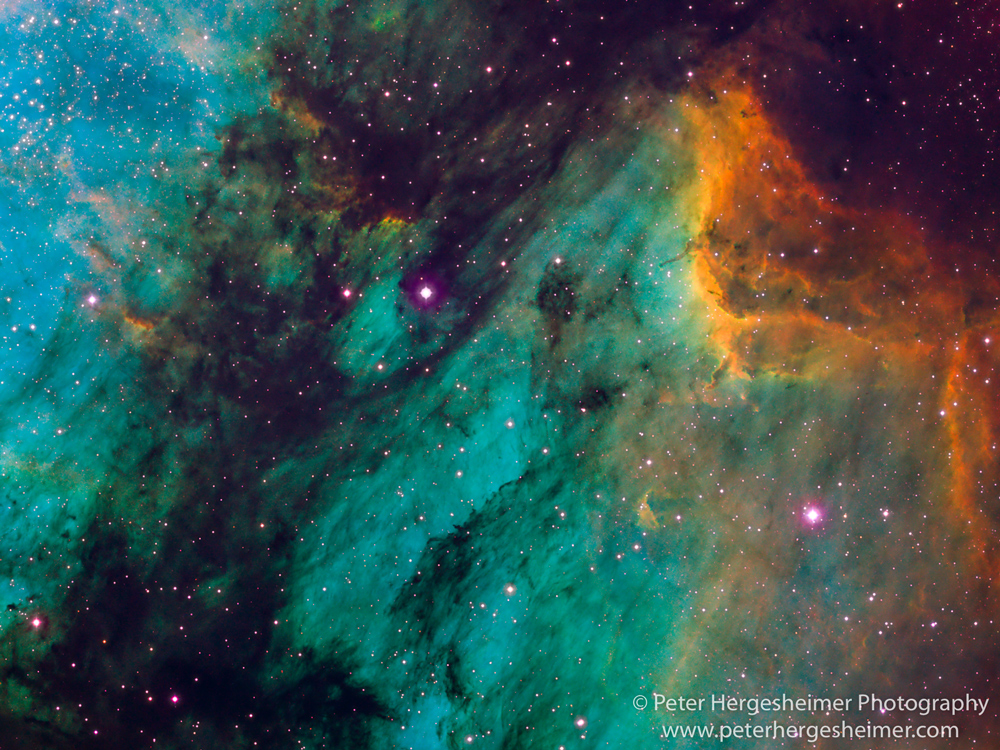
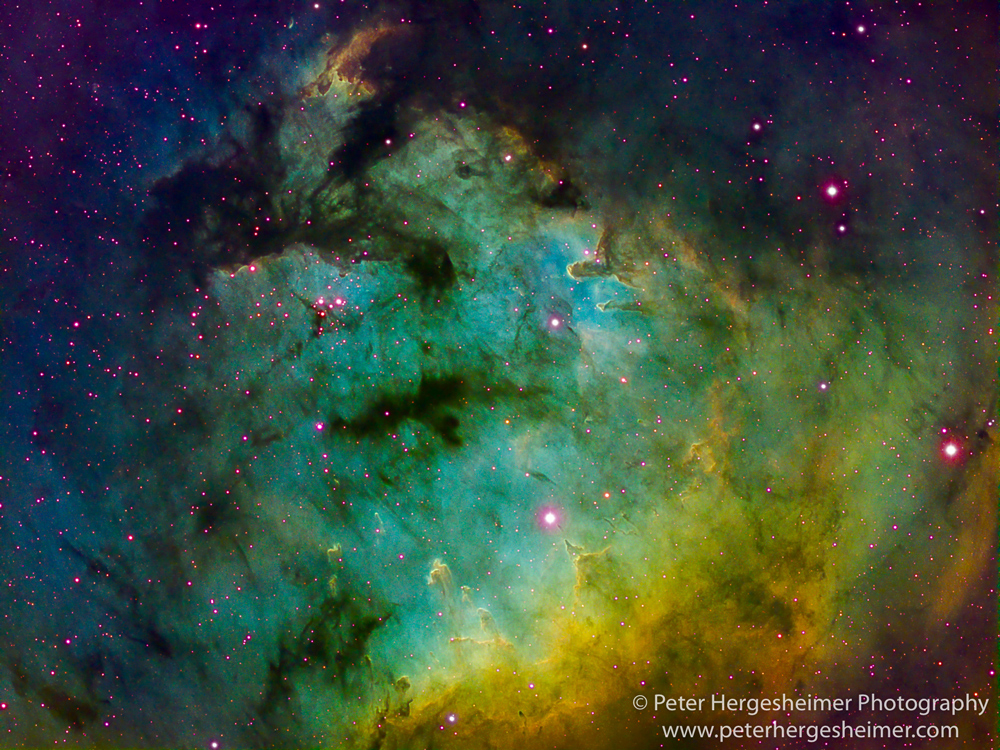
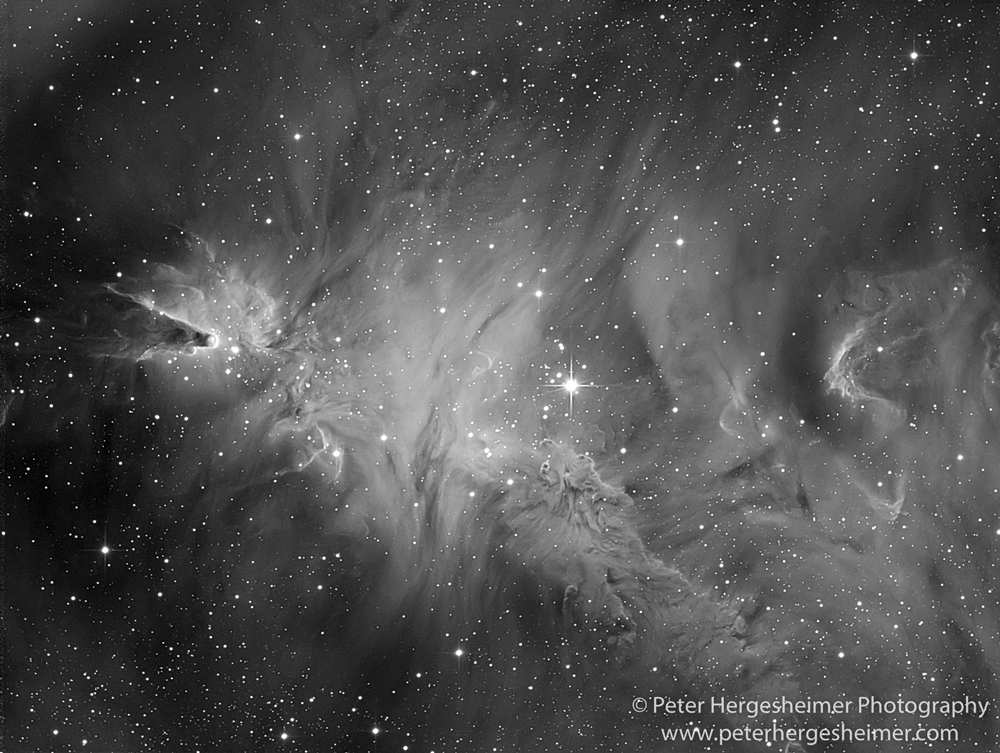
The following narrowband images were collected in my backyard.


Peter Hergesheimer
September 2019
Encinitas, California
Peter’s imagination was captured by astronomy and photography before he was 10 when he got his first telescope. This soon led to a darkroom and photo classes in high school. His profession went in another direction with degrees in Electrical Engineering and a career in wireless technologies spanning 40 years. He is the inventor on several patents and is currently the Principal Architect at a wireless company. Through much of his life, Peter has melded photography with many of his other interests, astronomy, SCUBA diving, backpacking, and travel. In addition to photography, Peter’s creative outlet includes performance on the saxophone, flute, and clarinet. Peter and his wife Beth live in the San Diego area and are frequently traveling these days with camera and tripod in hand. More and more, photography seems to determine the destination.