IM this post I’m gonna be showing you step by step how I built and painted the Italeri Sonderkraftzeug 10 with flak 30 that I used as the main focus in the France Diorama.
A little history..
The Sdkfz 10
The Sd.Kfz. 10 (Sonderkraftfahrzeug – special motorized vehicle) was a German half-track that saw widespread use in World War II. Its main role was as a prime mover for small towed guns, such as the 2 cm FlaK 30, the 7.5 cm leIG, or the 3.7 cm PaK 36 anti-tank gun. It could carry eight troops in addition to towing a gun or trailer.
Source: Wikipedia
The Flak 30
The Flak 30 (Flugabwehrkanone 30) and improved Flak 38 were 20 mm anti-aircraft guns used by various German forces throughout World War II. It was not only the primary German light anti-aircraft gun, but by far the most numerously produced German artillery piece throughout the war.[1] It was produced in a variety of models, notably the Flakvierling 38 which combined four Flak 38 autocannons onto a single carriage.
Source: Wikipedia
Building
For the SDKFZ10 I used an Italeri kit which was, like all Italeri kits I have ever built it was a tricky build. My experience with Italeri is never positive since all the kits I have tried are ill fitting and lacking in detail.
Specifically on this build I had several fit problems and had to use lots of putty and sanding to fill and smooth gaps, the grille supplied for the rear floor of the half-track wasn’t big enough to cover the area it should have, which I couldn’t believe! and some of the parts were so badly detailed I had to throw them away and make some new ones from scratch.
Luckily I enjoy fixing errors and building things from scratch so even if the kit is really mediocre I thoroughly enjoyed fixing its errors.
For the building part I made 7 sub assemblies, leaving them separated to make painting easier so I left parts such as wheels and tracks, which hide the bottom portion of the half-track seperate from the halftrack body making it easier to paint.
I also left the clear parts off of the model, that way I didn’t have to mask them.
I used the following order when making my model:
- Body and interior
- Tracks
- Wheels
- Ammo Trolley
- Flak 30
- Accessories
- Bumper with tow cables


As I said before, this part of the build was a little bit tedious because of the poor fit of the kit. Actually, in some images you can clearly see some errors on the moulding and gaps everywhere.
The Painting
 First of all I gave the model a layer of grey primer (I guess it was tamiya, I don’t really remember) followed by a preshade over the whole model applied with airbrush in an uneven way to make top layers look a little bit weathered and to add to the shading.

For this model I’ve chosen 2 different styles of paint, separating the bed of the half track from the main chassis and details. The Sonderkraftfahrzeug 10 was painted in a Standard bicolour 43+ camo pattern using Tamiya dark yellow XF-60 with airbrushed camofluage lines of Tamiya flat green XF-5 and leaving the cargo bay floor in Tamiya German grey XF-63, on the other hand the ammo trolley was simply painted in Tamiya German grey XF-5.
Once the camo was applied to the whole surface, trying not to paint the interiors or rear floor too much, I masked the edges of the camo arwa and the exterior parts to add a layer of Tamiya German Grey XF-63 to the floor, interiors, ammo trolley and back part of the flak 30, leaving the gun shield with camouflage.


The interior of the half-track was painted with a base of Tamiya German Grey XF-63 followed by some Tamiya Steel X-10 on the metal and chipping, and Tamiya XF-60 for the panels and then pinwashed with Dark Brown Oil.
For extra details I upholstered the seats with PVA and paper from a tissue in a “Sloppy” way so I got wrinkles all over the piece. Once the PVA was dried and paper was completely glued to the plastic I tore it a little bit in some spots to make the seat look like its been used quite a lot.
Finally the instrument panel decals were installed and varnished, unfortunately the decalls didn’t fit the space where they should have gone, so I had to cut the little pieces separately and install them one by one.
For final details I added some Oil stains to the floor with a wash of Tamiya Bronze X-33 applied in some spots.


The decal sheet is well-printed with vehicle number plate markings and divisional insignia for four vehicles:
- 7th Panzer Division, France 1940 in overall Schwarzgrau (RAL 7021)
- Fla-Btl. (Mot) 606, North Afrika 1942 in overall Afrika Braun (RAL 8020)
- Rgt. ”Herman Goring” Operation Barbarossa, July 1941 in overall Schwarzgrau (RAL 7021)
- Luftwaffe Unit attached to 11th Panzer Division, Russia, October 1941 in overall Schwarzgrau (RAL 7021)
 For my model I’ve chosen the 7th Panzer Division since I wanted it to be situated in France.
Once decals were installed I sealed the whole thing with a thin layer of Vallejo Matt Varnish 70520 Thinned with 96º Alcohol in 2 thin layers.
Weathering
For the weathering I first started by doing an Oil Dot Wash with Greens, yellows and red in order to give the piece a high tonal range and enhancing the yellow tone on it whilst unifying the whole paint job.


Once the wash was dried I started making some paint chips on the surface, this time I didn’t use the Hairspray technique I simply went for the brush and sponge method, trying to be delicate in some zones and more agressive in others to get a nice varied finish. This way I achieved areas with smaller chips in places where the finish was less likely to wear, and coarser chipping on the places that had more contact.
I also added some rust on desired spots with a really thinned mix of Galeria Burnt Sienna Acrylic thinned with water and finally a Dark Brown Pinwash all over the kits details in order to bring it out .


For the flak 30 Weathering I also added some pencil scratching over the floor and some edges to make it look more polished in some places since it was a place where soldiers stood more and got easily worn out.


Finally as the Flak 30 was installed on its base, I added the tracks and them a Light Brown Dry brush In some areas to make them look a little bit dirty, but not much, since the Half-truck is supposed to be parked in an urban place.
The Debris
Kar98
Well.. as I just can’t help myself and I like to add more and more stuff to every kit I do, on the SDKFZ10 I started by adding the 6 Kar98K rifles, replacing one of the for a sniper version of the same rifle I had from a Tamiya German weapons kit.
For painting these rifles I started with a base of Tamiya flat brown XF-10 followed by an Orange wash to make the wood look brighter and natural. The metals on the rifle were done by a darkened layer of Vallejo Steel and followed by some pure Vallejo steel on the edges to make them look polished.


Accesories and extra weapons
For adding some more items to the Half-truck I also added a couple of Stielgranates to the deck next to a M34 German helmet painted with half dried Tamiya Acrylics in order for it to look rougher and also painted a shield, freehand on the side.
On the drivers seat you can also find a Luger pistol from Tamiyas german weapons kit.


The Camo net
For the camo net I used an old piece of curtain which had a kind of hexagonal pattern in the weave, which I painted with Tamiya Flat Earth XF-52, I tied it to the half-track with a 1mm piece of rope, and glued on some leaves previously dried and punched with Greenstuffworld grey tool.
To install the Camo net I gently glued one by one layer of the material to the vehicle to make it look as if it had more weight that it actually did to add to the realism.


Misc
Finally for the map hanging on the door and the nazi flag I simply printed both on 80gsm paper with a laser printer, and here’s the trick:wet them first with pva so the paper starts acting like material, adding more weight to the paper and letting you fold it without making it wrinkled.
Once the piece of paper is wet enough to act like this but not to get torn or make the colours fade, start to glue them with superglue gently folding them to the shape of the model.

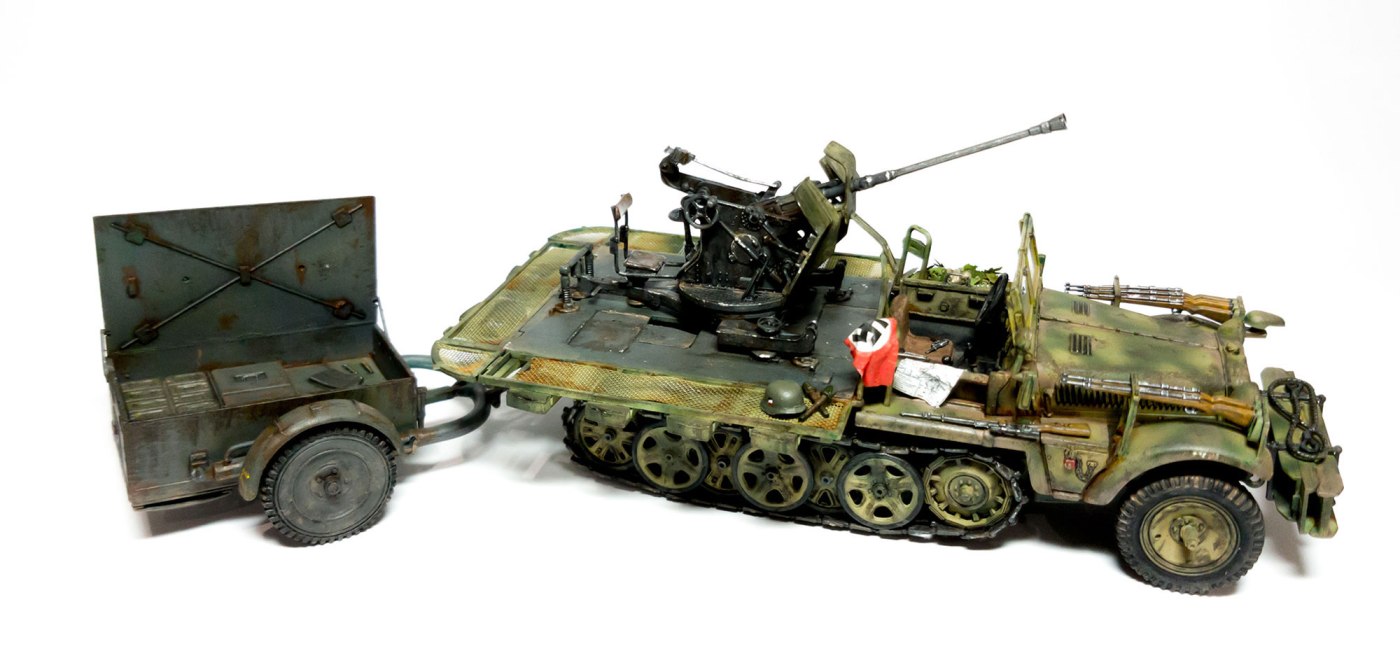
Here the final result:


I hope you like it
For any questions feel free to contact me

Leave a comment