Tag Archives: Yves St-Claude pipes

New Life for an Yves St. Claude French Connection 83 White Stemmed Bent Billiard


Blog by Steve Laug

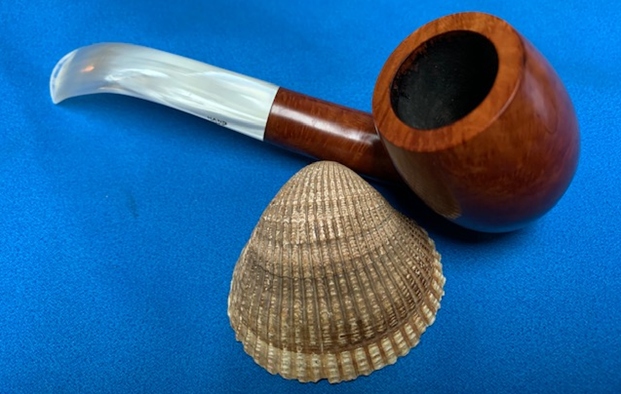
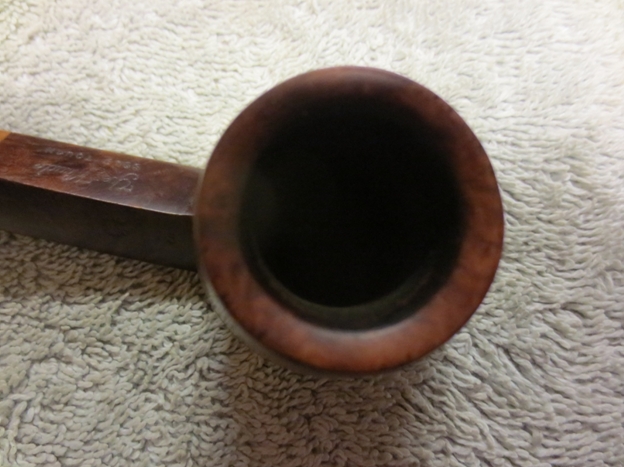
The next pipe on the work table came to us from an online auction in Ottawa, Illinois, USA. It is a nice looking smooth bent billiard with a white pearlized bent stem. It had a mix of nice grain around the bowl and shank. It has a taper variegated silver acrylic military bit stem. The shank and the stem have and inset black bar that makes aligning the stem and shank a simple proposition. The finish on the bowl is in great condition with a coat of shiny varnish over the light tan coloured stain that makes the pipe shine. The pipe has some grime on the surface of the briar. This pipe is stamped on the left side of the shank and reads Yves St. Claude [over] French Connection. On the right side of shank it has the shape number 83 followed by the Made in France circular COM stamp. There was a stylized YSC stamped on the left side of the shank. The pipe is lightly smoked with no cake in the bowl and minimal tars and oils in the stem airway. There were some very light tooth marks and chatter on both sides of the stem near the button. The pipe is in excellent condition. Jeff took photos of the pipe before he started his cleanup. He took photos of the rim top to show the condition of the top and edges of the bowl. It is a beautiful lightly smoked pipe with a carbonized bowl coating. The stem had light tooth marks and chatter on both sides ahead of the button. 
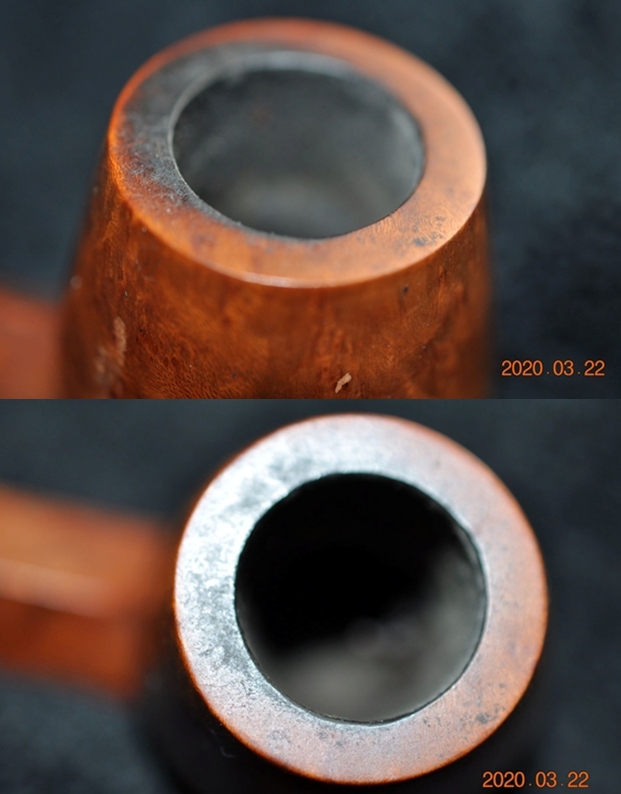
He took photos of the sides and heel of the bowl to show the grain around the bowl and the condition of the pipe. It is a great looking pipe.   
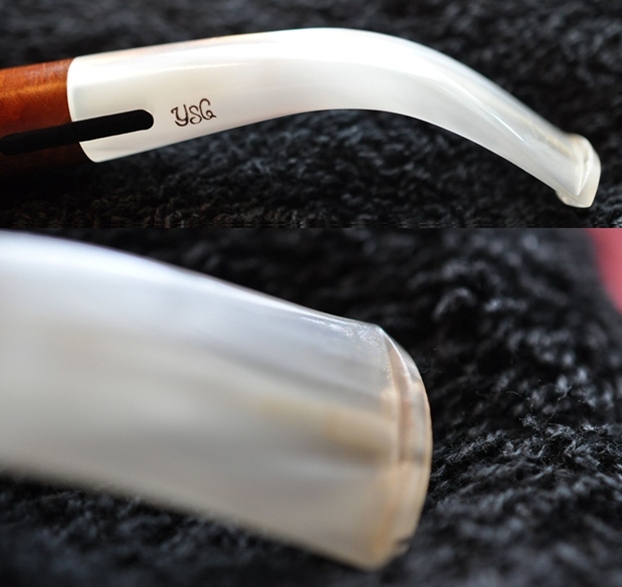
He took photos of the stamping on the sides of the shank. It is clear and readable as noted above. He also took photos of the YSC stamp on the left side and Hand Cut on the right side of the taper stem. I turned first to a blog I had written on the restoration of previous YSC pipe that I received (https://rebornpipes.com/2020/04/23/next-on-the-table-an-yves-st-claude-marbre-75-bulldog/).

In the previous blog that I cited above I had found several references to Yves Grenard, trained in Comoy’s England factory, purchasing the Chacom plant in St. Claude. He managed the factory and it passed on to his son afterward. I am pretty certain that this Yves St. Claude pipes was made by Chacom in France with the stamping bearing Yves name.

I turned back to Pipephil’s site to have a look at what was listed there and did a screen capture of the section (http://www.pipephil.eu/logos/en/logo-y.html).I turned to Pipedia and in the listing of French Brands and Maker I found a connection of the brand to Chapuis-Comoy and that the YSC brand was made primarily for Tinder Box (https://pipedia.org/wiki/French_Pipe_Brands_%26_Makers_U_-_Z). I followed that up by turning to the Chapuis-Comoy article from Pipedia (https://pipedia.org/wiki/Chapuis-Comoy).

French factory, in St. Claude. It began with Francois Comoy who, in 1825, was making pipes in boxwood and other types, as well as in clay, for the armies of Napoleon. In 1856, the Comoy factory was the first to produce briar bowls at St. Claude. In 1870, Francois’s grandson, Henri Comoy (1850-1924) was taken prisoner in Switzerland whilst serving in the French army during the Franco-Prussian war, where he found his cousins, the Chapuis. This meeting produced the idea of an association, which only became a reality in 1922, with the creation of Chapuis-Comoy. After Henri’s death, his sons Paul and Adrien, took over the company with the support of their cousins, Emile and Louis Chapuis Sr., and in 1928 they created the Chacom brand.

In 1932, due to the economic crisis at Saint-Claude, the factory merged with La Bruyère, adopting that name, and becoming one of the biggest pipe companies in the world, with 450 workers. Louis Chapuis Jr., joined the company in 1938 and Pierre Comoy in 1947. The name Chapuis-Comoy returned in 1957 (125 workers), due to the success of the Chacom brand in France. In 1971, the London factory (see Comoy’s) became independent, and Yves Grenard, second cousin to Pierre, took over Saint-Claude, and is still running it. Between 1987 and 2001, the factory, which employed over 40 people, joined the Cuty-Fort Enterprises SA holding and, in 1994, included the Ropp brand it its catalog.

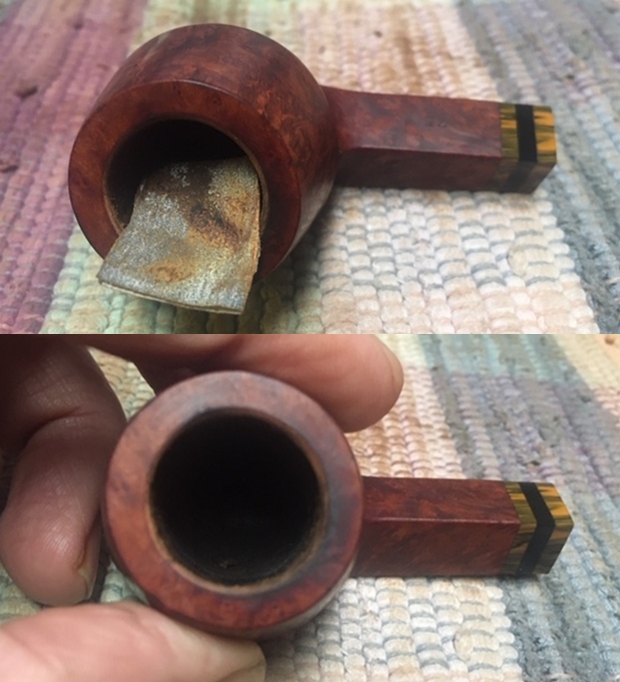
Reminded about the Chacom connection for the YSC brand it was now time to turn to the pipe itself and do my part of the work. As usual Jeff had done a thorough cleanup on the pipe. He reamed the bowl with a PipNet pipe reamer and followed up with a Savinelli Fitsall pipe knife to remove the cake. He scrubbed out the mortise and the airway in the shank and the stem with alcohol, cotton swabs and pipe cleaners. He scrubbed the exterior of the bowl, rim, shank and stem with a tooth brush and Murphy’s Oil Soap to remove the oils and tars on the rim and the grime on the finish of the bowl. He rinsed it under running water. One of the benefits of this scrub is that it also tends to lift some of the scratches and nicks in the surface of the briar. He dried it off with a soft cloth. He cleaned the internals and externals of the stem with alcohol, pipe cleaners and cotton swabs. He soaked the stem in Before & After Deoxidizer and rinsed it off with warm water and cleaned out the airway in the stem with alcohol. Other than the damaged rim top the pipe looked good.   
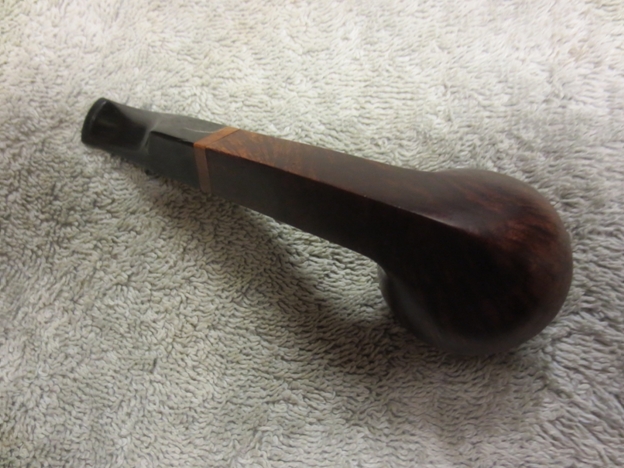
I took a photo of the rim top and stem to show the condition. The rim top and the inner edge of the bowl were in excellent condition. The acrylic taper stem had light tooth chatter and marks on both sides ahead of the button and on the button edges. 
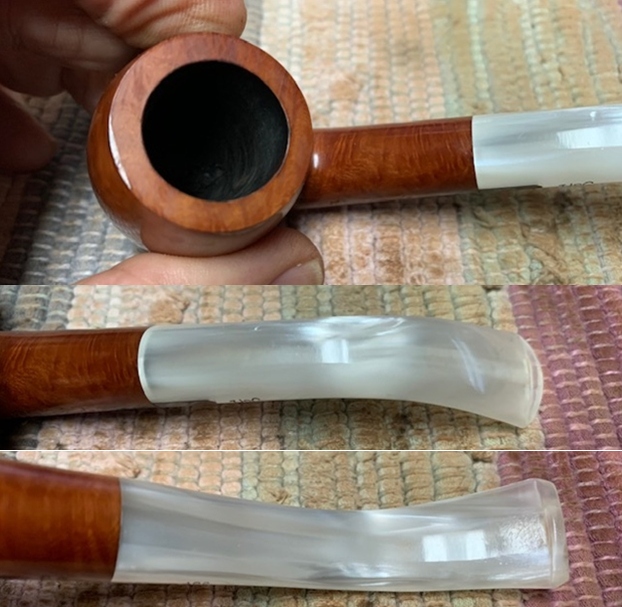
The stamping on the sides of the shank is clear and readable as noted above.
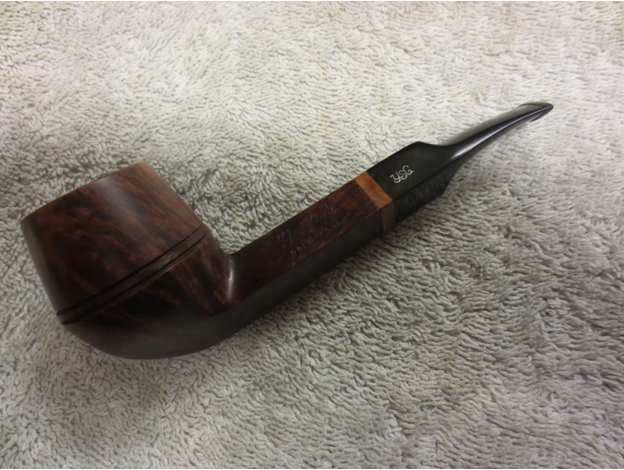
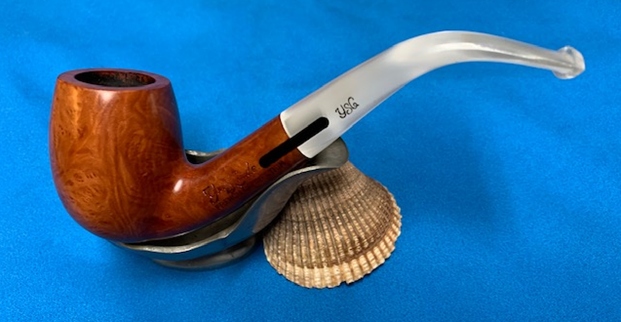
I removed the stem from the shank and took a photo of the pipe to give a sense of the whole. It is a nice looking bent billiard in great condition.
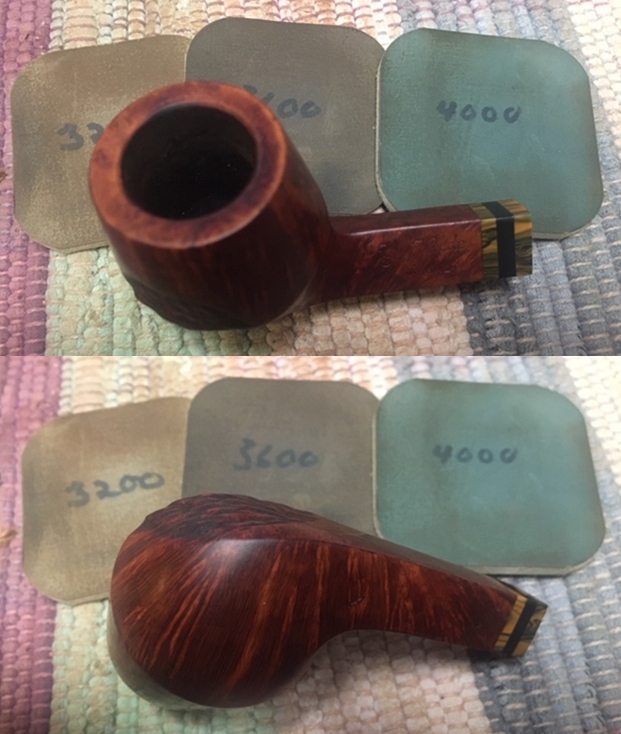
I started working on the pipe by removing the varnish coat as it had some bubbling on the rim top. I had to remove it from the entire pipe not just the rim top to get an even coverage when I waxed it. I sanded it with micromesh sanding pads, wet sanding with 1500-12000 grit sanding pads and wiping it down with an alcohol dampened pad after each sanding pad. I rubbed the bowl and shank down with Before & After Restoration Balm. I worked it into the surface of the bowl sides and shank with my fingertips to clean, enliven and protect the briar. I let the balm sit for a little while and then buffed with a cotton cloth to raise the shine. The Balm did its magic and the grain stood out.    
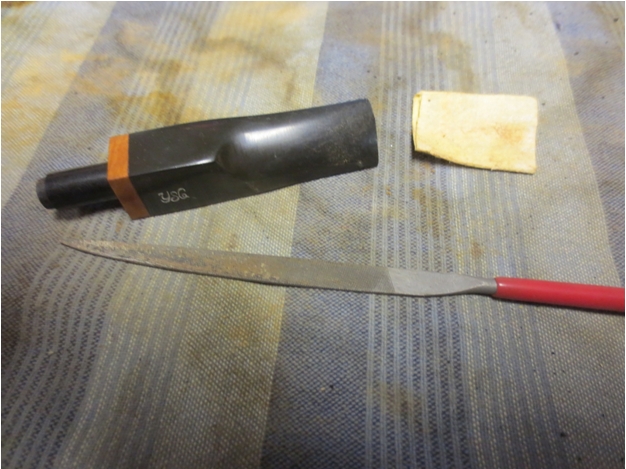
I set the bowl aside and worked on the stem. I sanded out the tooth marks with 220 grit sandpaper and started polishing the stem with 400 grit wet dry sandpaper.  
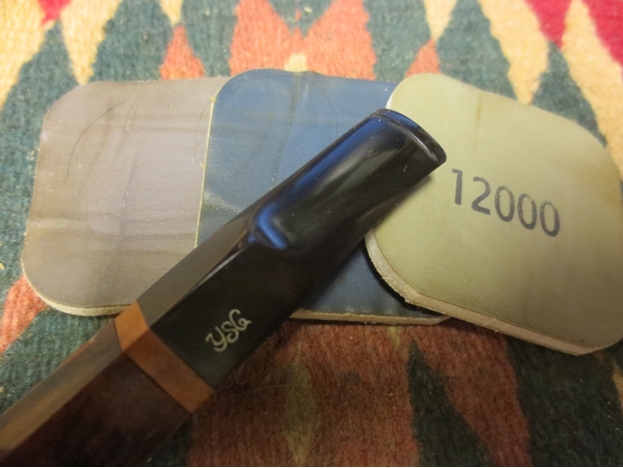
I polished the acrylic stem with micromesh sanding pads – 1500-12000 grit pads. I wiped it down with Obsidian Oil after each sanding pad. I used Before & After Pipe Polish – both Fine and Extra Fine to further polish the stem. The photo below shows the polished stem. 
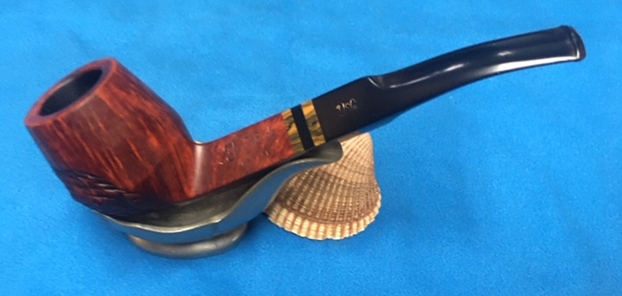
This nice smooth finished Yves St. Claude French Connection 83 with a white acrylic taper stem is a great looking pipe. The rich medium brown finish and the white stem work really well together. The briar is clean and really came alive. The rich medium brown stain gave the grain a sense of depth with the polishing and waxing. The grain really popped. I put the acrylic stem back on the bowl and carefully buffed the pipe with Blue Diamond on the buffing wheel using a light touch on the briar. I gave the bowl and the stem multiple coats of carnauba wax on the buffing wheel. I buffed the pipe with a clean buffing pad to raise the shine. I hand buffed the pipe with a microfiber cloth to deepen the shine. The finished YSC French Connection Bent Billiard is a beauty and feels great in the hand and looks very good. Give the finished pipe a look in the photos below. The dimensions of the pipe are Length: 5 ½ inches, Height: 2 inches, Outside diameter of the bowl: 1 ¼ inches, Chamber diameter: ¾ of an inch. Thanks for reading this blog and my reflections on the pipe while I worked on it. There are many more to come!

Next on the Table – an Yves St Claude Marbre 75 Bulldog


Blog by Steve Laug

The next pipe on the table is an interesting Bulldog without the twin rings. It has the shape and no rings. It also has a combination finish of rustication on the left side of the owl and a smooth finish on the rest of the pipe. The shank has a three layered extension with some missed Tiger’s eye looking material separated by a centre band of black acrylic. The pipe is stamped Yves St.Claude MARBRE on the left side of the shank and on the right side it has the shape number stamp 75. On the right underside it is stamped Made in France in a circle similar to the Comoy’s Made in England Stamp. “Made” and “France” make up the outside of the circle and “in” is in the centre. On the left side of the saddle stem it bore a script stamp that read YSC. I have worked on two Yves St. Claude pipes in the past and have included the links to those two blogs if you want to check them out (https://rebornpipes.com/2017/06/17/refurbishing-an-yves-st-claude-glacier-80-bent-billiard/) and (https://rebornpipes.com/2015/02/04/cutting-off-a-broken-stem-and-reshaping-the-stem-on-an-yves-saint-claude-bulldog/).

The finish was tired and dirty but looked pretty good under the grime. There were dings and scratches that cut deeply into the sides of bowl on both sides. On the lower right side of the bowl and shank there was small sandpit. The outer edge of the rim looked very good. The rim top and inner edge had a buildup of tars and oils. The inner edge appeared to be damaged and slightly out of round. The bowl had a thick cake. The stem was oxidized and there was tooth chatter and marks on both sides near the button. The button edge also has some damage. Jeff took the following photos of the pipe before he started his cleanup work. The photos of the rim top and bowl show the thick cake, tobacco debris and thick lava overflow on the rim top. The pipe was a mess. You can also see some chipped areas on the outer edge of the bowl and nicks in the sides of the bowl. He captured the grain and the rustication around sides of the bowl in the next photos. You can also see the nicks in the briar but it is still quite pretty beneath the wear and tear and grime! He took photos of the stamping on the shank sides. They are clear and readable and read as noted above. The vulcanite stem was in good condition other than the tooth marks on the surface of both sides ahead of the button and some wear on the button as well. In the previous blogs that I cited above I had found several references to Yves Grenard, trained in Comoy’s England factory, purchasing the Chacom plant in St. Claude. He managed the factory and it passed on to his son afterward. I am pretty certain that this Yves St. Claude pipes was made by Chacom in France with the stamping bearing Yves name.

Reminded about the Chacom connection for the brand it was now time to turn to the pipe itself and do my part of the work. Jeff had done his usual thorough cleanup and the pipe looked very good. The grain was quite nice and the colour was very good. The grain even stood out in the unique rustication pattern on the left of the bowl. Jeff had reamed the bowl with a PipNet pipe reamer and cleaned up the debris left behind with a Savinelli Fitsall Pipe Knife. He scrubbed the internals in the shank and the stem with alcohol, cotton swabs and pipe cleaners. He scrubbed the externals of the bowl with undiluted Murphy’s Oil Soap and a tooth brush and rinsed it off with running water. He scrubbed the stem with Soft Scrub and soaked it in Before & After Deoxidizer. I took photos of the pipe before I started my part of the restoration. I took a close up photo of the rim top to show the damaged areas and how clean it was. You can see damage on the back and right inner edge of the rim. There appeared to be some burn damage and darkening. The stem looked good other than some remaining oxidation and some tooth marks and light chatter on the surface ahead of the button.I took photos of the stamping as well at this time to show how well they cleaned up and how readable they are.I took the stem off the shank and took a photo of the parts. It is another great looking pipe.I decided to start on the beveled inner rim edges of the rim top. I sanded the beveled edge with a piece of folded 220 grit sandpaper to smooth out the damaged edges and removing the darkening. The rim top also looks much better and will improve with polishing.I decided to address the large flaw on the underside of the shank next. I filled it in with briar dust and clear super glue. When the repair cured I sanded it smooth with 1500 grit micromesh and blended it into the surrounding briar. It looks a lot better to me at this point. I polished the bowl and rim with micromesh sanding pads – dry sanding it with 1500-12000 grit sanding pads. I wiped it down with a damp cloth to remove the dust left behind from sanding. I buffed bowl on the wheel with Blue Diamond to polish the briar and bring the grain out. I rubbed it down with Before & After Refurbishing Balm. I worked it into the briar with my fingertips and let it sit for 20 minutes. The Balm works to preserve, protect and enliven the briar. The pipe is starting to look very good at this point. I set the bowl aside and turned my attention to the stem. I sanded out the tooth marks and chatter remaining on the stem with 220 grit sandpaper and followed that by starting the polishing with 400 grit wet dry sandpaper.I continued polishing the stem with Denicare Mouthpiece Polish – a red gritty paste that feels a lot like Tripoli. I find that it works well to polish out some of the more surface scratches in the vulcanite left behind by the 400 grit wet dry sandpaper. I rub it into the stem surface with my fingertips and buff it off with a cotton pad.I used Antique Gold Rub’n Buff to touch up the stamping on the stem. I applied a spot of the product on the surface and worked it into the stamping with a tooth pick. I rubbed it off and buffed it with a soft cloth. The finished look was very good.I polished the stem with micromesh sanding pads – dry sanding with 1500-12000 grit sanding pads. I wiped the stem down after each sanding pad with a cloth containing some Obsidian Oil. I finished polishing it with Before & After Pipe Stem Polish – both Fine and Extra Fine and buffed it off with a cotton cloth. This Yves St. Claude pipe, made by Chacom in France is a great looking pipe. The combination of finishes on the bowl works well with the shape of the pipe. This Chacom like take on a Bulldog is quite interesting and unique. I put the bowl and stem back together again and buffed the bowl and the stem with Blue Diamond on the buffing wheel. I lightly buffed around the rustication so as not to fill in the grooves. I gave the bowl and the stem several coats of carnauba wax. I carefully buffed the entire pipe with a clean buffing pad to raise the shine. I finished buffing with a microfiber cloth to deepen the shine. The finished pipe looks very good. The grain is quite beautiful a mix of cross flame, straight and birdseye grain around the bowl sides and the rim top and heel. The pipe feels great in the hand. It has an interesting shape that fits well in either the right or left hand. The finished Yves St.Claude Bulldog is shown in the photos below. The dimensions of the pipe are Length: 5 ¾ inches, Height: 2 inches, Outside diameter of the bowl: 1 ¼ inches, Chamber diameter: ¾ of an inch. This great looking pipe turned out very well. It should be a great pipe. It will be going on the rebornpipes store shortly if you are interested in adding it to your collection. Thanks for reading this blog and my reflections on the pipe while I worked on it.

Refurbishing an Yves St. Claude Glacier 80 Bent Billiard


Blog by Steve Laug

The next pipe I chose to work on today was one that came from the friend of mine who has the pipe shop. He had been given a large number of pipes from a customer’s estate to sell and he had given them to me to clean up. This one is a rusticated billiard that has a slight upward bend to the shank and a Lucite stem with a ¼ bend. It was stamped on the underside of the shank Yves St. Claude in script over Glacier. Next to that it was stamped with a COM circle that read Made in France. At the end of the shank near the stem/shank junction it is stamped with the shape number 80. The finish was very dirty and almost lifeless looking. The striated rustication was well done but the grooves were all filled with grit and grime. The bowl had a light cake and the rim had some darkening and tar on the back side. The stem had some light tooth chatter but no deep tooth marks. The variegated yellow/gold stem went well with the rustication.In searching the web I found several references to Yves Grenard, trained in Comoy’s England factory, purchasing the Chacom plant in St. Claude. He managed the factory and it passed on to his son afterward. I am pretty certain that this Yves St. Claude pipes was made by Chacom in France with the stamping bearing Yves name.I took a close up photo from the top looking into the bowl to show the light cake in the bowl and the darkening to the back side of the rim. The rim top is a bit oddly shaped in that the back outer edge of the bowl slightly flattened and then rusticated over the top of the shape. I also took photos of the chatter on both sides of the stem at the button. I sanded out the tooth chatter with 220 grit sandpaper and it did not take much to smooth out the marks. There were also some marks left behind from when the stem had originally been bent that sanded out quite easily.I scrubbed the bowl with undiluted Murphy’s Oil Soap and a tooth brush to remove the grime. I used a brass bristle brush with the soap on the rim surface to remove the darkening and tars. I rinsed the bowl under warm water to remove the soap and grime. I took photos of the cleaned bowl and included them below. I decided to use a dark brown aniline stain thinned with isopropyl by 50% to make it more of a translucent medium brown. The colour once it was dried, buffed and polished would really look good with the yellow stem. I applied the stain, flamed it and repeated the process until I was happy with the coverage.There were some thick, hard tars on the inside of the mortise walls so I scraped them out with a dental spatula. Afterwards I cleaned out the mortise and the airway in the shank and stem with alcohol, cotton swabs and pipe cleaners. I worked on the stepped tenon with alcohol and cotton swabs to remove the darkening at that point. I wiped down the outside of the stem with a damp pad. I used white acrylic paint to fill in the YSC stamp on the left side of the saddle. Once the paint dried I scraped the excess off and polished it with 1500-2400 grit micromesh sanding pads.I polished the Lucite stem with micromesh sanding pads – wet sanding with 1500-2400 grit pads and dry sanding with 3200-12000 grit pads. I wiped the stem down with the damp pad between each set of three pads. I put the stem on the pipe before taking the photo of the stem after I had finished sanding with the last three pads. The new stain looked really good with the yellow Lucite stem. The contrast worked really well on my opinion.I buffed the stem and bowl lightly with Blue Diamond polish on the buffer. I gave the bowl multiple coats of Conservator’s Wax and buffed it with a shoe brush. I gave the stem multiple coats of carnauba wax. I buffed the entire pipe with a clean buffing pad to raise a shine and finished by hand buffing it with a microfibre cloth to deepen the shine. The finished pipe is shown in the photos below. The dimensions of the pipe are, Length: 5 ½ inches, Height: 1 5/8 inches, Outer bowl diameter: 1 3/8 inches, Chamber diameter: 7/8 inches. The pipe has been thoroughly cleaned and prepared for the next pipeman who wants to add it to their rack. I will be putting on the rebornpipes store shortly but if you want it email me at slaug@uniserve.com or send me a message on Facebook. Thanks for looking.


Cutting off a broken stem and reshaping the stem on an Yves Saint-Claude #75 Bulldog


Blog by Steve Laug

yvessaintclaude2aIn the gift box of pipes I received (shown below) there was one pipe that kept calling out to me to have a look and see what I could do with it. It is shown in the photo below – it is the bulldog in the bottom right corner. It is stamped Yves St.Claude GOLD TOUCH on the left side of the shank and on the right side it has the shape stamp 75 and Made in France in a circle similar to the Comoy’s Made in England Stamp. “Made” and “France” make up the outside of the circle and “in” is in the centre. On the stem it bore a script stamp of YSC and also a light golden coloured wooden stem adornment. I think this is the “Gold Touch”. I have done a bit of research on the net and have found several other examples of the Gold Touch and all have had this wooden stem adornment. The stem was broken off at an angle from the button forward about one inch.boxadditions In searching the web I found several references to Yves Grenard, trained in Comoy’s England purchasing the Chacom plant in St. Claude. He managed the factory and it passed on to his son afterward. I am pretty certain that this Yves St. Claude pipes was made by Chacom in France with the stamping bearing Yves name.

I took the pipe to my worktable and took the following photos. They are a little dark but give a pretty clear picture of the condition of the pipe. The finish was clean but had a lot of damage. There were dings and scratches that cut deeply into the sides of bowl on both sides. On the right side there were vertical scratches on the bowl. The centre of the two rings had several places where it was chipped and damaged. The outer edge of the rim had dents on it from tapping the pipe out on hard surfaces. The top of the beveled rim had a build up of tars and oils. The inner edge was clean and undamaged. The bowl was quite clean and did not need reaming. The stem had light oxidation but the major problem with the stem was that it was broken. The bottom edge of the diamond stem had several cuts and dents in the vulcanite that would be a challenge. I would need to decide what to do with it – should I cut it back and reshape it or replace it with another saddle stem. The problem with replacing it would be that I would lose the stamping on the saddle and the nice wood stem adornment. Shortening it would not be hard to do but I was not sure what it would look like. So I was faced with a decision.YSG1

YSG2

YSG3

YSG4 The next two photos are close up shots of the stem to show the damage. The first photo is the underside of the broken stem and the second is the top side.YSG5

YSG6 I scrubbed the bowl with acetone on cotton pads to remove the finish and grime from the surface of the bowl. I wanted to have a clean surface to work with when I repaired the deep scratches on the sides of the bowl and also the damaged ring around the bowl.YSG7

YSG8

YSG9 I scrubbed it until the bowl and rim were clean. I filled the deep scratches and sharp edged dents with clear super glue and then sanded them until they blended into the surface of the bowl. Once I had sanded them down they virtually disappeared into the grain. This was one of those times that the patches literally disappeared into the briar. The next photos show the bowl stripped of its finish and cleaned and repaired.YSG10

YSG11

YSG12

YSG13 I decided to cut back the stem and reshape it. I figured that if it did not look right I could make a new stem. I used my Dremel with a sanding drum to cut away the damaged portion of the stem. I took it back until the remaining stem was solid and the damage was gone. Fortunately the airway was absolutely centered in the stem. Once I had it cut off I kind of liked the look of the shorter stem and I thought that I could reshape it so that it would look natural. It reminded me of some of my older WDC bulldogs that had an elongated shank with a short stem. I think that it works because of the wooden stem adornment which gives the shank a longer look.YSG14

YSG15

YSG16

YSG17 Below I have included a photo of the entire pipe with the shorter stem to show the new look. I like it!YSG18 I decided to stain the pipe bowl and set it aside to dry while I worked on the stem. I use an old candle stand with a wine cork that fits into the bowl of the pipe as a drying stand for the bowl. It works very well to keep all surfaces exposed to the air. I used a walnut aniline based stain to bring out the grain on the bowl.YSG19

YSG20

YSG21

YSG22 While the bowl was drying I turned my attention to cutting a new button on the stem. I use several needle files in the process followed by a folded piece of 220 grit sandpaper to work the new sharp edge. I start with a knife blade needle file and use the straight edge to define the line of the button. Once that is done I use the curved edge to carve away the surface of the stem ahead of the new button line. I continually refine the sharp edge in the process with a flat rectangular blade needle file that has a straight edge. It does not have the teeth to cut the edge at the beginning like the first file.YSG23

YSG24

YSG25 Once I have the general button cut I sand the stem surface with the 220 grit sandpaper folded. I use the folded edge to get right up against the new button. I work the sandpaper to get rid of the file marks. The next two photos show the newly shaped button and the smoothed out stem surface.YSG26

YSG27 I then worked on the slot in the button. For this I use three different needle files – a flat oval, an oval and a round file. I work them interchangeably as I open and flair the airway. I start with the flat oval to spread out the opening and the other two to widen the gap.YSG28

YSG29

YSG30 Once the slot was opened I used a folded piece of 220 grit sandpaper to shape the edges and to smooth out the opening of the oval slot.YSG31 Once the slot is opened and smooth I sand the stem with a medium and a fine grit sanding sponge to further shape the stem and also to remove the scratches.YSG32

YSG33 I then used my usual array of micromesh to sand and polish the stem. I wet sanded with 1500-2400 grit sanding pads and dry sanded with 3200-12,000 grit pads. I rubbed the stem down with Obsidian Oil between each set of three pads. After the 12,000 grit pad I rubbed it down a final time and let the oil soak into the vulcanite.YSG34

YSG35

YSg36 I buffed the stem with White Diamond and then gave the bowl and stem multiple coats of carnauba wax. I buffed it with a soft flannel buff to raise the shine. YSG37

YSG38 The finished pipe is shown in the photos below. I like the shortened stem and how it looks on the pipe. The overall look of the pipe with the newly shaped stem has both a Danish flair and a look of days gone by. I think I will be enjoying some good smokes in this one.YSG39

YSG40

YSG41

YSg42 I have also included a few close up photos of the rim and the stampings on the shank and stem. It is truly a beautiful pipe.YSG43

YSG44

YSG45