
The original PG-02 gimbal from Really Right Stuff wasn’t just one of my favorite gimbal heads; it was one of my favorite tripod heads. Period. For nearly ten years, I used it for wildlife photography with super-telephoto lenses as well as landscape and panoramic photography in place of a ball head. In a previous review, I called it the ultimate all-in-one tripod head. Then, suddenly, it disappeared from the market… until now.
When Really Right Stuff told me a new Mk2 version of the PG-02 was about to hit store shelves, I was excited to test the new features and compare it to the original I knew so well. RRS loaned me a pre-production version of the gimbal for six weeks to make my initial evaluations, and once that was returned, I ordered my own copy.
While I wait for my production model to arrive, this review comes with the mild caveat that evaluation was performed on a pre-production model. However, RRS has assured me that there are no differences between the gimbal I tested and the one any customer would receive off the production line. Once I receive my own gimbal and confirm this, I will remove this caveat.

The fact I have ordered this gimbal might be something of a spoiler as to my final opinion. Still, I hope you stick around for the full review because there’s a lot to dig into with this unique multi-purpose tripod head. Once you’ve read this review, you’ll have a complete understanding of the two different versions of this new PG-02 Mk2 gimbal, and you’ll confidently be able to choose which one is right for your photography. You’ll also know how to use this gimbal instead of a ball head when you don’t want to travel with multiple tripod heads, and you’ll understand all the ins and outs of using it as a multi-row panoramic head.
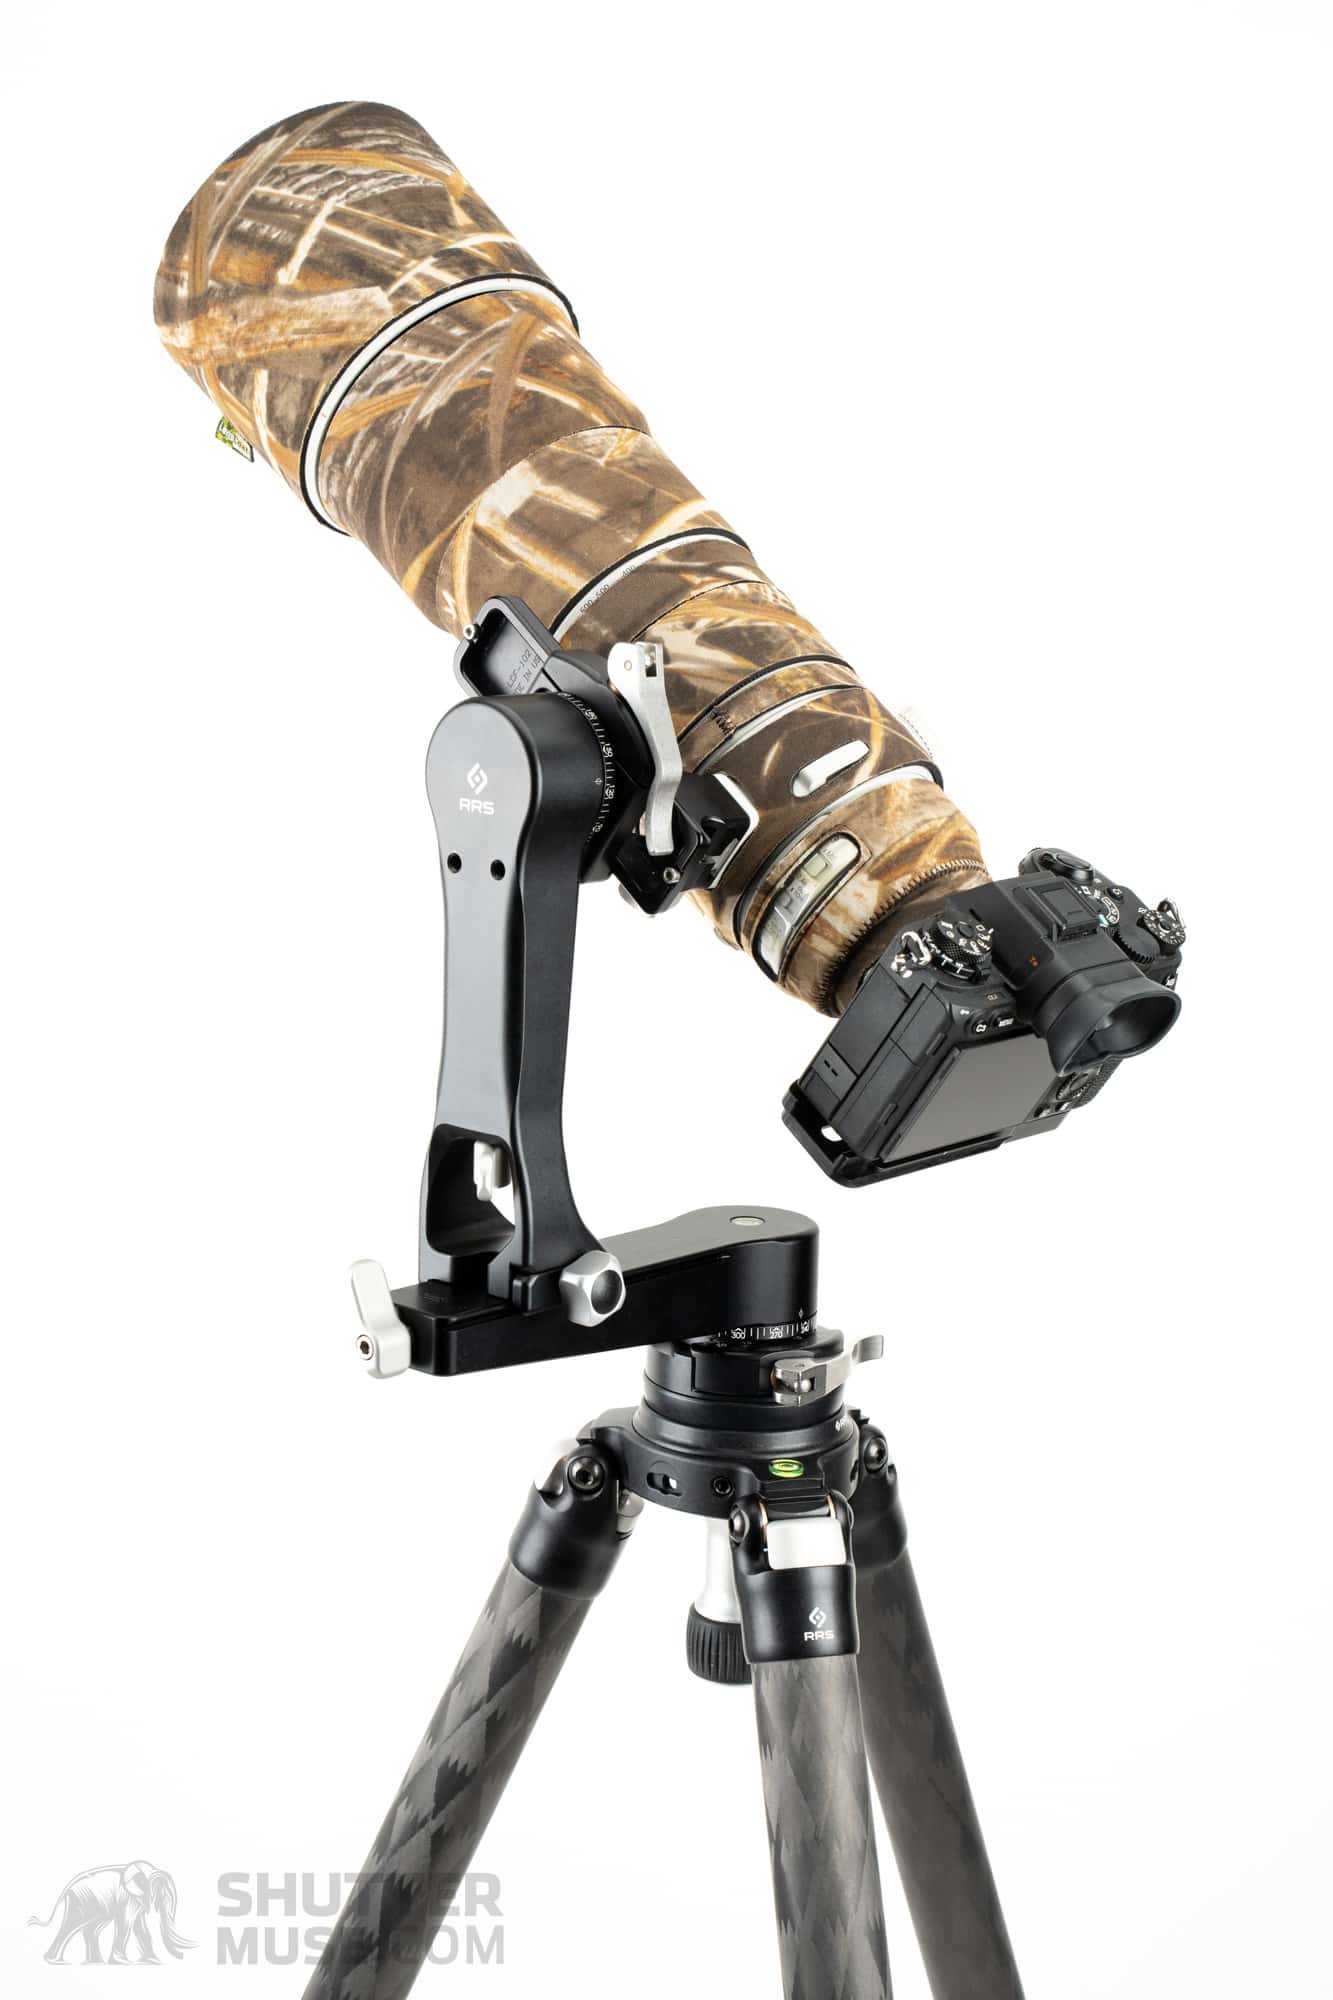
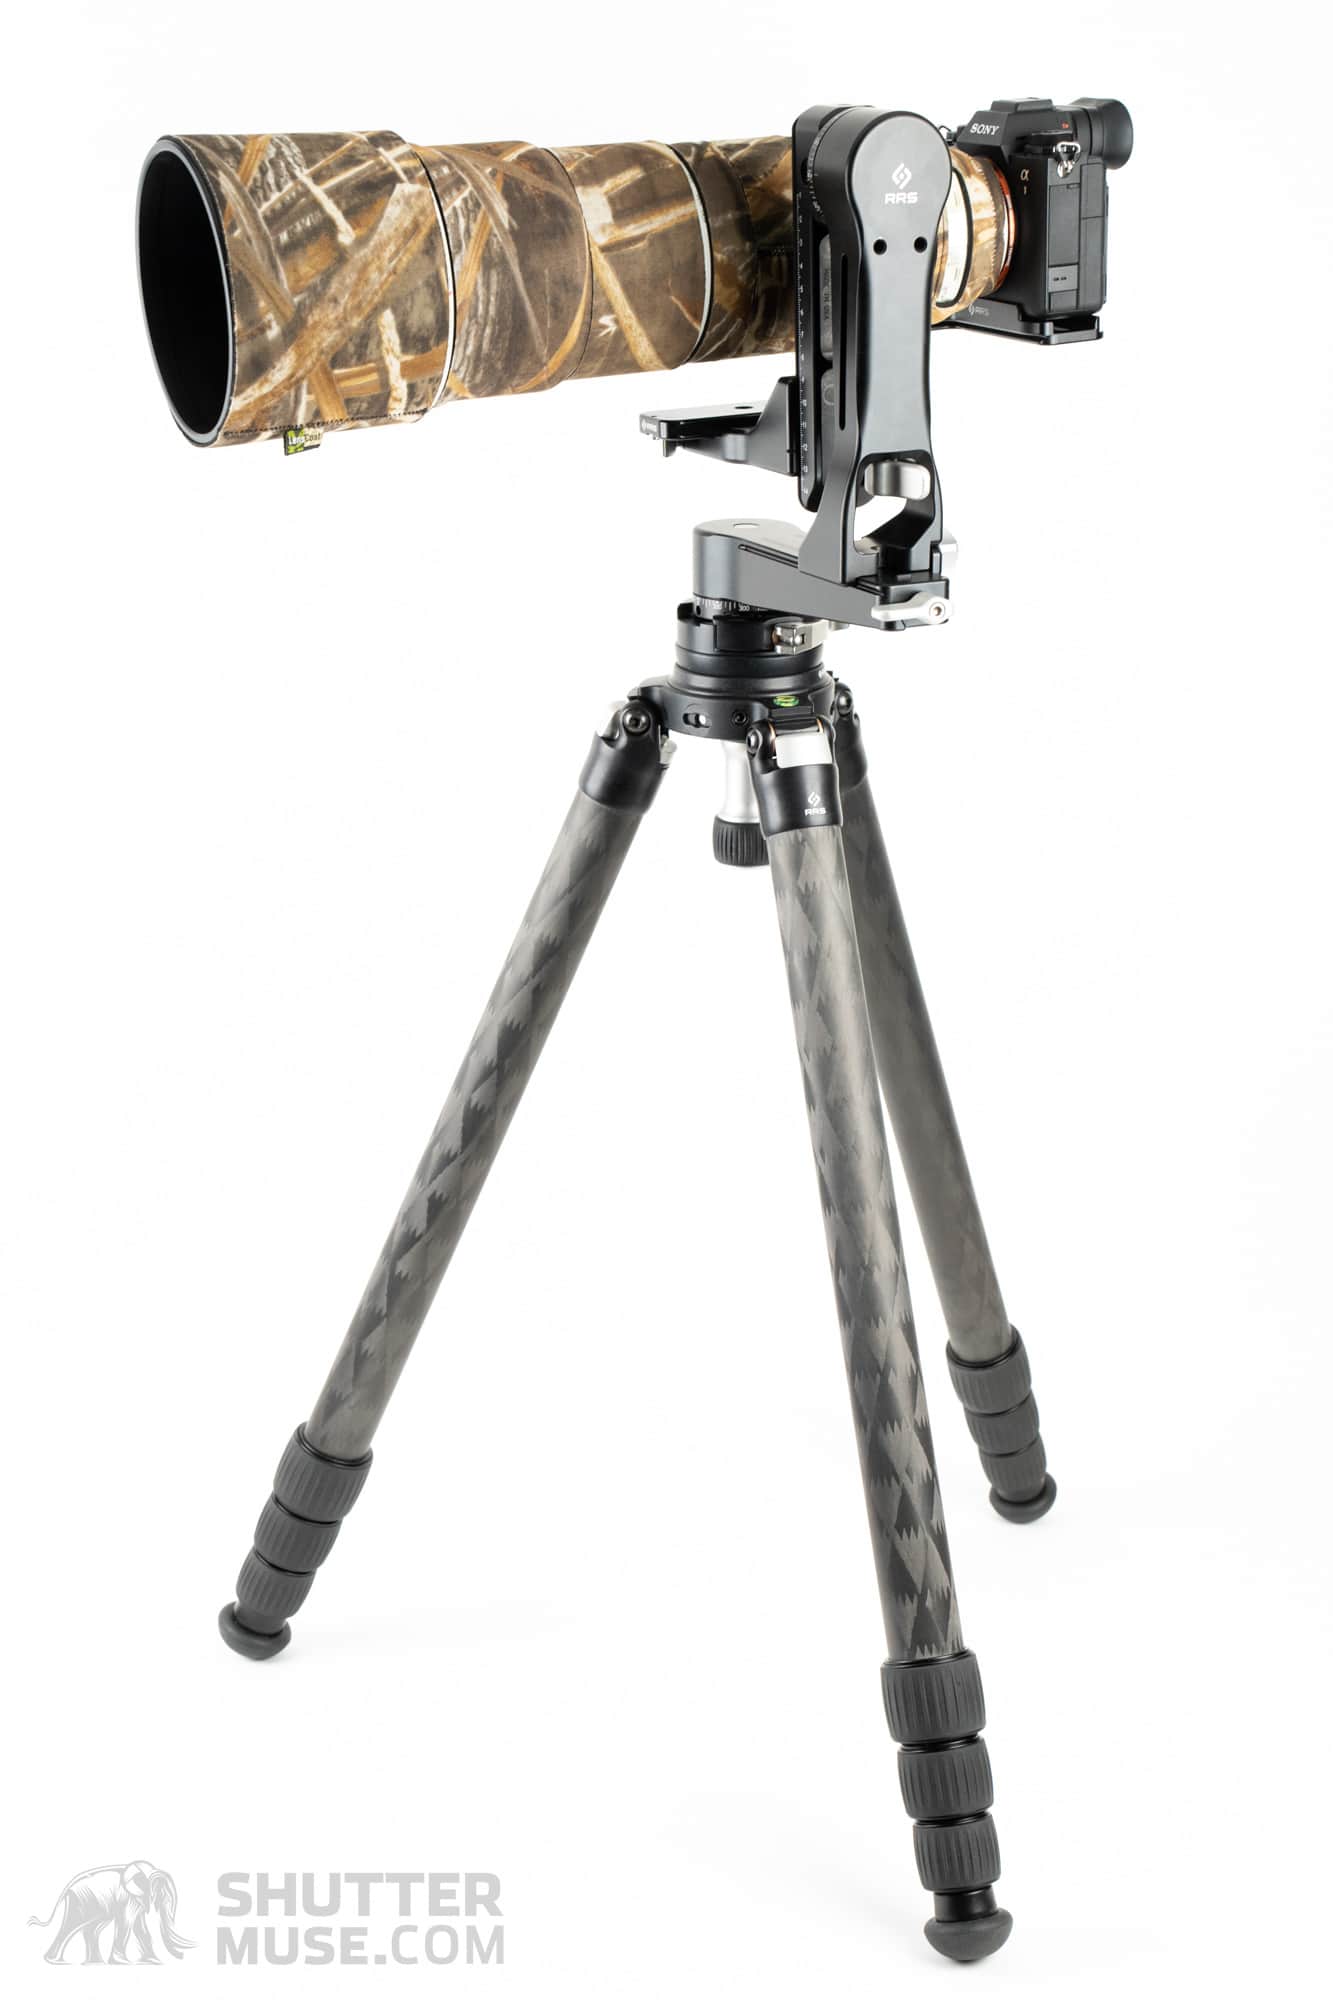
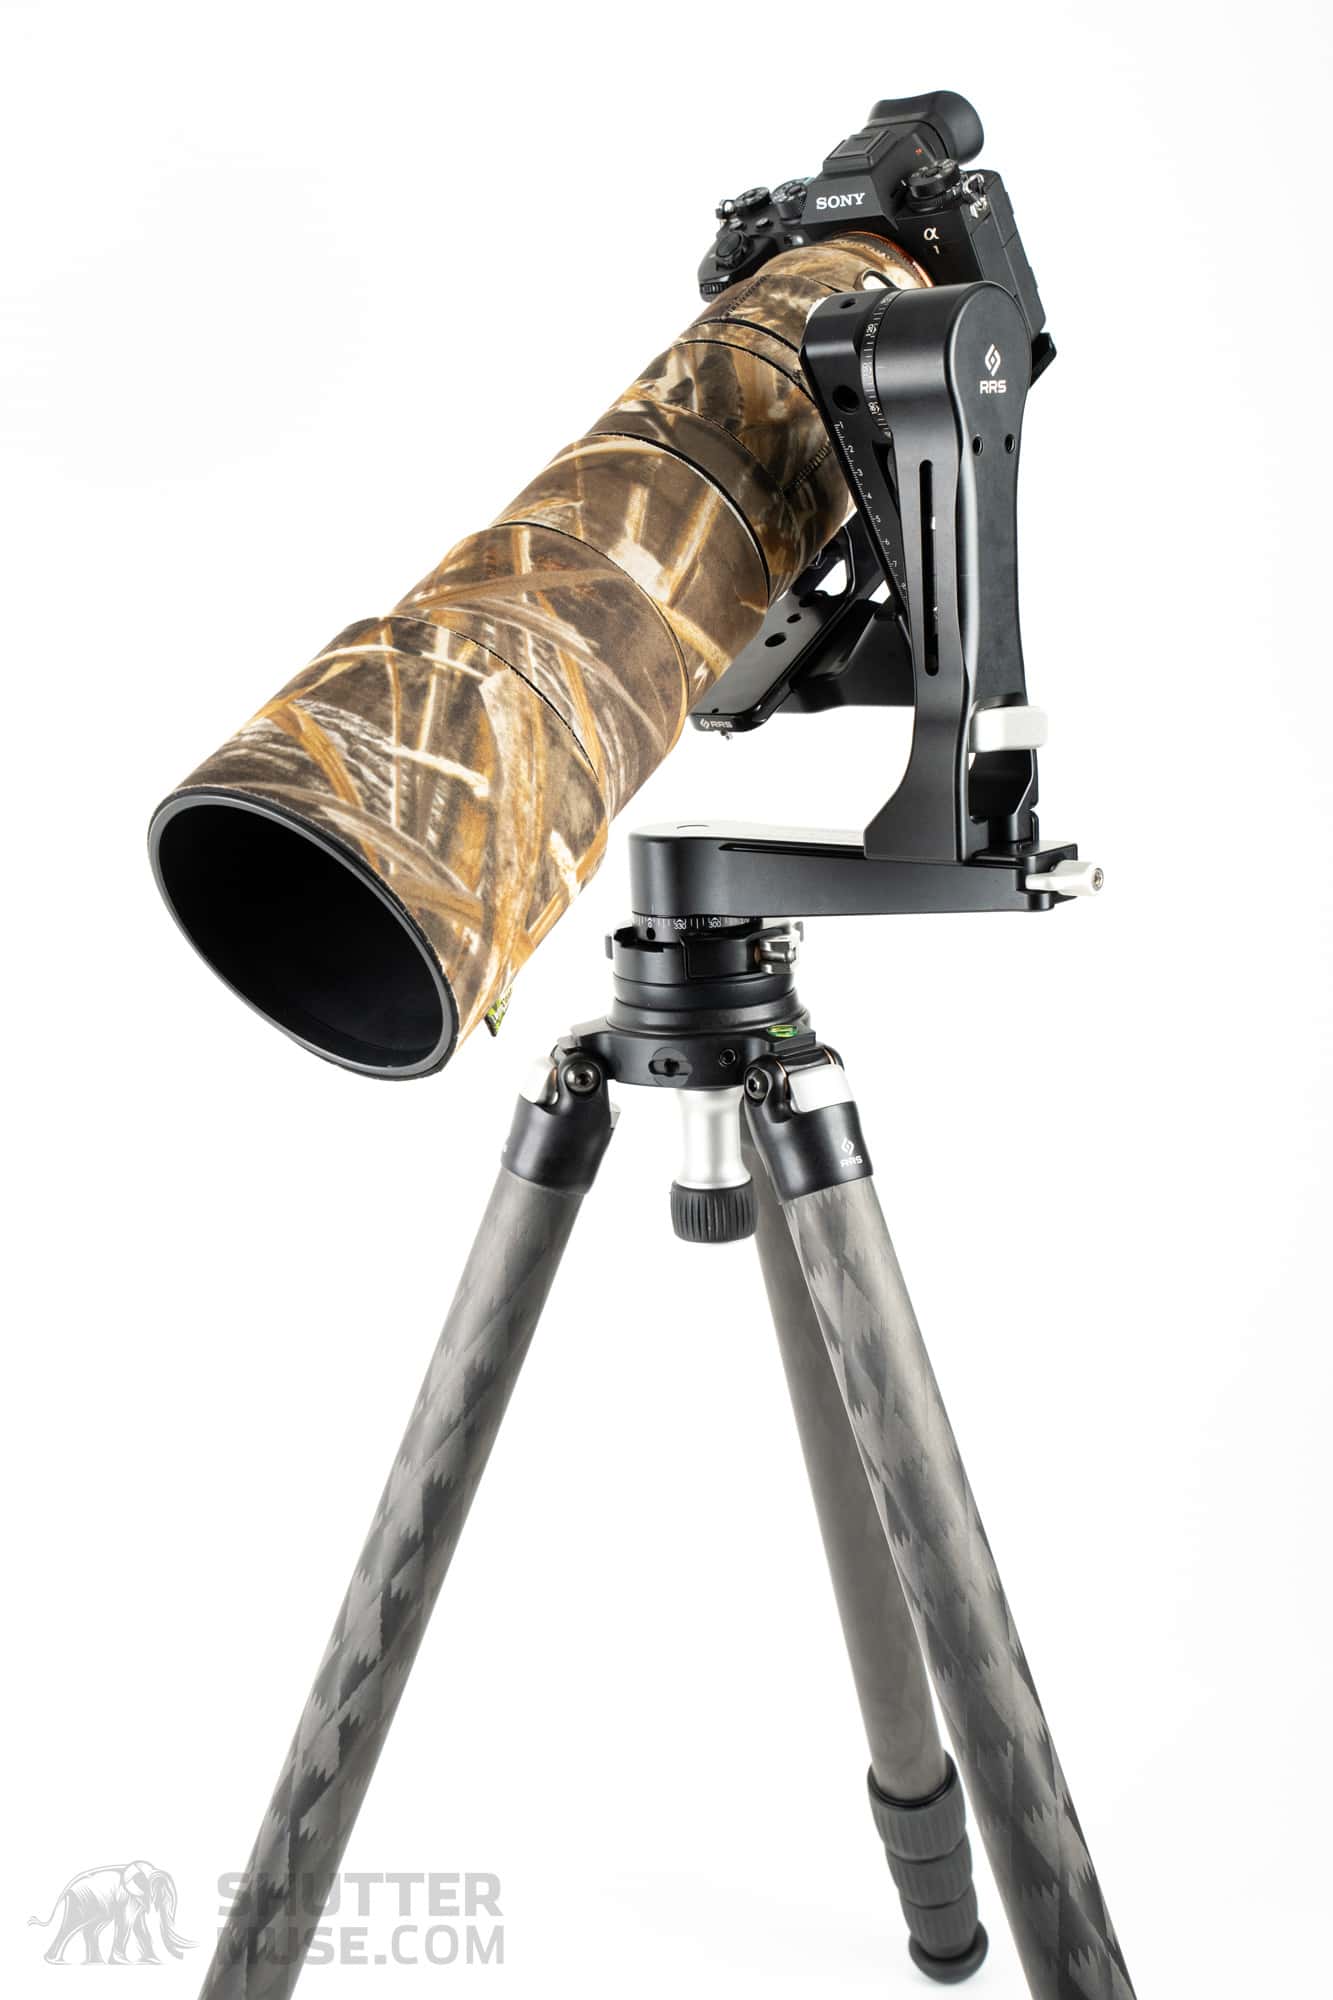
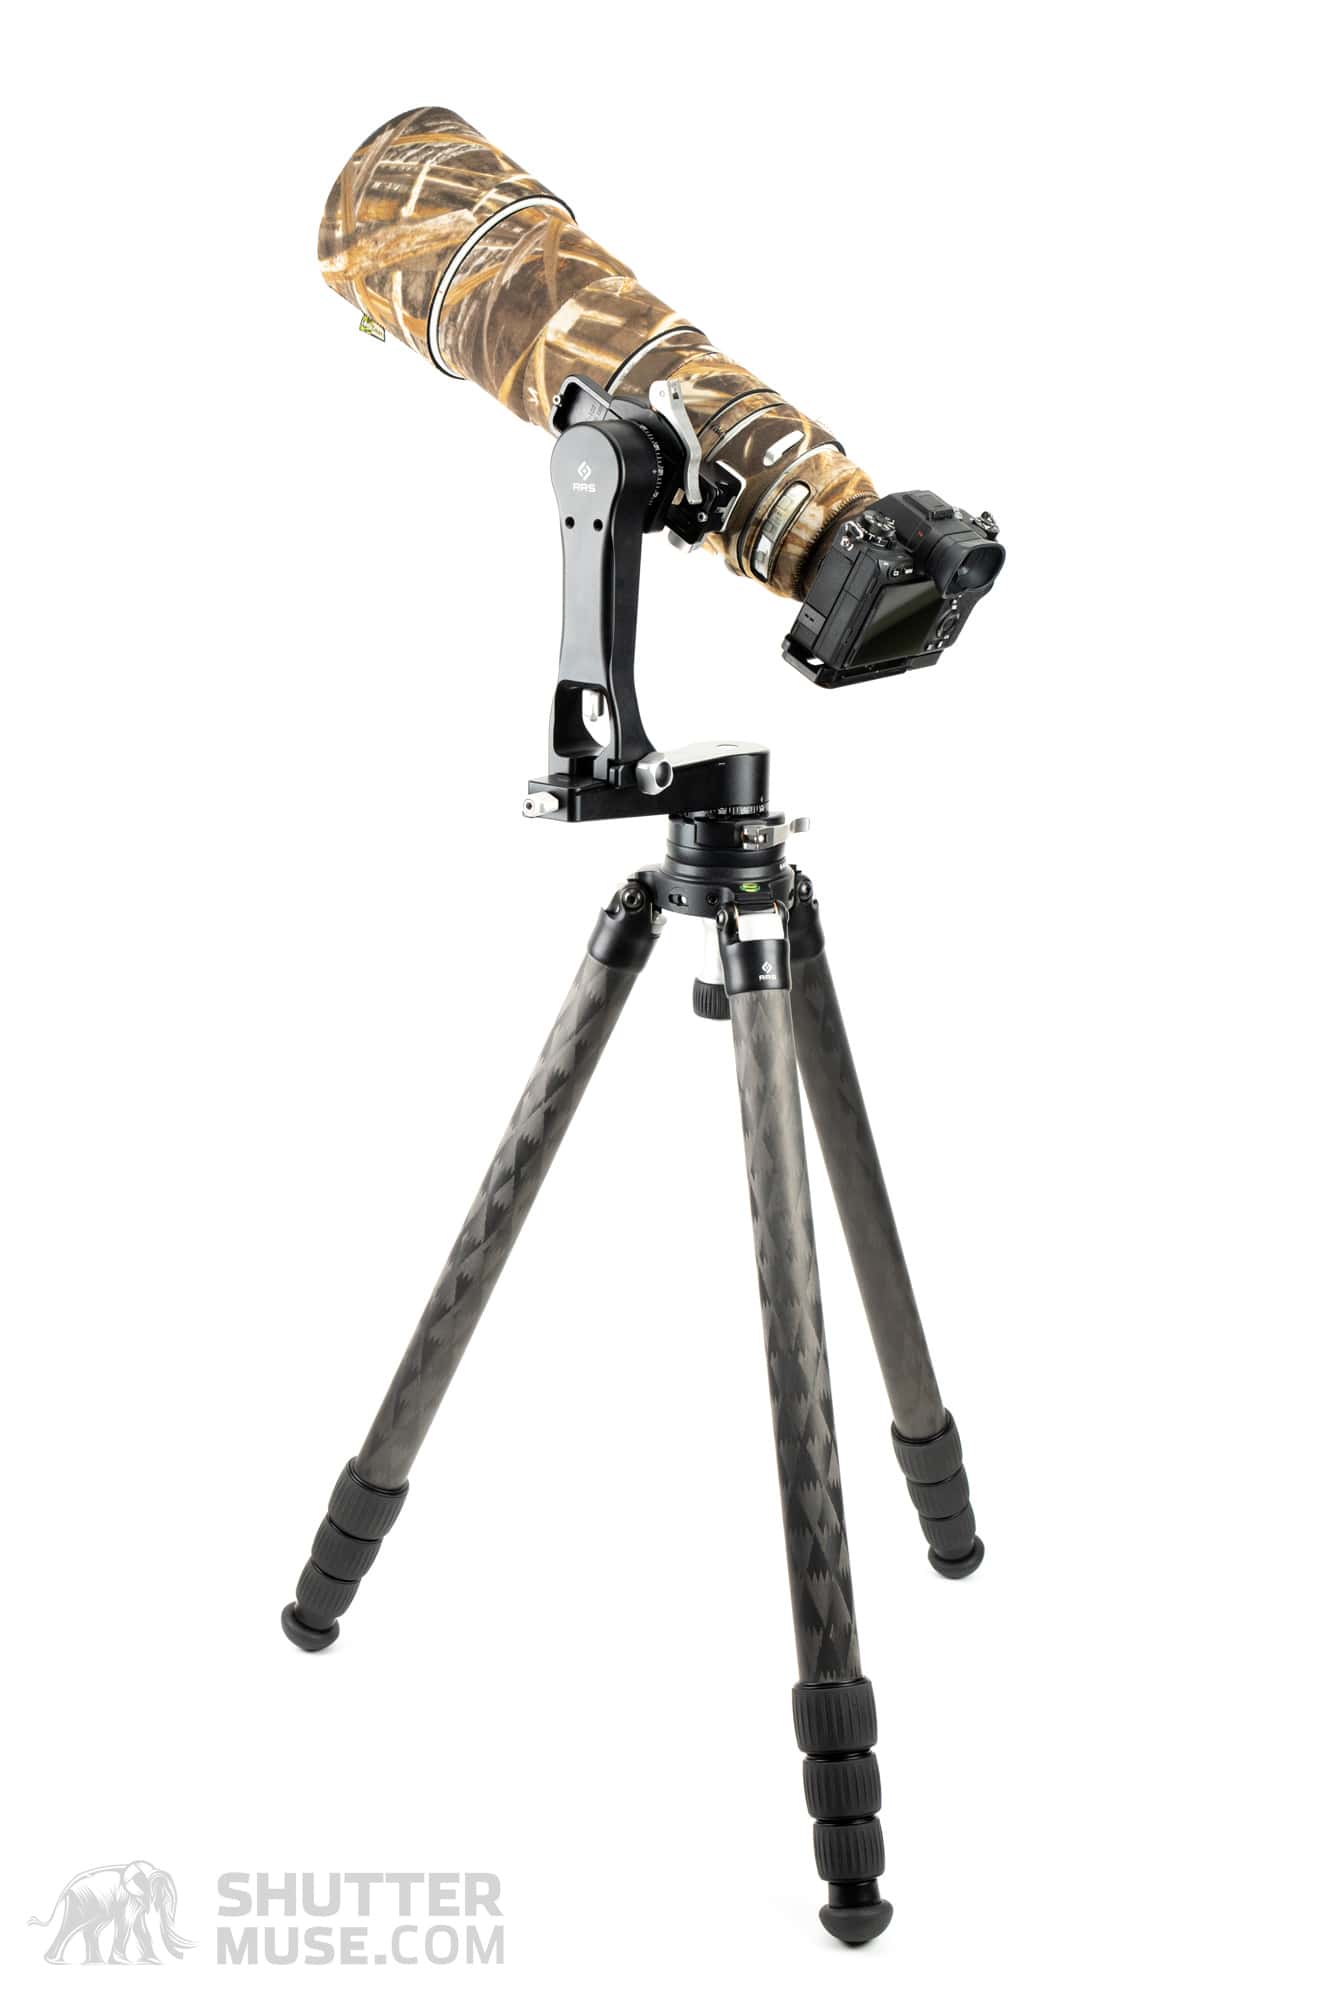
Which tripod are you using? I’ll answer it upfront, as I know people will ask. Throughout the review, you’ll see photos of the gimbal on my tripod. The tripod is a Really Right Stuff TVC-34L Mk2, with the optional RRS TA-3 Short Handle + Lever Clamp Leveling Head. See my RRS tripod guide and RRS head guide for more help choosing their legs and heads.
Table of Contents
- What’s in the Box? A Parts Guide
- PG-02 Mk2 Specifications and Component Weights
- PG-02 Mk1 vs. Mk2
- PG-02 Mk2 Features and Design
- Adding a Second Camera to the Gimbal
- Using the PG-02 for Panoramic Photography
- Using the PG-02 Instead of a Ball Head
- Side-Mount Vs. Full-Gimbal
- Will There Be an FG-02 Mk2?
- Conclusion
What Is in the Box? A Parts Guide

The Really Right Stuff PG-02 Mk2 gimbal is available in two distinct configurations: Side-Mount and Full-Gimbal. Later in the review, I’ll discuss the merits of each version. For now, an overview of the supplied components and their naming conventions will be helpful to you.
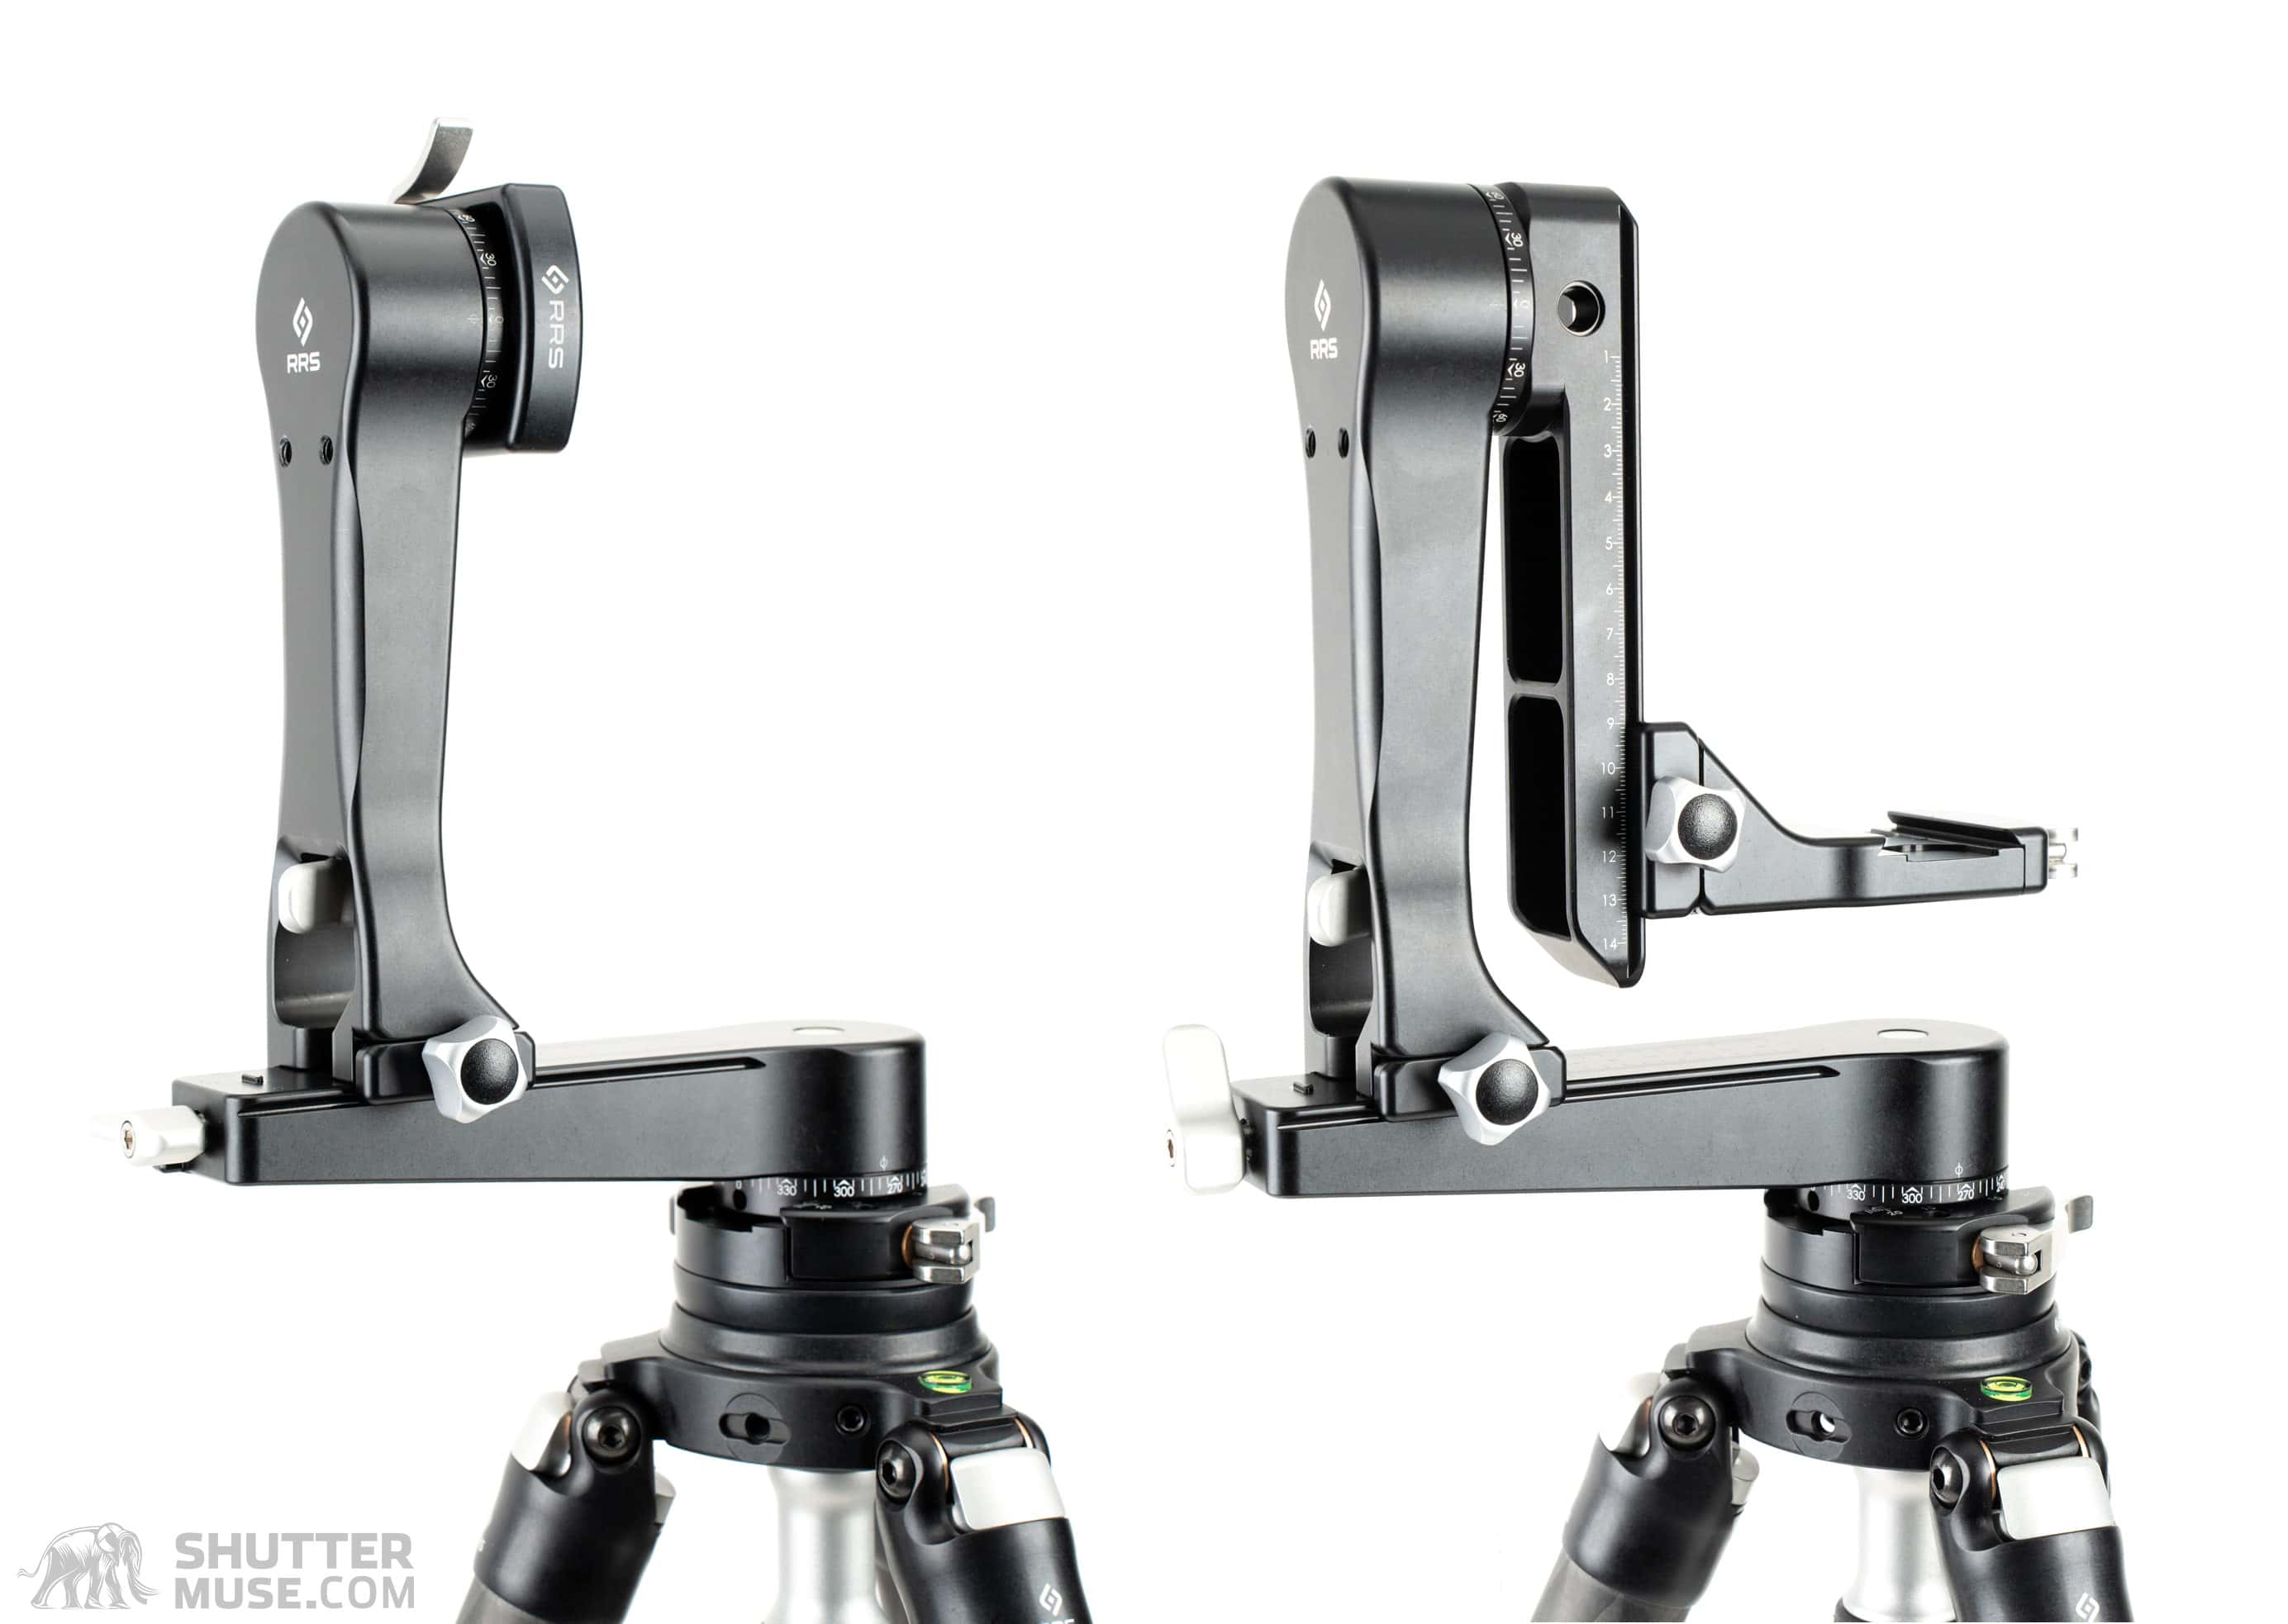
PG-02 Mk2 Side-Mount Parts

The Side-Mount version of the gimbal breaks down into two pieces. The PG-02 Horizontal Arm and the PG-02 Vertical Arm. The Vertical Arm comes fitted with a B2-LR-II lever-release clamp when you buy the Side-Mount version, though you could opt to attach any other RRS clamp with a three-hole pattern.
PG-02 Mk2 Full-Gimbal Parts

The Full-Gimbal version of the PG-02 Mk2 uses the same Horizontal Arm and Vertical Arm as the Side-Mount version. Instead of having a clamp attached to the Vertical Arm, there’s a parallel dovetail bar called the Drop-Rail, and a right-angled quick-release clamp called the Cradle Clamp. The Full-Gimbal also comes with a short Control Arm.


RRS PG-02 Mk2 Gimbal Specifications
| Spec. | PG-02 Mk2 Side-Mount | PG-02 Mk2 Full-Gimbal |
|---|---|---|
| Height | 9.5″ / 241.3mm | 9.5″ / 241.3mm |
| Width | 8.44″ / 214.4mm | 8.44″ / 214.4mm |
| Depth | 3.45″ / 87.6mm | 3.58″ / 90.9mm* |
| Weight | 40.14oz / 1138g | 51.64oz / 1463g* |
| Load Capacity | 50 lbs.(directly over-center) – 15lbs.(up to 7″ off-center) | 50 lbs.(directly over-center) – 15lbs.(up to 7″ off-center) |
| Country of Origin | USA | USA |
- The PG-02 Mk2 Full-Gimbal has an optional control arm for smooth panning and video usage. Including the weight of the control arm takes the weight up to 51.64oz / 1463g and increases the depth to 8.55″ / 217.2mm.
Individual Component Weights


Occasionally I find myself in a situation where the weight of my gear really matters. I’m dealing with one such example the week I write this review as I try to figure out how to get as much camera gear as possible from my home in the Yukon to the Australian island of Tasmania. It would be an understatement to say that baggage allowances on some of my flights are tight, especially when traveling with a super-telephoto lens and its necessary support gear. In such cases, I often end up weighing various equipment options to help me figure out what would be the most efficient to bring with me. These measurements, performed on my own scales, may be helpful.
| Component | Weight |
|---|---|
| PG-02 Mk2 Horizontal Arm | 16.19oz (459g) |
| PG-02 Mk2 Vertical Arm (no clamp) | 18.06oz (512g) |
| PG-02 Mk2 Drop-Rail | 6.60oz (187g) |
| B2-LR-II Clamp _ (for Side-Mount) | 5.36oz (152g) |
| PG-CC Mk2 Cradle Clamp | 8.18oz (232g) |
| PG-02 Mk2 Control Arm | 2.43oz (69g) |
| PG-02 Mk2 Side-Mount with B2-LR-II Clamp TOTAL | 39.93oz (1132g) |
| PG-02 Mk2 Full-Gimbal (no Control Arm) TOTAL | 49.35oz (1399g) |
| PG-02 Mk2 Full-Gimbal (with Control Arm) TOTAL | 51.78 (1468g) |
PG-02 Mk1 Vs. Mk2 – What’s New?


If you own one of the previous two versions of the PG-02 gimbal, you might wonder what’s new and whether it’s worth upgrading. And no, that’s not a typo. Despite this new version being called the Mk2, two older versions of the gimbal exist. For simplicity’s sake, I will refer to them as the PG-02 Mk1 and Mk1.5. While RRS never referred to them this way, it’s a logical naming scheme. The Mk1.5 was not a total redesign. In fact, the Horizontal Arm remained unchanged on the Mk1.5. The only difference between the Mk1 and the Mk1.5 was a change in the tilt release mechanism, moving from a large silver knob to a smaller silver lever.


When the RRS designers set about redesigning the PG-02, their main goal was to reduce its weight. Comparing the new Horizontal and Vertical Arms with the old ones, you can see how this was achieved by tapering their shape and hollowing them out. The bearing housing on the Horizontal Arm has also drastically reduced in size on the Mk2, and for Full-Gimbal users, the new Cradle Clamp has also had a nip and a tuck. The result is an 11.5% weight reduction on the Full-Gimbal and a 10% reduction on the Side-Mount version. While this is a modest reduction, I welcome the fact that they achieved it with no compromise to the rigidity and capacity of the original version.

Another notable change for the Mk2 is the inclusion of an Arca-Swiss dovetail on the Horizontal Arm where you attach the gimbal to the tripod. On the Mk1, the dovetail was a separately purchased accessory. Overall, there is also the feeling that the whole head is less bulky and, therefore, slightly easier to find space for in a bag or a bag’s side pocket. Gone are the sizeable rubber-coated locking knobs, replaced with the aluminum knobs from their smaller BH-30 and BH-40 ball heads. Finally, the pan and tilt locking mechanisms have been completely replaced on the Mk2 with simple silver switches designed to operate simultaneously with one hand.
PG-02 Mk2 Gimbal Features and Design
Now that I’ve laid out what you’re getting and given you a quick overview of what’s new, let’s dive into a closer look at all the individual features of the PG-02 gimbal.
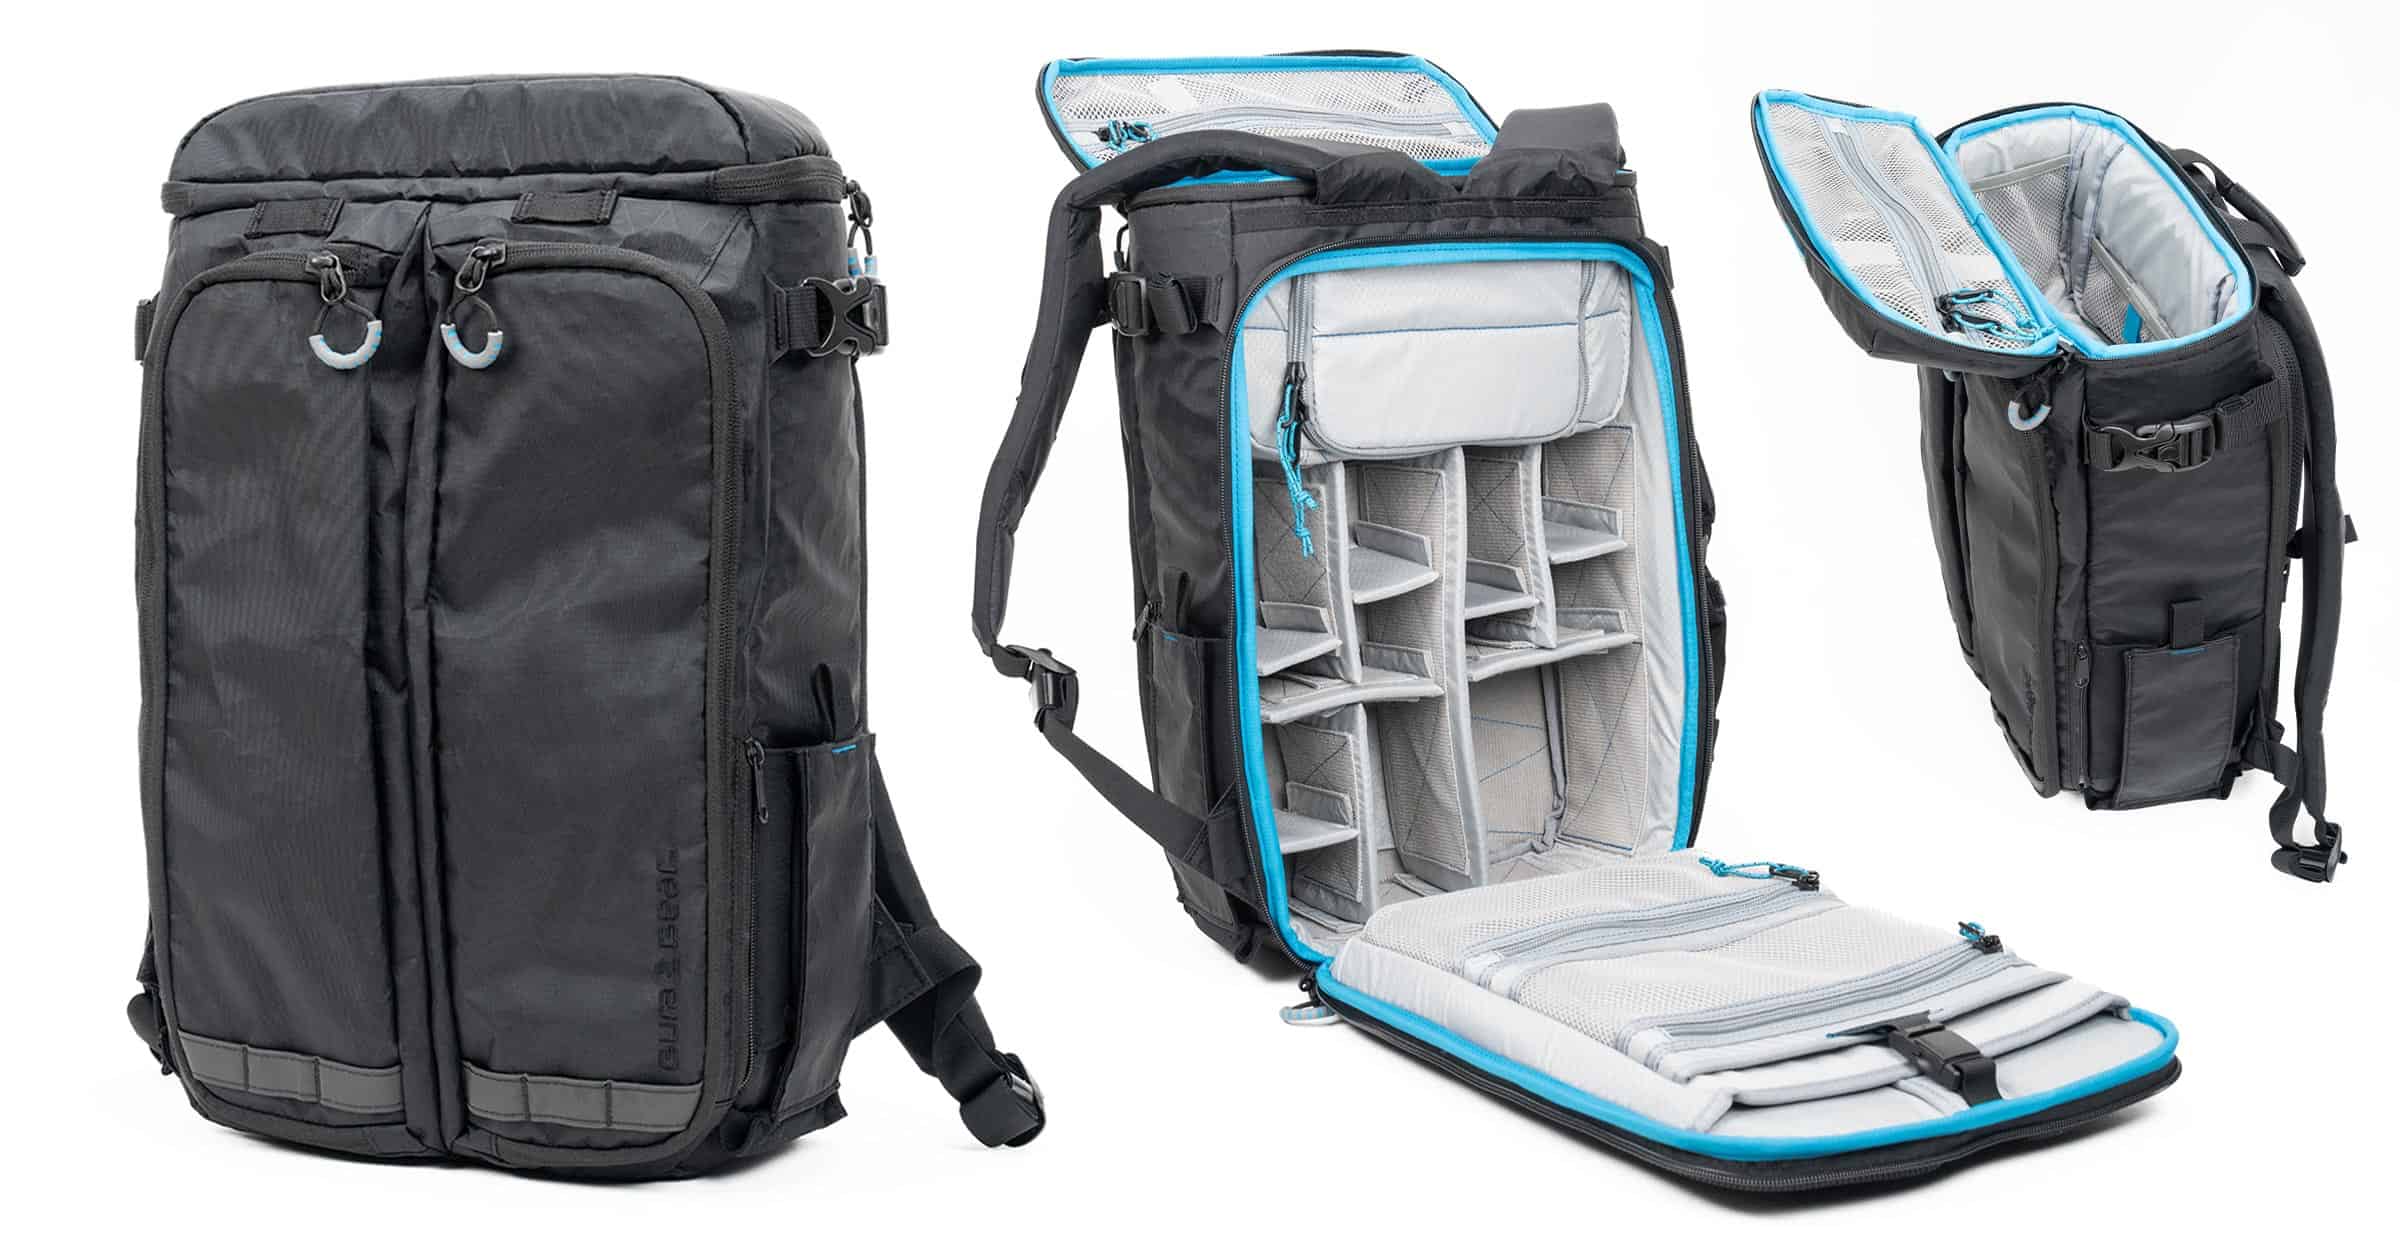
Carrying Case

When you first un-box a PG-02, your first indication of the overall product quality is the fancy padded case that it comes in. Unlike most cases in which camera gear is delivered (I’m looking at you, crappy lens cases), I always use the PG-02’s padded case. The reason is that a gimbal’s shape makes it much less convenient to leave on a tripod as you would with a ball head. A well-padded, durable protective case for the detached gimbal is welcome and highly convenient when you want to pack the gimbal into your checked luggage while traveling.
The outside of the case features metal D-rings for attaching a shoulder strap (not provided) and several nylon handles. On the inside, you’ll find a couple of dividers designed to accommodate the components of the Full-Gimbal and the Side-Mount, as well as three pockets in the lid for the Control Arm, tools, and spare Arca-Swiss plates or rails. The Full-Gimbal uses most of the space in the case, but those who opt for the Side-Mount variation will have some extra space to play with. I usually use that space to store additional tripod-related accessories, such as spiked feet or quick-release plates.


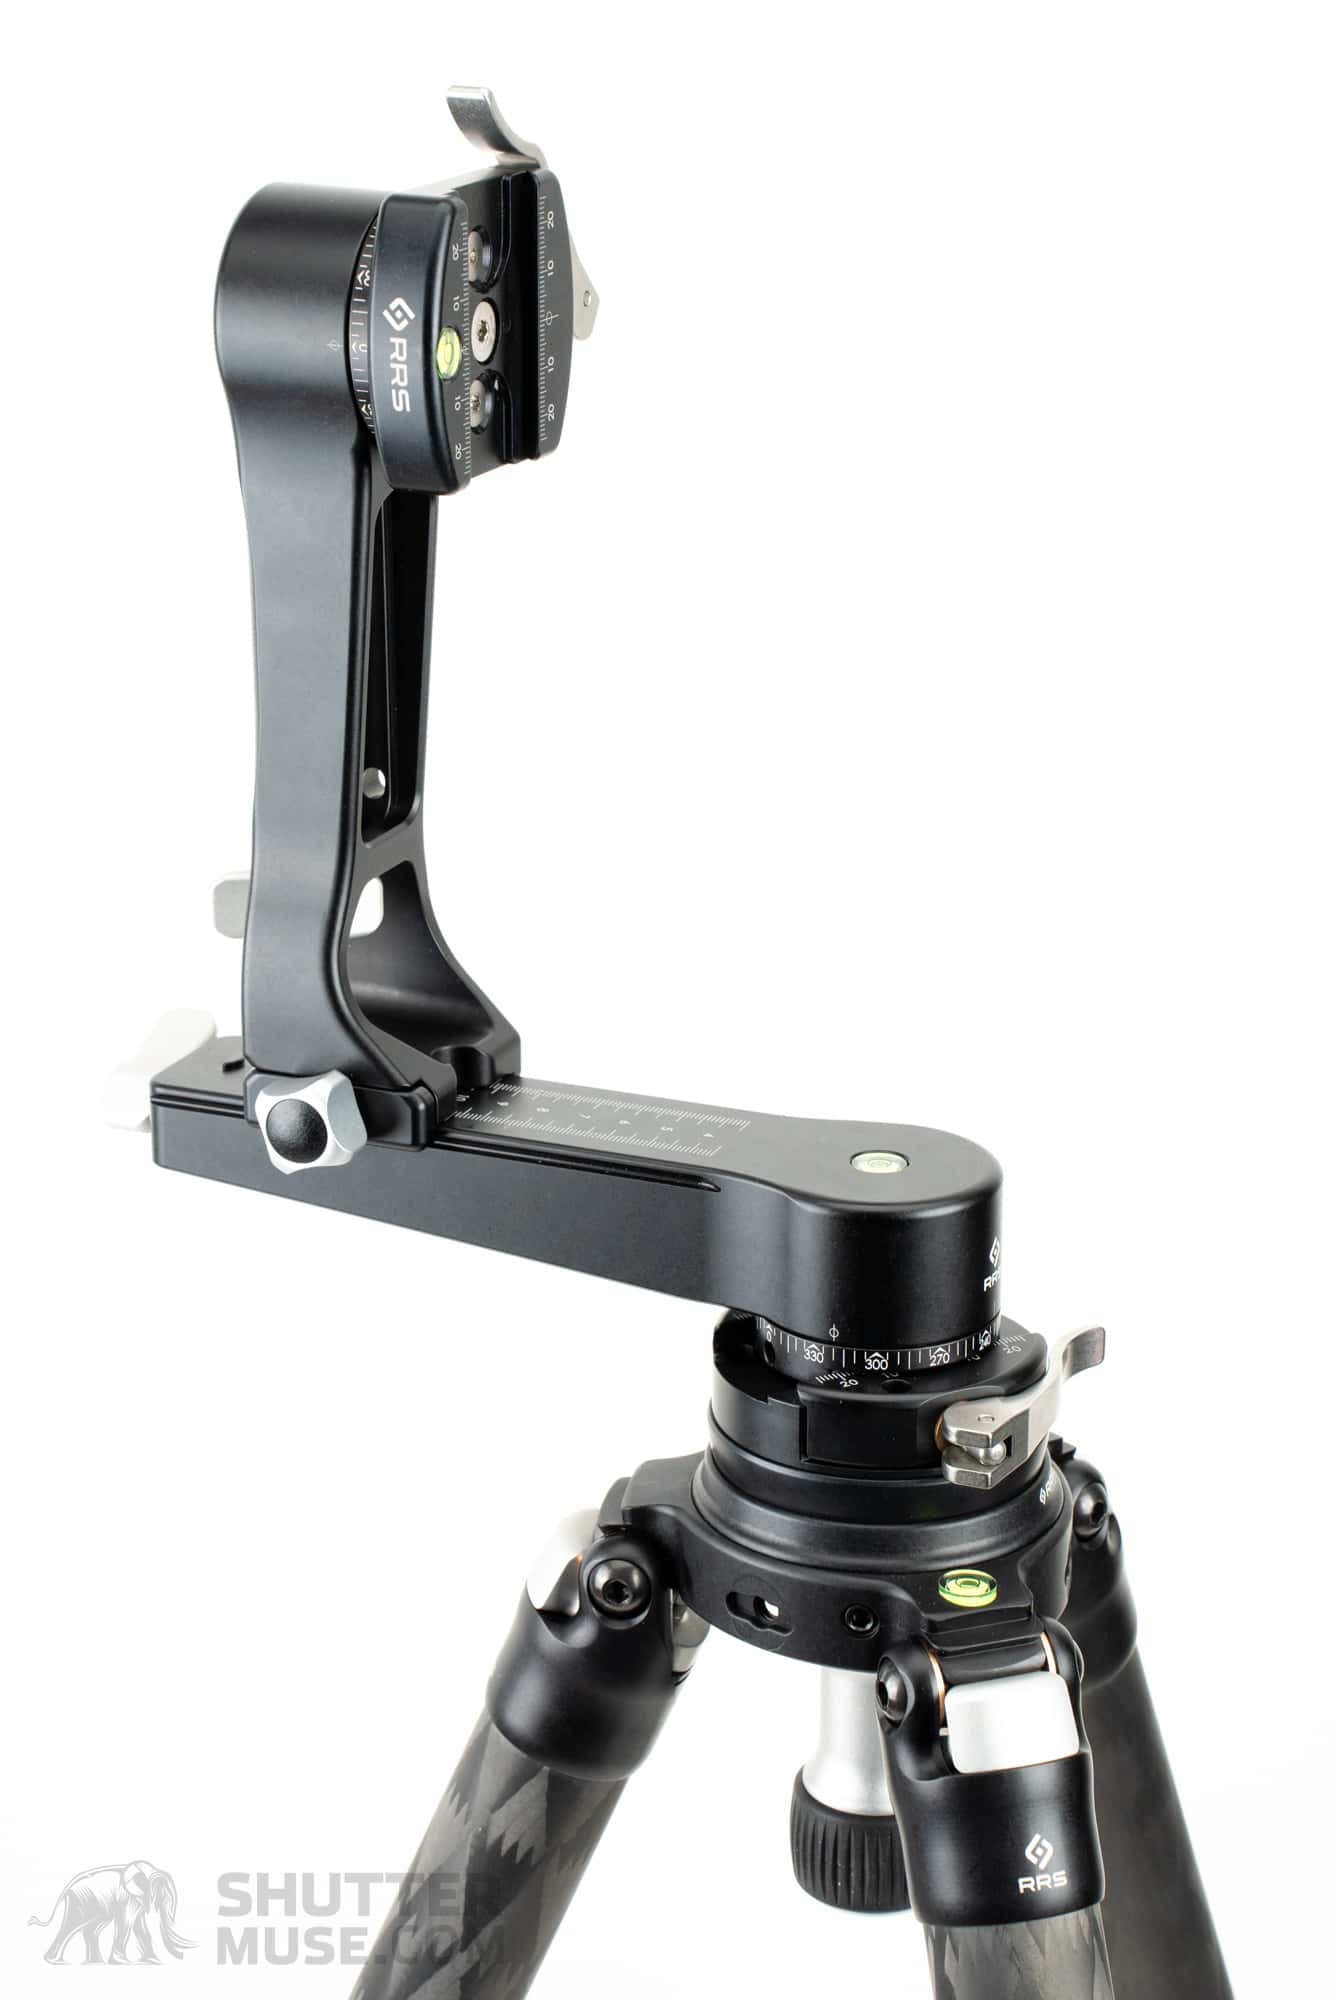
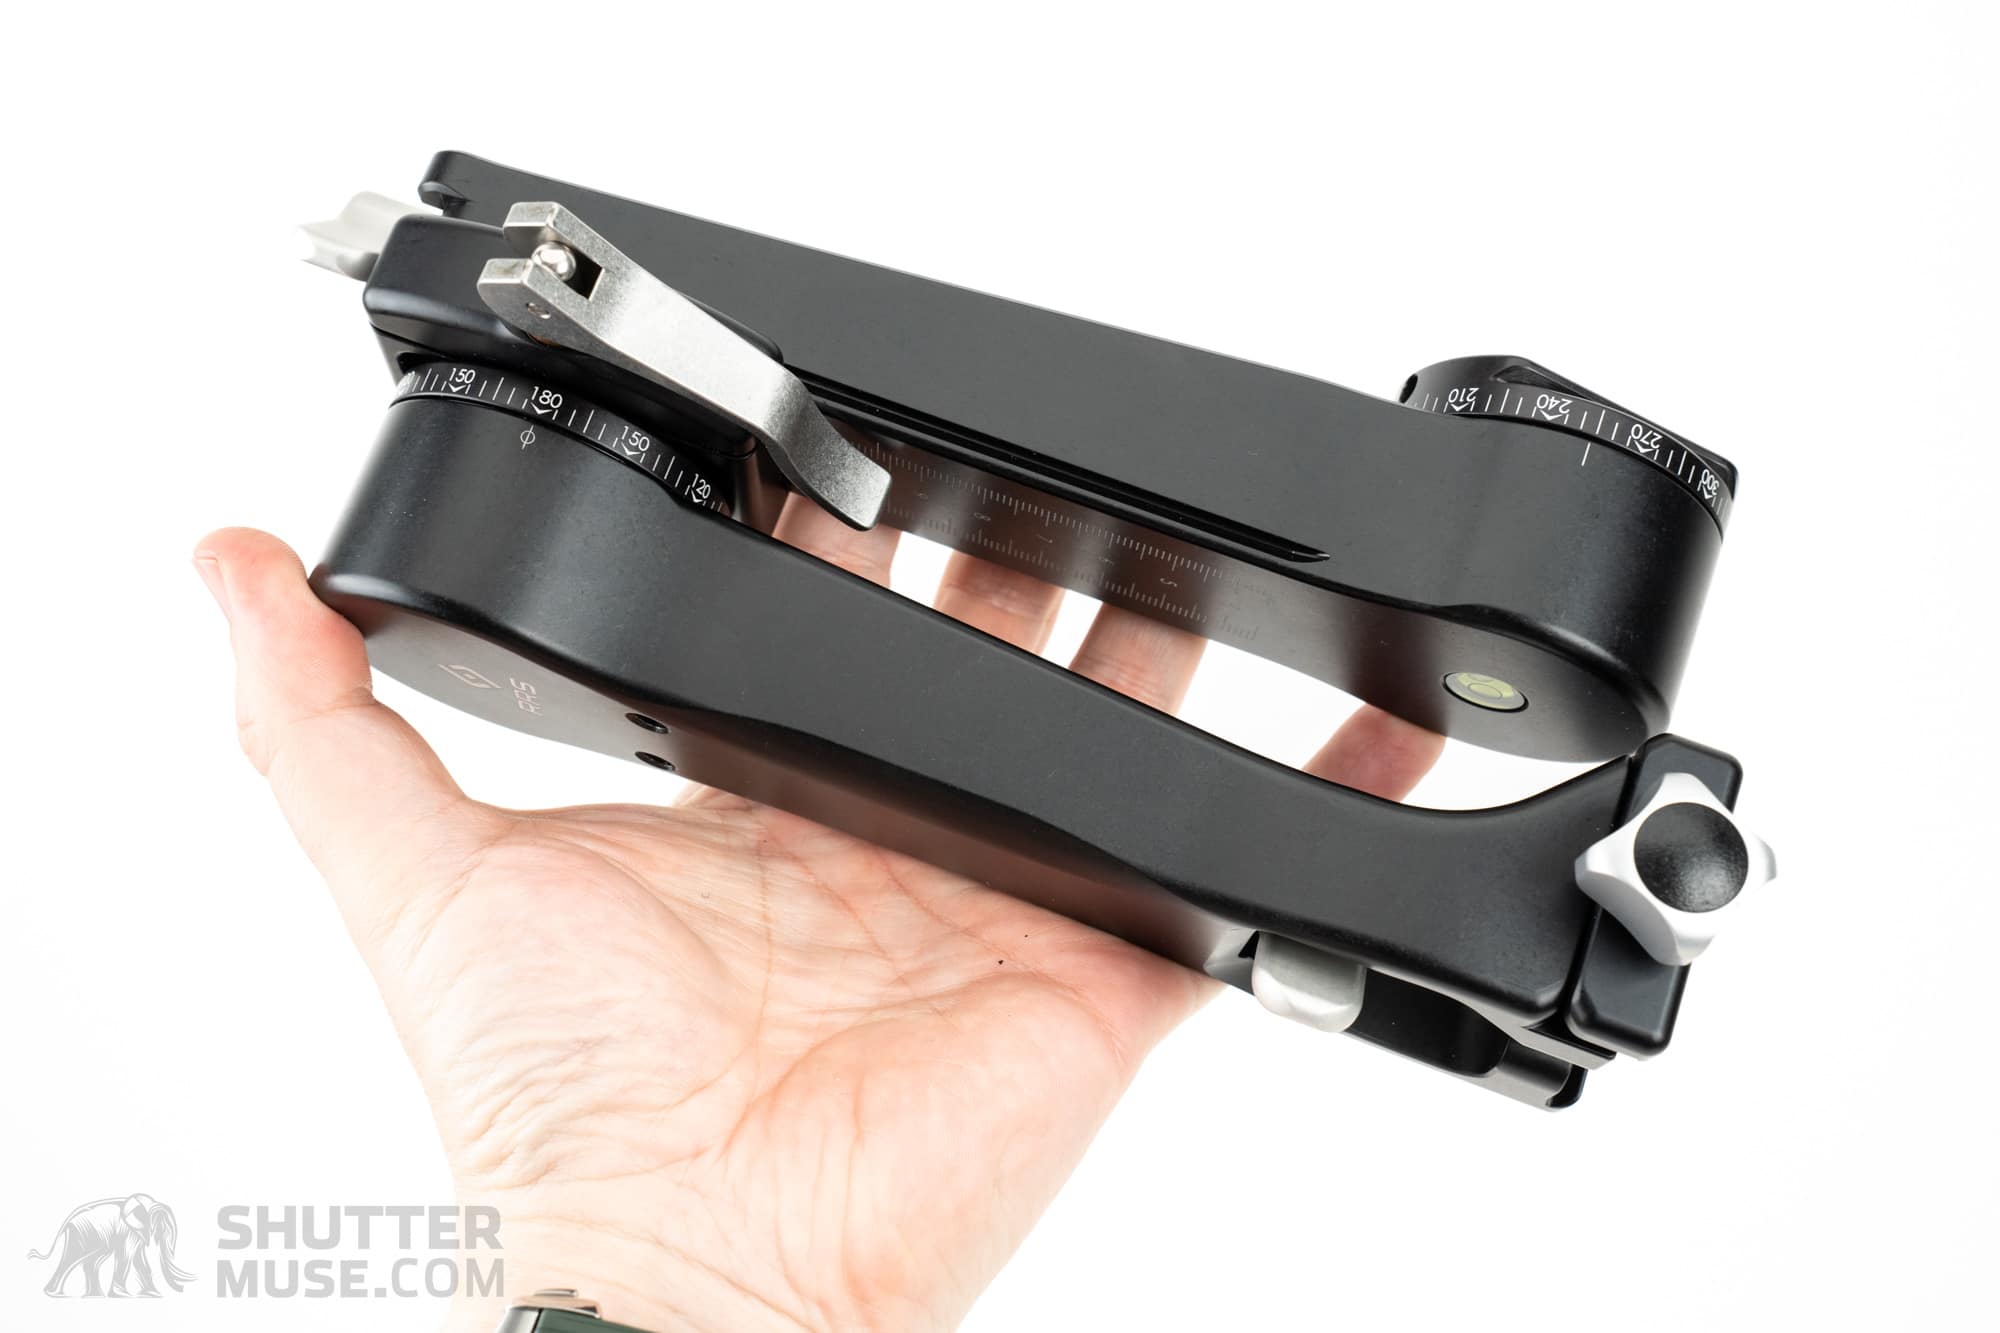
Horizontal Arm


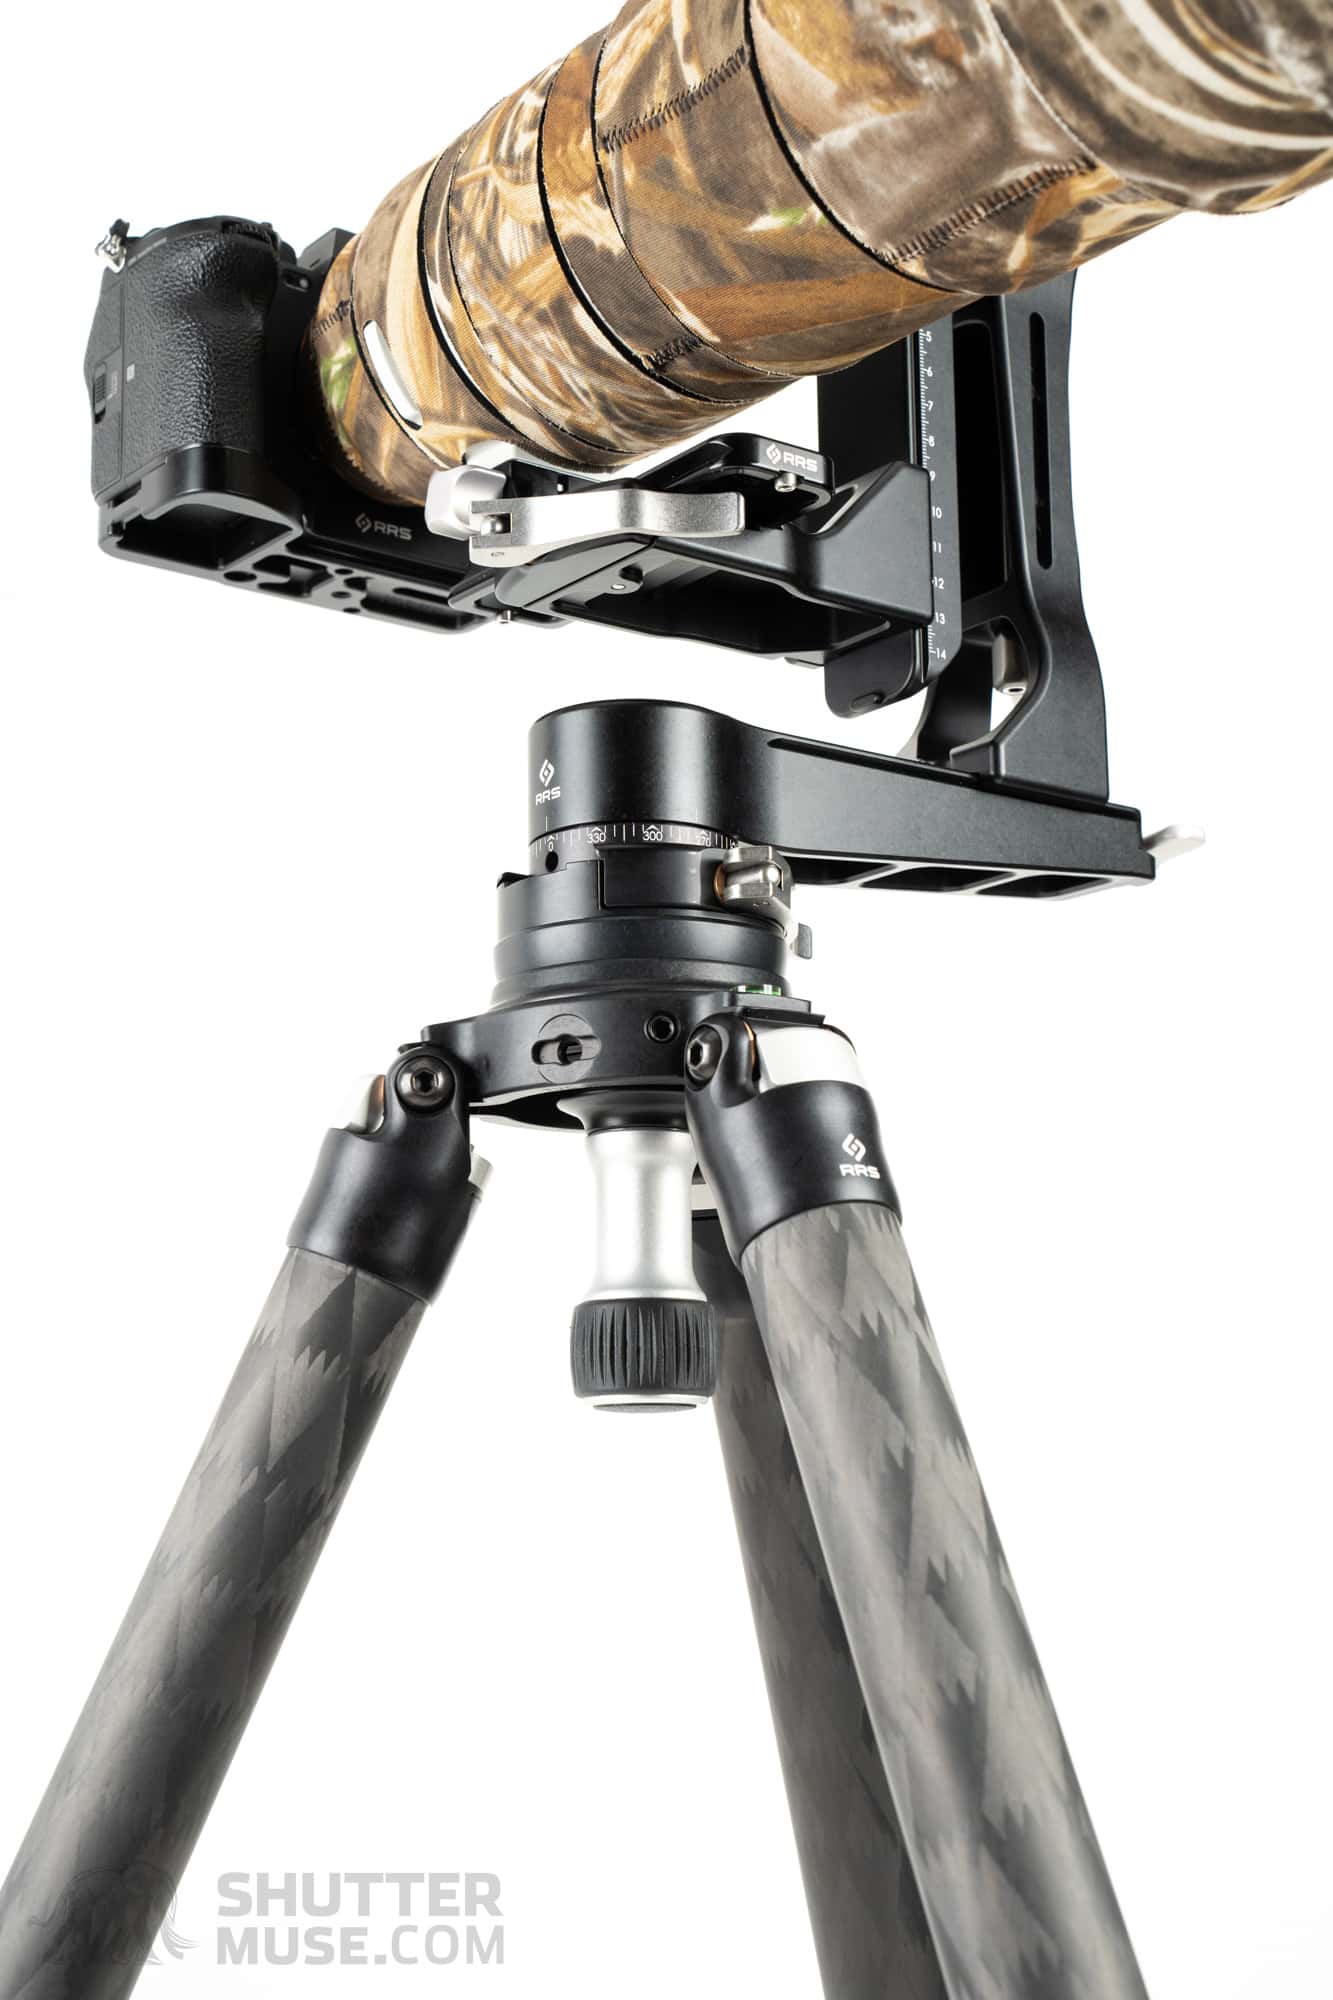
The Horizontal Arm features a bubble level above the pivot point and an Arca-Swiss dovetail on the bottom with a 3/8″ 16 thread. With this, the gimbal can be mounted directly onto a tripod or clamped into a quick-release clamp on a ball head or leveling head. Laser-etched markings on the arm allow for repeatable placement of the Vertical Arm to suit your lenses. To lock the bearings in the Horizontal Arm, there’s a small silver lever with roughly 90 degrees of movement from the locked to the fully unlocked position. In the unlocked position, the panning motion of the gimbal is silky smooth, even when loaded with the heaviest 600mm lens and camera combination, I could find.
Vertical Arm


The Vertical Arm clamps onto the Horizontal Arm with a screw-lock Arca-Swiss compatible clamp. The side of the Vertical Arm features a pair of 1/4″ 20 threaded holes that can be used with various camera accessories like monitors, microphones, or even a second camera when paired with a suitable clamp like the RRS BC-18 Micro Ball Head. Users of the Full-Gimbal PG-02 will see an additional 1/4″ 20 accessory hole on the top of the Drop-Rail, and a hole on the side for the Control Arm.
Similar to the Horizontal Arm, the tilt bearings on the Vertical Arm are locked by a small silver lever that has about 90 degrees of movement from locked to unlocked. Partial movement of the lever can be used to adjust the tension of the tilt slightly, though this does impact the smoothness of the tilt motion. I found the tilt bearings to be identical to the panning bearings and was pleased to feel just the right amount of stiffness to the rotation in the unlocked position.
A previous complaint I had with the Mk 1.5 gimbal was that the tilt bearings were so smooth that if your lens balance were off by just half a millimeter, your lens would slowly tilt up or down. Getting a perfect balance took patience and too much time. RRS appears to have gone with just a fraction more internal resistance in the bearings for the Mk2 version, and the result is pure perfection.
Cradle Clamp


The Cradle Clamp from the Full-Gimbal PG-02 Mk2 uses the familiar lever-release system from most Really Right Stuff quick-release clamps. It does an excellent job of self-adjusting to the small differences in design and tolerances of Arca-Swiss plates from various manufacturers. I tested it with various quick-release plates from RRS and Kirk Photo and a bunch of no-name ones from my bucket of randomly acquired parts. There were no issues.
As an aside, the old, slightly chunkier version of the RRS Cradle clamp was a popular upgrade for people that used a Wimberley gimbal or a PMG Katana gimbal but wanted a lever-release clamp instead of the screw-lock clamp they came with. The old RRS cradle clamp has been discontinued. Still, this new one continues to use the same Arca-Swiss standard on the vertical side and is still a great upgrade option for Wimberley or ProMediaGear gimbal users.
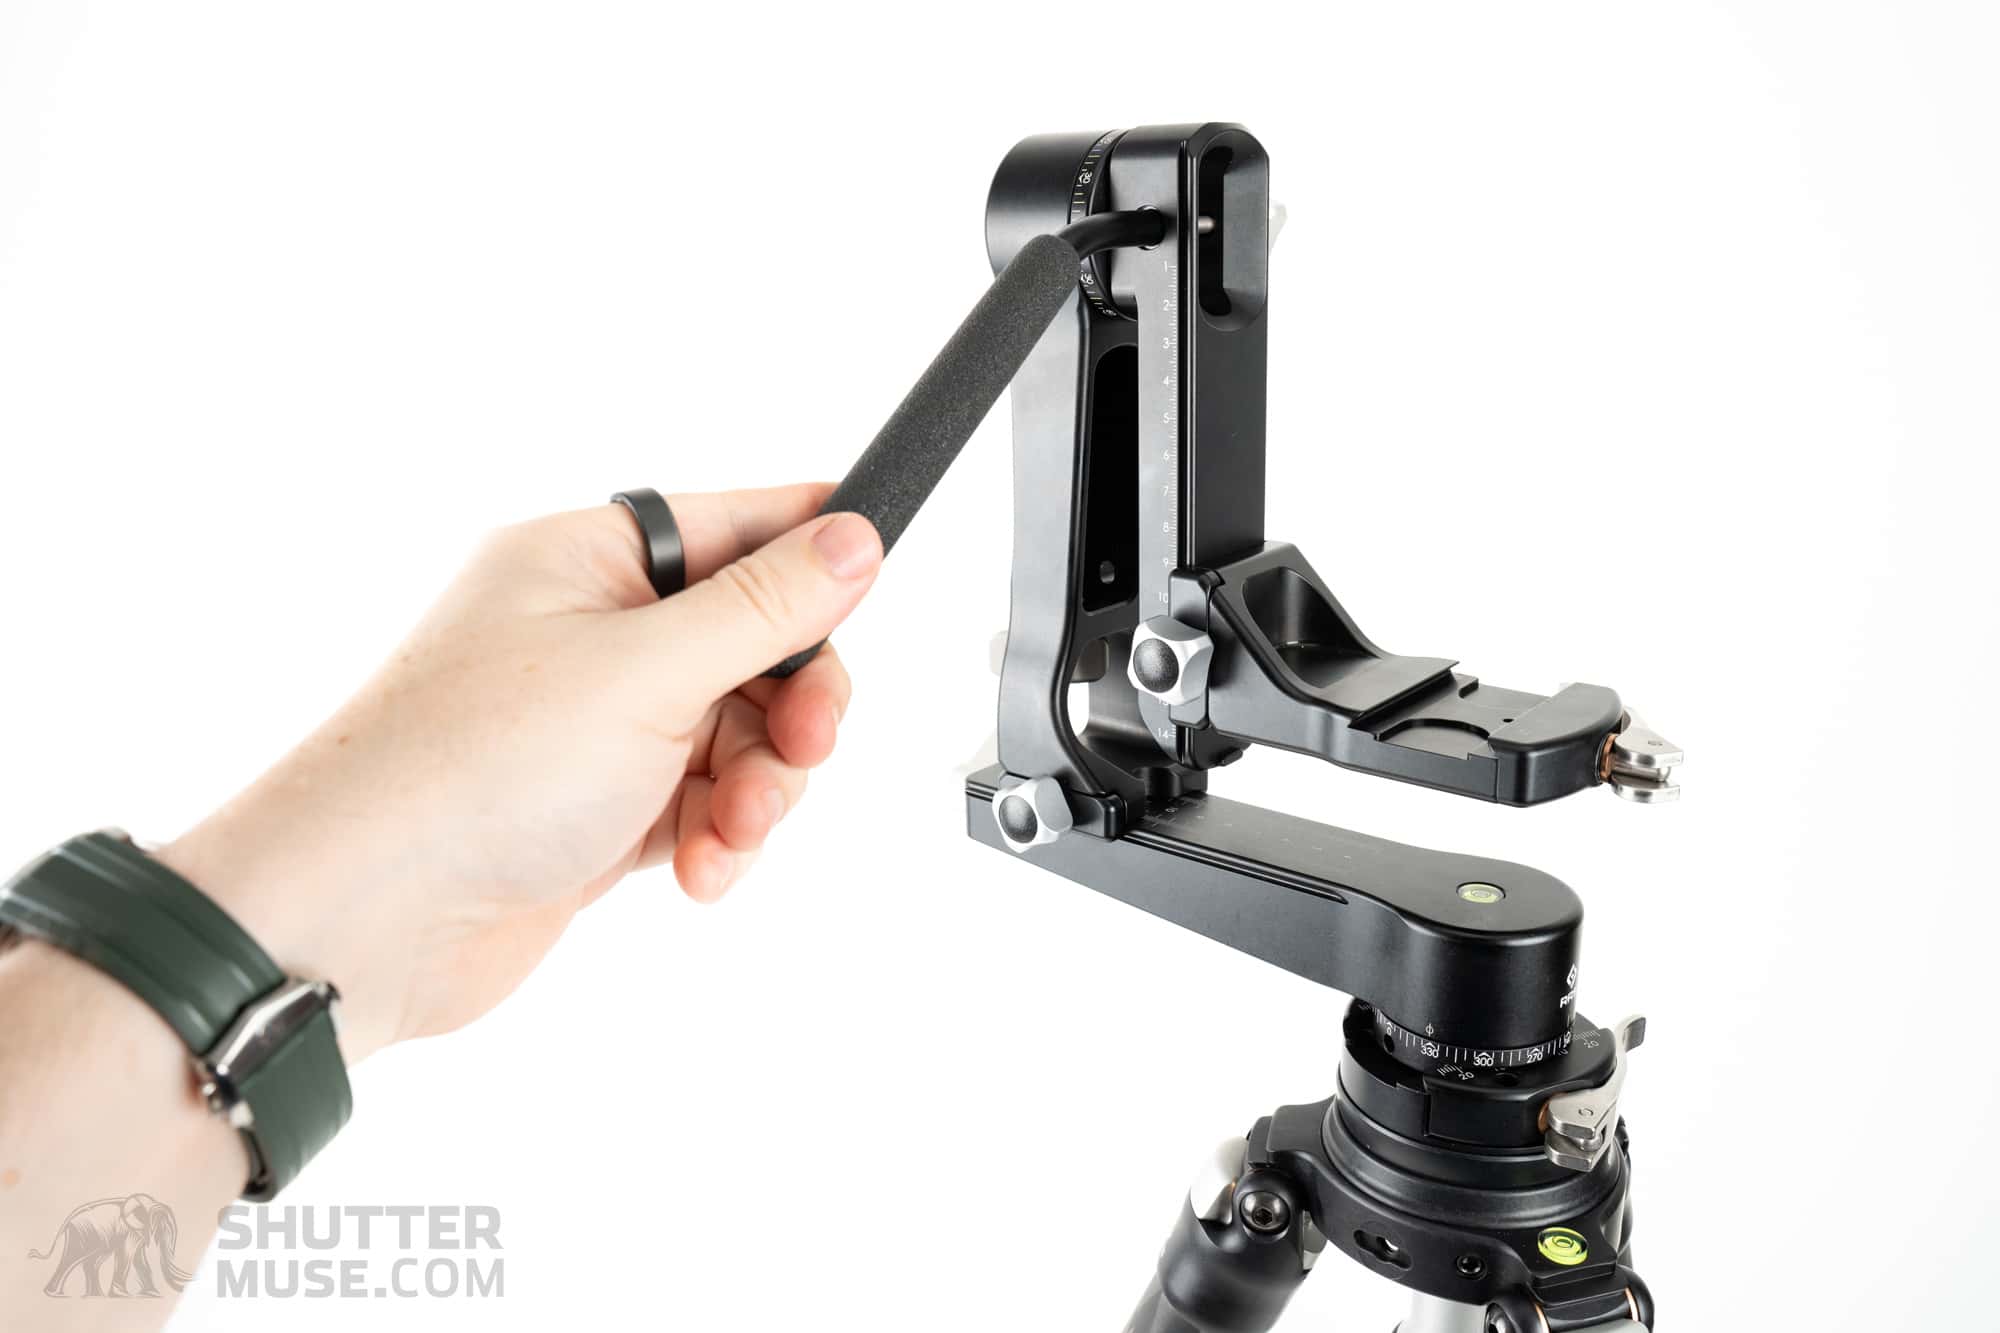
Simultaneous Pan/Tilt Release

All gimbal tripod heads have separate locking mechanisms for their pan and tilt movements. Usually, the pan locking knob or lever is placed on the gimbal’s horizontal offset, and the tilt locking knob or lever is placed high on the vertical arm alongside the bearings it controls. This means that locking or unlocking most gimbals is a two-stage process. First, you lock or unlock one axis and then lock or unlock the other. It can be done quickly with practice, but RRS still saw room for improvement.
The pan locking lever is situated where you’d expect it to be, on the end of the Horizontal Arm. However, the clever designers at RRS have moved the tilt locking lever down from its traditional position adjacent to the tilt bearings to a position at the bottom of the Vertical Arm. This places the pan and tilt locking levers within easy reach of each other and allows you to operate them simultaneously.
At first, this seemed like a small change, but I was impressed by how much difference it made in the field. Not only was it noticeably faster to go from a fully locked to an unlocked gimbal, but it was also much easier to do with my eye to the viewfinder. If the action has started and I need to unlock the gimbal, instead of unlocking each axis in turn, then putting my eye to the viewfinder, I found I could immediately place my eye to the viewfinder and blindly release both the pan and tilt locks simultaneously.
On my first trip with the gimbal, this simplified system helped me get a few extra shots by allowing me to shoot the action a second or two earlier than would generally be possible if I’m starting from a fully locked-off gimbal.
Full-Gimbal Control Arm
The Full-Gimbal version of the PG-02 Mk2 comes with a short Control Arm that inserts into the Drop-Rail. The arm helps to deliver smoother panning and tilting motions during video recording without the vibrations that can show up when moving super-telephoto lenses by hand. The second benefit to using the control arm is that it positions you a couple of steps back from the camera, allowing you to use the rear screen or a small external HDMI monitor more easily for filming. The monitor can be mounted to the camera or the gimbal using the 1/4″ 20 accessory threads.


Including the lightweight Control Arm in the Full-Gimbal package is another nice improvement over the original version of the PG-02. A Control Arm Clamp (b2-lr-vc) used to be available as an optional extra for the original gimbal, but this was a bulkier and heavier option. In keeping with RRS’ mission to decrease the size and weight of the gimbal package for this Mk2 iteration, this is another welcome and logical change.
The one downside to the new Control Arm design is that it only works with the Full-Gimbal version of the PG-02 Mk2 since it attaches through the hole in the Full-Gimbal’s Drop-Rail.
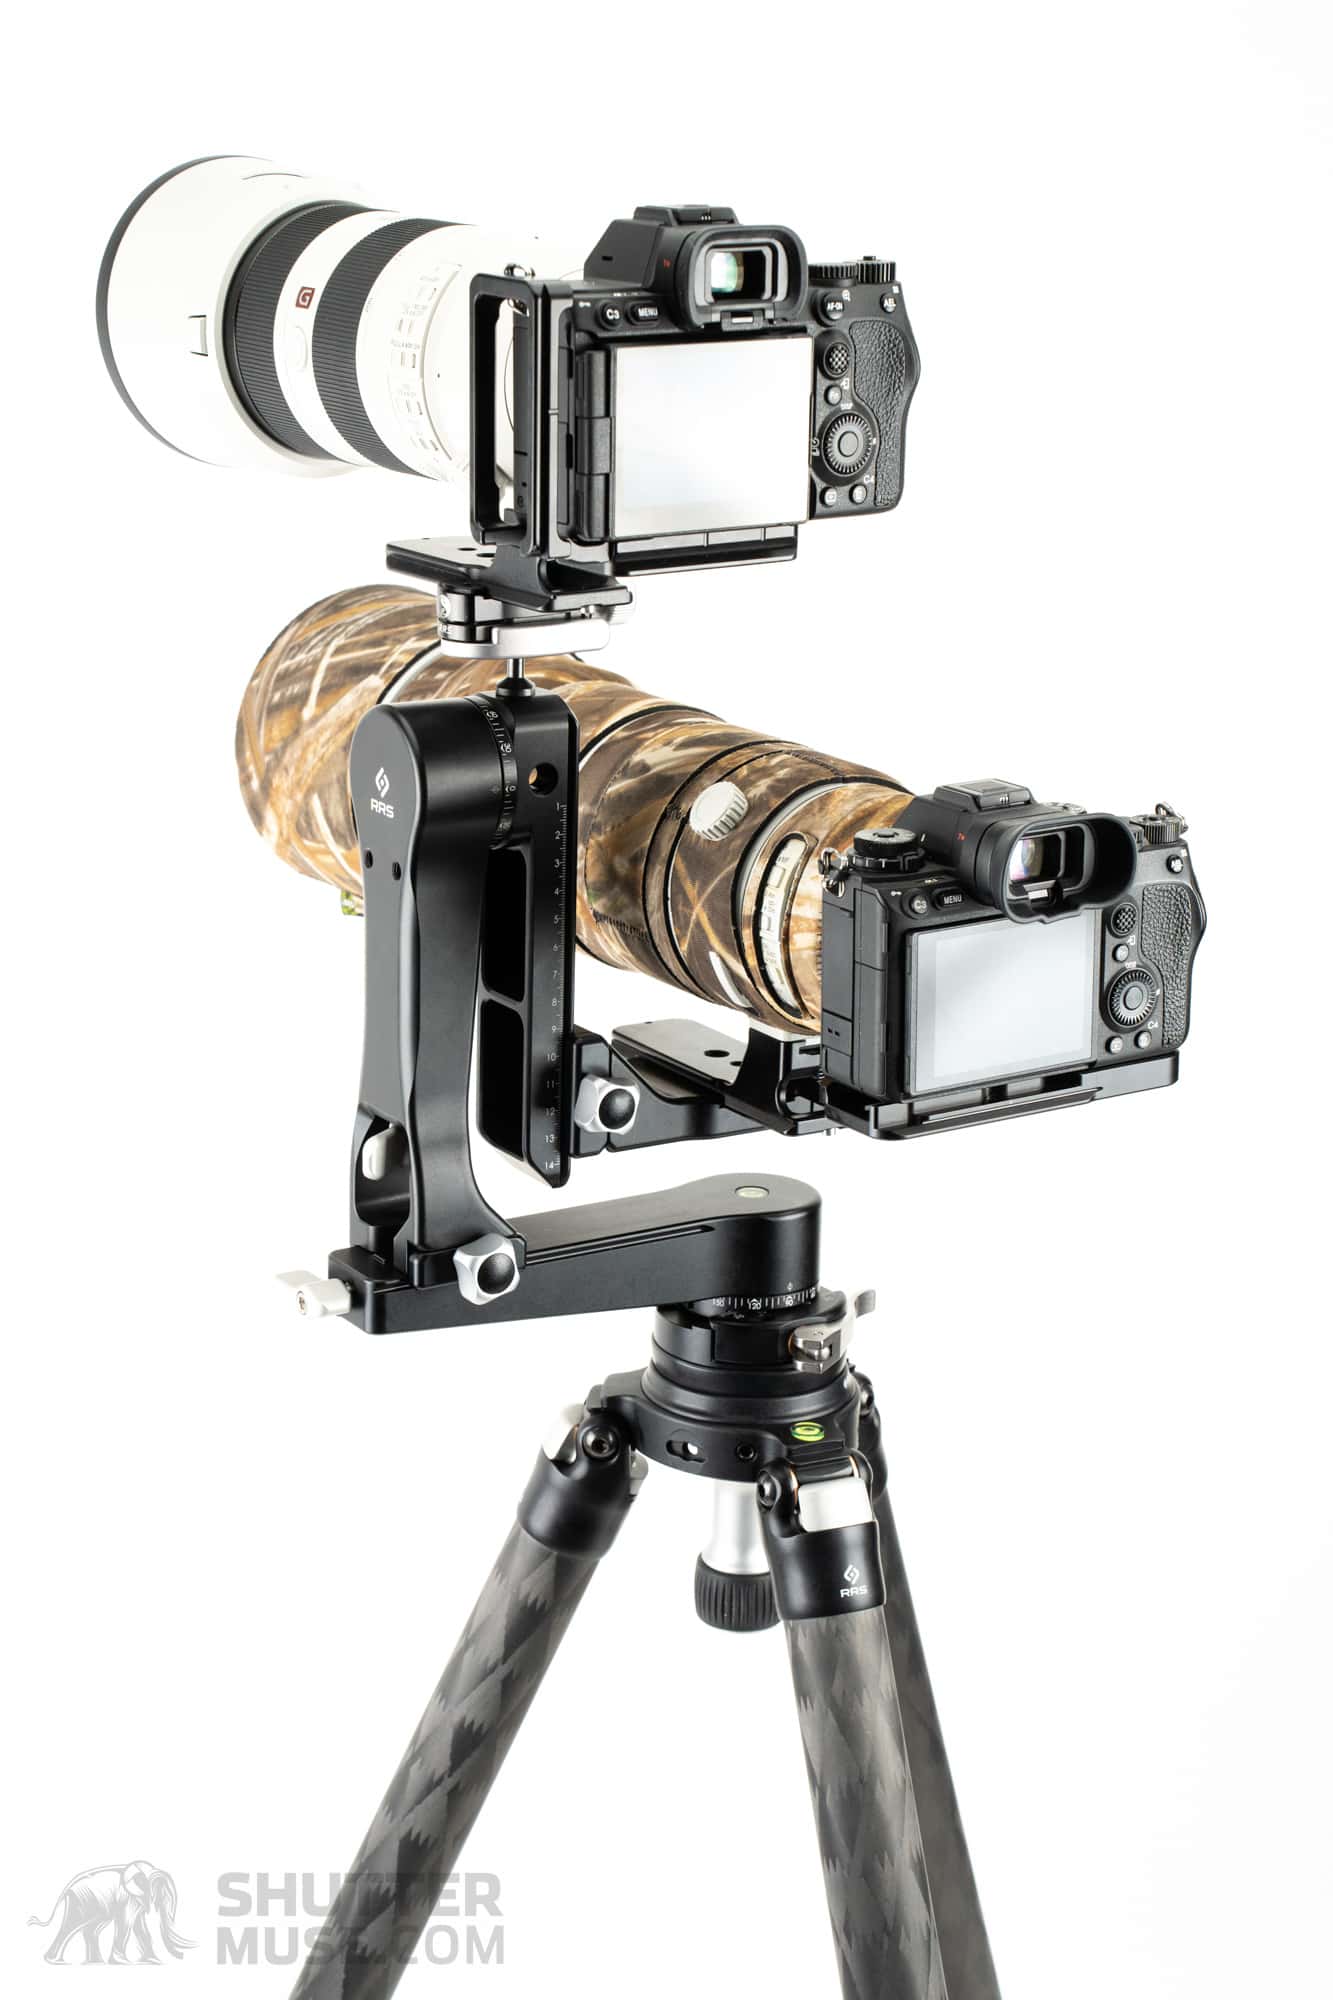
Adding a Second Camera

Previous versions of the PG-02 gimbal included threaded holes on the top of the vertical arm, enabling you to install a ball head to hold a second camera. I would occasionally use this with the RRS BC-18 Micro Ball Head. It worked well for wide-angle shots using a phone or a GoPro, but it wasn’t ideal for longer lenses. With the holes located in the top of the Vertical Arm, the camera would move horizontally with the gimbal but did not tilt up or down. For the PG-02 Mk2, Really Right Stuff’s designers have improved this considerably.

On the PG-02 Mk2, two 1/4″ 20 holes on the side of the Vertical Arm still offer a great way to attach a BC-18 Micro Ball Head to hold a phone, a GoPro, or a second camera with a wide-angle lens. It’s a great way to capture a behind-the-scenes perspective of your shoots. As well as those two holes, anyone choosing to buy the Full Gimbal option will have a third 1/4″ 20 hole on the top of the PG-02 Drop-Rail. Now that this hole is located on the Drop-Rail instead of the Vertical Arm, a second camera mounted in this position will pan horizontally and tilt vertically with the primary camera.

For those shooting videos, a second camera is a great way to capture a tighter and wider shot simultaneously. For those shooting still photos, having a second camera with a wider focal length can be useful for capturing environmental portraits of wildlife after you have captured tighter portraits with a super-telephoto lens. While the design change to place the hole on the Drop Rail is welcome, this setup wouldn’t work as well as it does without the remarkable BC-18 Micro Ball Head, with its capacity to hold just about any camera setup, including a 600mm f/4 lens! I love that little head and have found a million uses for it over the years.

Using the PG-02 for Panoramic Photography

Though most people will use the PG-02 for super-telephoto wildlife photography, RRS calls it a Pano-Gimbal head for good reason. Adding an MPR-CL II nodal rail to the kit turns the Side-Mount PG-02 into a precision multi-row panoramic head. In the gimbal head market, this feature is unique to the RRS PG-02 because its two-piece design allows you to slide the Vertical Arm along the Horizontal Arm to position the center of the lens directly over the gimbal’s point of horizontal rotation. Without this ability to move the camera along the Horizontal Arm, you would not get perfect alignment in your multi-row panoramic stitching.

In addition to the nodal rail, successful panoramic photography with the PG-02 would also require perfectly level panning. This can be painstakingly achieved by individually adjusting your tripod legs or much quicker with a leveling head like the RRS TA-3 seen in the photos on this page. Alternatively, you could clamp the gimbal onto a strong ball head.
For those that do not need the complexities of multi-row panoramic photos, the PG-02’s Horizontal Arm can be combined with an RRS FAS clamp to create the perfect single-row panoramic head. In this setup, the Horizontal Arm acts as the nodal rail with a built-in panning base. Clamp that onto a leveling head or a ball head to ensure a level horizon, and move the FAS clamp backward and forwards along the Horizontal Arm to position the lens’ nodal point over the center of rotation.
Using the PG-02 Instead of a Ball Head


When the Side-Mount version of the PG-02 is paired with a leveling base on your tripod and an L Plate on your camera body, it can be used in place of a ball head. Some people find it preferential and find that the disconnection between the tilt and pan movements allows them to adjust or correct complicated compositions more easily. Of course, moderate telephoto lenses such as a 70-200mm can be used for landscapes by adding an Arca-Swiss dovetail to the lens foot and changing camera orientation by rotating within the lens collar.
The Full-Gimbal version of the PG-02 Mk2 can also be used for landscape photography, but you need to purchase an MPR-CL II rail with an integrated clamp and the L Plate on the camera. This requirement is because the Cradle Clamp runs in the fore-aft direction, perpendicular to what you need for the camera body. The MPR-CL II gives you a perpendicular clamp and allows you to shift the camera body backward, so it doesn’t contact the gimbal’s Drop-Rail.
I often travel with a super-telephoto lens for wildlife photography and a wide-angle lens for landscapes. Using the gimbal head for everything saves me some weight in my camera bag and greatly simplifies my setup. While it’s possible to use a ball head for both jobs, a ball head is a fairly terrible head to use with a super-telephoto lens, whereas the gimbal head does an excellent job for both. If you’ve been looking for one tripod head to do everything, the RRS PG-02 Mk2 is as close to a perfect solution as you’re going to get.
Side-Mount Vs. Full-Gimbal
Whether you buy the Side-Mount or Full-Gimbal version of the PG-02 Mk2, they can be easily converted from one to the other. If you want access to both types of gimbal, buy the Full-Gimbal version and add a B2-LR-II clamp to your cart. Swapping the Drop-Rail for the lever-release clamp to convert from Full-Gimbal to Side-Mount needs three screws loosening with the supplied hex tool. If you’d rather choose one type and stick with it, this section will help you figure out which version is right for you.
Side-Mount
- Lighter by 11.85oz (336g)
- More compact. Easily fits into backpack side pockets.
- When properly balanced, lens returns to the level position when you take your hands off it
- Lower cost ($750 vs $950)
- Fewer parts = more rigid
- More clearance for extreme upward and downward-facing lens angles
Full-Gimbal
- Easier to load the Cradle Clamp as it takes the weight of the lens
- When properly balanced, lens does not move when you take your hands off it
- Includes Control Arm
- More difficult to use in place of a ball head
- More difficult to use as a panoramic head
- Easier to use with a telephoto lens rain cover
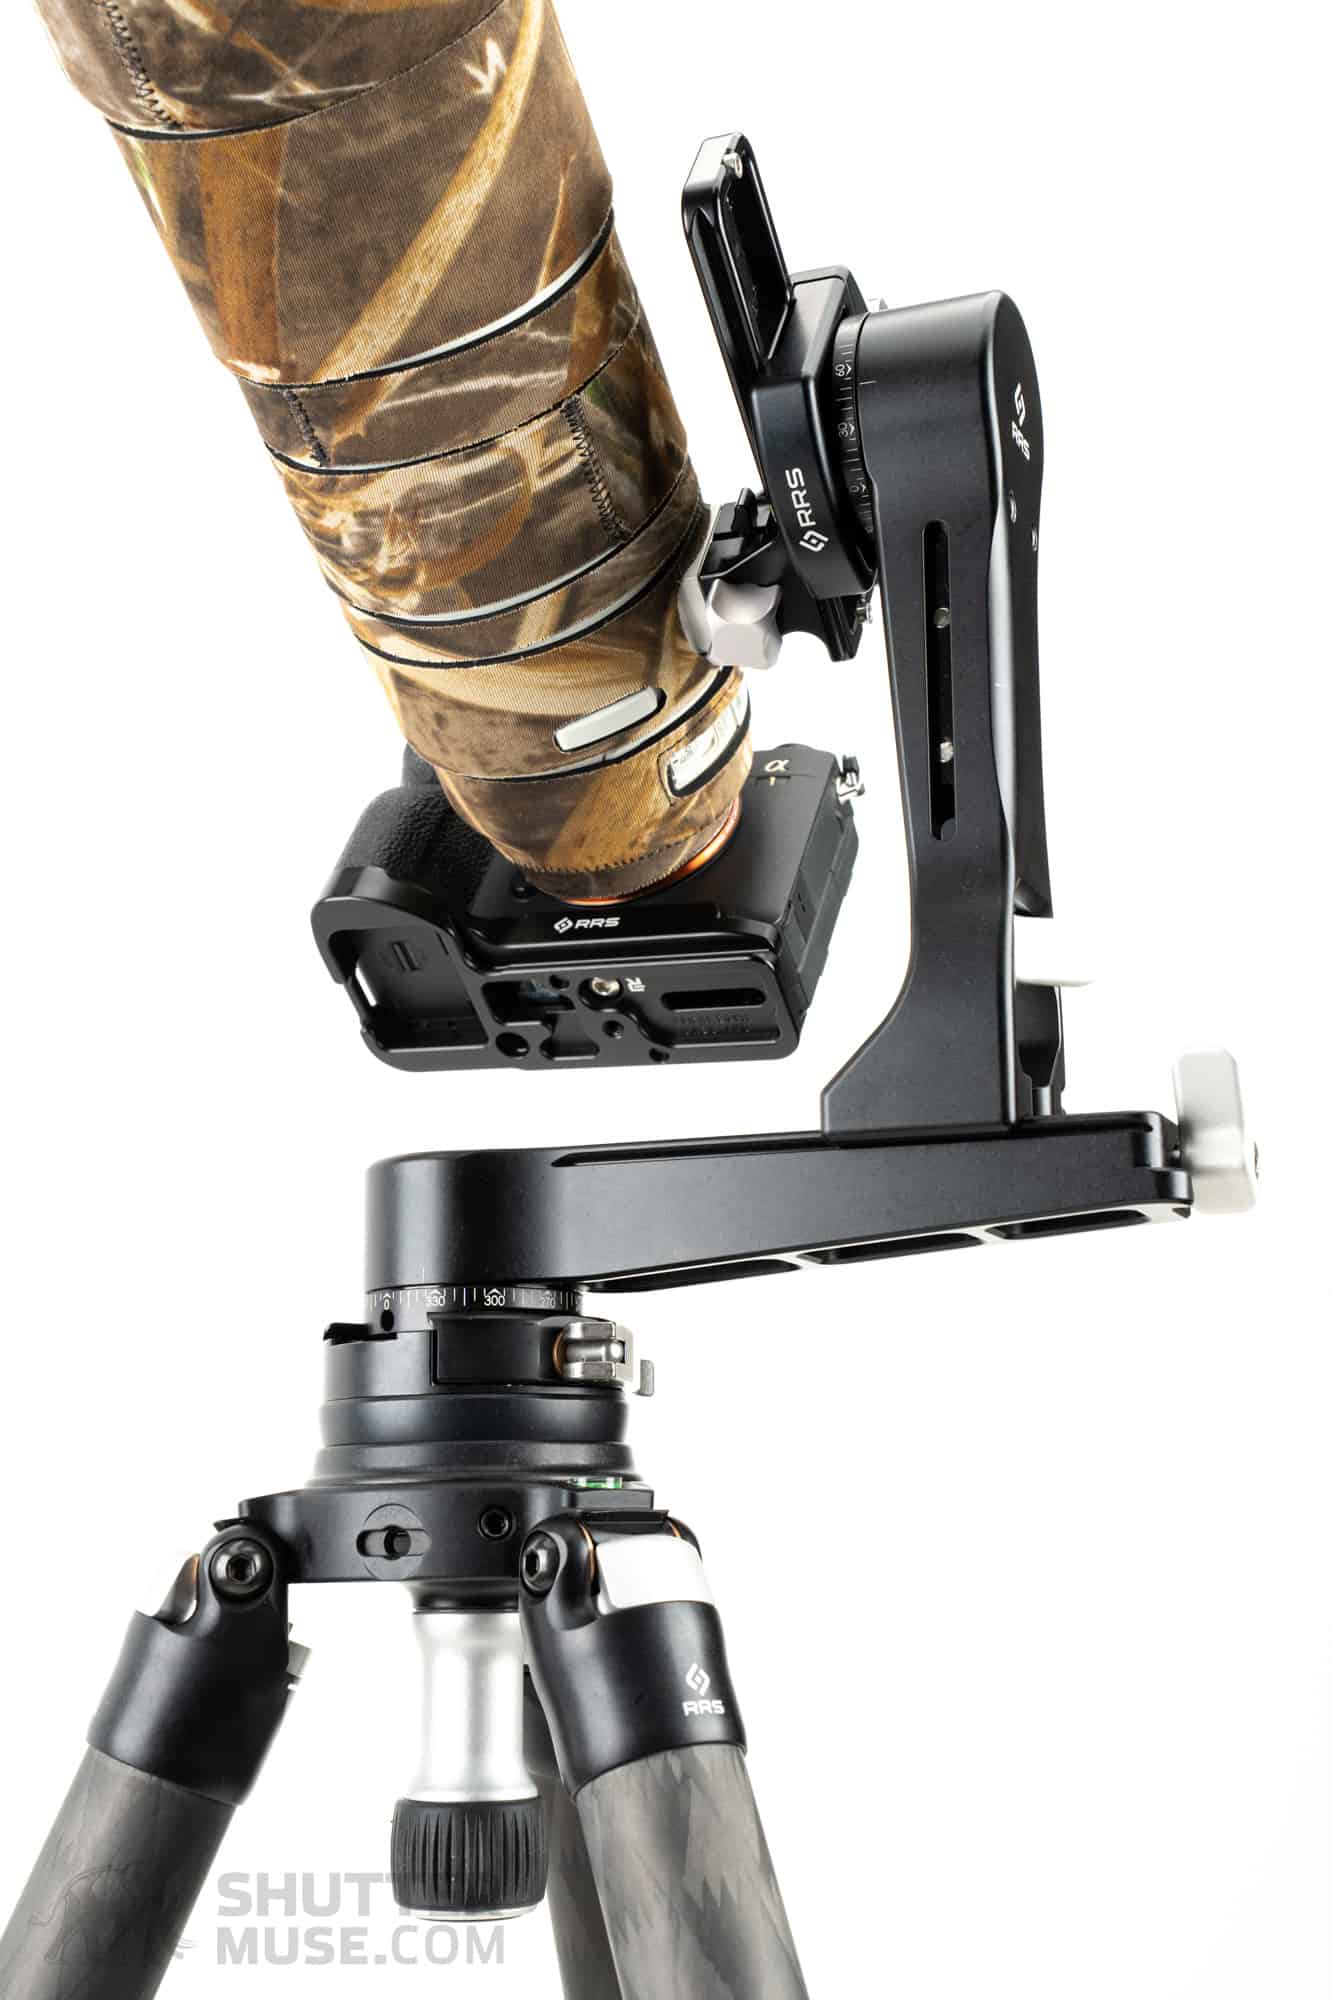
Over the years, I’ve had many conversations about the pros and cons of side-mount gimbals compared to what many people see as the more traditional cradle style. The first question people ask when they see me using a side-mount gimbal is, “is it safe?” And let’s be clear. They do not care about my safety; they are asking about the safety of my camera and lens. The answer to this first question is a resounding yes. A side-mount gimbal is perfectly safe. In the case of the PG-02 Mk2, both versions of the gimbal carry the same 50lb load rating, which is more than enough, by a factor of two, for a 600mm f/4 and a pro-sized camera body.
Once I have convinced someone that a side-mount gimbal is safe for their gear, there are often questions about how to load the camera and lens. To load a side-mount gimbal, you will first swivel the lever-release clamp so that the lever is on the top, then you will lock the gimbal’s tilt and pan mechanisms. Next, you grasp the lens barrel with one hand, usually just in front of the camera body where the circumference is smaller, and lift the camera and lens into the clamp. Continue holding the weight of the camera and lens with that hand while closing the lever-release clamp with your other hand.
Loading the Full-Gimbal version works a little differently. First, you will set the Cradle Clamp horizontal, lock the gimbal’s tilt and pan mechanisms, and open the lever on the Cradle Clamp. Then you lift the camera and lens, with one hand or two, and rest it onto the open jaws of the Cradle Clamp. Once you are sure that you have the balance point roughly in the right place, you can remove one of your two hands from the lens, letting gravity keep the lens on the clamp with your hand for guidance. Using your free hand, lock the lever on the cradle.
As long as you can hold the entire weight of your camera and lens in one hand, you should not struggle with loading a side-mount gimbal clamp. If you do struggle with the weight of your gear or have a physical disorder that might leave you struggling to close a lever clamp, the Full-Gimbal version would be a good choice.

Rarely mentioned in gimbal head discussions is the difference between the behavior of properly balanced side-mount and cradle-mount gimbal heads when you take your hand off your lens and camera. When a side-mount gimbal is balanced correctly, the lens will always return to the horizontal position when you take your hands off the camera. When a cradle-mount style gimbal is correctly balanced in both the vertical axis and the horizontal fore-aft axis, the lens will continue to point in whatever direction it is when you take your hands off the camera. If your cradle-mount gimbal is not doing this, it usually means you have not adjusted the vertical balance.
In use, I do prefer it when the lens stays pointing in the direction you leave it. It can save a precious second if you’re waiting for some action and already have the lens lined up with a known location. Of course, you can leave a side-mount gimbal pointing with the lens at an upward or downward angle, but the tilt lock must be engaged to keep it there and disengaged when the action starts. On the PG-02 Mk2, the new ergonomic, low positioning of the tilt lock control goes a long way to alleviating that negative.
My choice? I’m choosing the side-mount style of gimbal 95 times out of 100. The weight savings and the smaller footprint in my bag are big enough reasons to make that choice. The slightly improved stability and easier use as a ball head replacement are secondary bonuses. In the case of the PG-02 Mk2, the main reasons I might choose to convert my Side-Mount gimbal to the Full-Gimbal for a day would be to use the Control Arm for video shooting or the top 1/4″ 20 thread to mount a second camera.
Will There Be an FG-02 Mk2?

When the original version of the PG-02 gimbal was available, there was a sister product called the FG-02. FG stood for “Fluid Gimbal.” The FG-02 used fluid cartridges in the pan and tilt mechanism, similar to those in fluid video heads. Again, the pan and tilt mechanisms had an adjustable amount of drag, just like a fluid video head. This unique product was great for filming videos with a super-telephoto lens and delivered smoother panning and tilting than the standard PG-02. I believe they were built to order, so they were not a product with a high sales volume. Still, many regarded it as an excellent gimbal head for video work.
The FG-02 was discontinued at the same time as the original PG-02. Unsurprisingly, as soon as it was announced that an Mk2 version of the PG-02 was coming to market, some asked me whether I thought an FG-02 Mk2 would follow. The short answer is that I don’t know. The longer answer is that I think we might see one eventually if enough people ask, but RRS is not known for speedy product development. They take the time to get things right. If you like the look of the PG-02 Mk2, you should buy one now. I wouldn’t recommend waiting to see whether an FG-02 Mk2 ever comes to pass.
Conclusion
The RRS PG-02 Mk2 is one of the more expensive gimbal heads on the market, but its exceptional performance makes it worth every penny. Compared to the previous version, the decreased weight and slightly more compact design are welcome, and I’m impressed that this was achieved while adding several new features and without compromising the head’s rigidity and capacity,
While a lighter-weight gimbal was a no-brainer upgrade for an Mk2 version, I didn’t expect the cleverly redesigned pan and tilt locking switches. The new ability to simultaneously unlock the pan and tilt mechanisms with one hand is a fantastic functional improvement unique to the Really Right Stuff gimbal. While testing the PG-02 Mk2 on its first wildlife expedition, this simple, functional change earned its keep and enabled additional shots that would have been lost with a slower dual-step release system.
Outside its function as a super-telephoto lens support device for wildlife photography, this gimbal is also a superb replacement for a ball head or panoramic head, giving photographers who shoot a variety of genres an option to buy and travel with a single tripod head that can do it all. Simply put, if you want the best gimbal head on the market, get the PG-02 Mk2.
Where to Buy
The RRS PG-02 Mk2 gimbal is currently available from B&H Photo as a full gimbal with the cradle, or in the side mount configuration. International customers should know that B&H handles overseas shipping brilliantly. In many cases you can get free shipping and pay for duties upfront to avoid nasty surprises.


Very nice review Dan. I have the original side mount version and the new MkII side mount version which I have adapted to a full gimbal cradle mount version by adding a drop rail and a RRS cradle I had. Easy to switch back and fourth with no screws to remove, just open the clamp on the side mount. I find the new locks being placed in close proximity to each other easy to manipulate with just one hand. I also find the new locking mechanisms better at adding smooth varying degrees of drag to each access. When using as a ball head and locking done both the pan and the tilt, It’s easier to lock the tilt with no lens movement than it was on the original version. It’s a great head!
I cringe when looking at any side mount with 300 2.8 and up as I have learned my lesson that the full gimbal will result in less spills
Glad for insurance and Canon Pro Service
I’ll never use side mount again
That out of the way excellent review and serious competition to Wimberley
Sorry to hear that you had an accident. I’ve never heard directly from someone that did. Can you explain what happened?
All sounds great BUT one thing missing is a stepper on the base instead of just degree markings you have to look at for a next capture when doing a panorama! Also no need to look at the cameras screen to pick the next 1/3 or 1/4 part. Exp. I can use a $120 pano rig that has a multi selectable stepper say at 15 degrees and do a 200 degree panorama of the Milky Way at night never looking at the camera screen and using in camera NR and moving to the next step while in NR mode and total capture of 1 1/2 minutes. Only making sure leveled. And the rig fits in it very small bag to boot.
Of course, that will be the problem with any product designed for multiple applications. Most people buying this head are wildlife photographers, and a stepper would not work for them. In contrast, it is still possible to use a pano head that doesn’t have a stepper, and I don’t find it necessary. When I shoot panos I don’t look through the viewfinder once it is set up; I look at the scale and rotate the necessary amount between shots. I don’t see that as an issue, although at night, it requires a brief moment of light from my phone to see the scale.
Side mounting lenses is risky. Can be fatal for some lenses.
Should only be tried with lens foots that encircle the lens body, if at all.
The Nikon 500mm/f5.6 PF Tripod Foot has a truly awful design, with the base (to which the tripod foot is attached) fixed to the body of the lens with just four tiny screws. Those screws are quite weak and can come off even when carrying the lens by the foot. A friend found them to be very loose when he opened up the original foot to replace it.
Here’s a comment from the linked thread below –
“there is a thread on Fredmiranda about a user that had that plate (where the foot attaches to the tripod collar) come off – apparently all four screws had worked their way loose…”
When the entire lens is hung from a foot that’s not even under it (when side mounted on a gimbal), there is no way those screws are going to sustain this load for long. They’re badly designed as it is, and are certainly NOT designed for cantilever mounting. (In fact, I don’t think any lens foot has ever been made for a sideways cantilever mount. If such a lens does exist, I’d love to see it).
See the last image in the original post –
https://www.photo.net/forums/topic/521760-nikon-500mmf56-pf-tripod-foot/
I have to be honest; I think this opinion is a gross overreaction. Many other photographers and I have been side-mounting lenses for nearly a decade since RRS began popularizing this style with the original PG-02. I have never had a screw come loose, let alone multiple come loose to the point where it could cause an issue. If people are really worried about the screws coming loose, use a dab of blue Loctite. Problem solved for $9.99.
As for the comment on Fred Miranda, that’s just one person’s opinion. My opinion is different, and before being a photographer, I was an Aerospace Engineer, so it’s not an unfounded one. The commentator is talking as if the cantilevered force is acting directly and entirely on the four screws, but that is simply not the case. As long as your screws are tight, most force acts on the contact point between the lens casing and the lens foot. Both of which are solid aluminum.
As far as I know, there is not one – not ONE – piece of evidence or report online that shows any failure of a lens foot or casing from the forces applied by side-mounting. Yes, there are cases where people have dropped their lenses while mounting them, which is pure user error. You will find the same stories of the same thing when people use ball heads. Loose screws causing an accident? I have to chalk that up to user error or manufacturer error. The screws were probably not tightened while the lens foot was being installed. And while the screws were loosening, why did the user not feel that and retighten them? This doesn’t make sense to me. I would notice if there were even a tiny amount of play in my lens foot from a loose screw. How did someone allow all four screws to come loose to the point that the foot detached from the lens?! I’m sorry, but you can’t blame side-mount gimbals if someone is just negligent with thousands of dollars worth of camera equipment.
A thorough, concise and well illustrated piece Dan. I have the original RRS gimbal and switch between side mount and cradle without any of the “dangers” mentioned above. One thing I would add is that I bolt on an 80mm clamp for side mounting. In terms of the update, saving a bit of weight isn’t a motive for me to change. I have mentioned before that my other gimbal, made by GimPro in South Africa, is in my opinion even better – especially for wildlife. It has the smoothest bearings and has options to extend the radius of operation with extension arms when you are following hunts. Take a look sometime.
I bought the FG-02 with the side mount.
I had to replace the lever-release clamp with a less convenient RRS screw-knob clamp to use it with my heavy Canon 500/4 IS Mark I equipped with the RRS replacement lens plate. That lever-release clamp what’s not strong enough to keep the lens firmly attached.
Later on I upgraded to the cradle clamp which I find much more convenient with such a heavy lens and much faster to balance.
“That lever-release clamp what’s not strong enough to keep the lens firmly attached” – There’s no reason why the clamp would not have held the weight of that lens unless you somehow had a faulty clamp. Did you ever talk to RRS about this?
I have used the FG-02 with Canon and Sony cameras with 600/4 lenses for many years without any issues.
Here is my configuration, which requires no tools to switch among side mount, cradle mount and multi-row Pano:
1) FG-02-HB Horizontal Arm
2) FG-02-VA Vertical Arm
3) PG-02-VR Vertical Rail (installed to the vertical Arm)
4) FAS Clamp
5) CRD Rail (vertical rail with on end clamp)
Side mount configuration:
FG-02-HB + FG-02-VA + PG-02-VR + FAS Clamp (centered on tilt axis)
Cradle mount configuration:
FG-02-HB + FG-02-VA + PG-02-VR + CRD Rail + FAS Clamp
Multi-Row Pano:
FG-02-HB + FG-02-VA + PG-02-VR + FAS Clamp (nodal point align with the tilt axis)
What do you use to connect the Really Right Stuff PG-02 MK2 full gimbal to the RRS TA-3 Short Handle + Lever Clamp Leveling Head maybe the RRS TH-DVTL-55 Dovetail plate?
Thanks and great review .