
Narrowband Imaging
What is narrowband imaging?
In normal color imaging, three filters (red, green, and blue) are used to separate the primary colors of the visual spectrum. Red, green, and blue (RGB) filters are designed to approximate the color sensitivity of the human eye, so that the resulting image is true color. Each of the RGB filters covers approximately one third of the visual spectrum and the filters overlap slightly so that the whole spectrum is detected by the CCD. (There is sometimes a gap between the green and red filters to block a prominent light pollution emission line, as in the diagram below.)
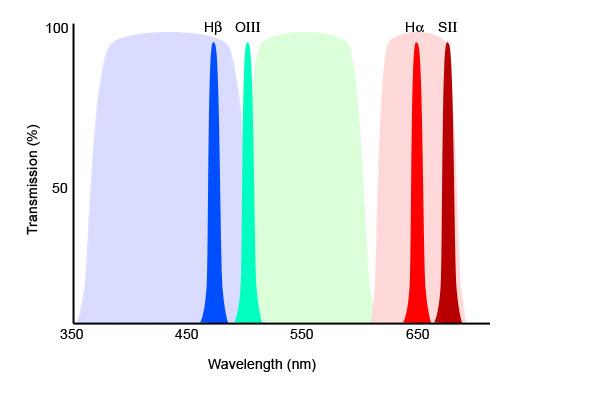
Narrowband filters instead capture only a very small part of the spectrum. They are said to have a narrow bandpass. The bandpass is simply how much of the spectrum the filter allows to pass. This is usually measured in nanometers. The entire visual spectrum runs, approximately, from a wavelength of 400nm (blue) to 700nm (red). Therefore, a typical RGB filter might have a bandpass of 100nm. In contrast, a typical narrowband filter has a bandpass of just 3-5nm (see following pages for specifics).
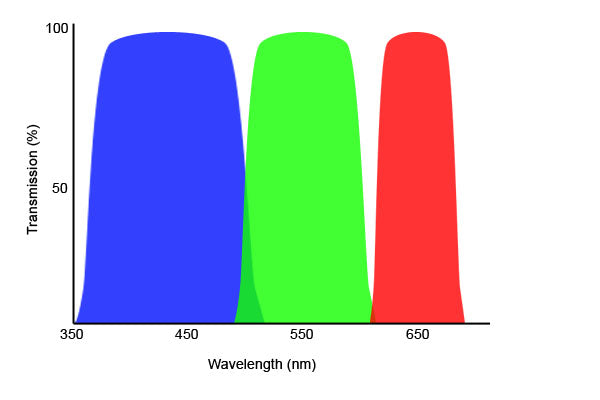
Above: Typical set of RGB filters

Above: Some of the more common narrowband filters, with RGB filters in the background for comparison
|
Bandpass and Focal Ratio An interesting effect of narrowband filters is that the bandpass is a function of incident light angle. In other words, a steep light cone entering a narrowband filter can actually change the bandpass wavelength. An example of this effect is the need for solar H-alpha filters to have a roughly parallel beam of entering light. With the older DayStar filters, the primary filter was located at the back of the scope and required the telescope to operate at a very slow focal ratio (greater than f/30) to have an approximately parallel beam of light entering the filter. The newer Coronado filters place the primary filter on the front of the scope. Therefore the filter is receiving a parallel beam of light (directly from the Sun) and the telescope itself can then operate at any focal ratio. The same effect is seen with narrowband filters for CCD imaging. At a certain focal ratio (faster than f/4), the bandpass of the filter has shifted so much that the peak wavelength now sits off the main transmission portion of the filter and the effect is significantly reduced filter efficiency. For telescopes operating at focal ratios below f/4, wider bandpass filters (10nm) are recommended to keep the peak wavelength within the highest transmission part of the filter. For slower scopes, a narrower filter is preferable as it enhances the effect of the filter. |
Emission Lines
Narrowband filters are designed to capture specific wavelengths of light. There is a large class of celestial objects known as emission nebulae, and their name arises from the fact that they are actually emitting their own light (as opposed to reflection nebulae, which shine by reflectedstarlight). The Orion Nebula, Lagoon Nebula, and Swan Nebula are three common examples of emission nebula. Planetary nebulae are normally considered a separate class of objects than emission nebulae, since they represent a very different phenomenon (star death instead of star birth), but for CCD imaging purposes, they can also be considered emission nebulae as they are emitting their own light. Supernova remnants also fall into this category, so objects like the Ring Nebula, Dumbell Nebula, Veil Nebula, and Crab Nebula are all potential targets for narrowband imaging as well. (The blue nebulosity surrounding the Pleiades is a classic example of a reflection nebula, and would be something that is not well suited for narrowband imaging.)
What all these emission nebulae have in common is that they are composed of gases, and these gases are emitting light. The atoms within the gas are being excited by energy from nearby stars (either the stars forming within the nebula, as in the Orion Nebula, or by the remnant of the dead central star in a planetary nebula like the Ring). The energy imparted by the starlight causes electrons within the gas atoms to jump up to a higher atomic orbit. Electrons are lazy by nature and prefer to be in the lowest energy state possible. The electrons will re-emit their excess energy and drop back down to a lower orbit. They give off the extra energy in the form of a photon of light. And since electrons always make jumps in discrete steps (they go from high energy to low and there is nothing in between), an electron going from one orbit to a lower one always gives off the same amount of energy and therefore the same wavelength of light. Thus, each atom has a distinct emission line or color of light associated with it. Also, each atom contains different orbits, so there can be multiple wavelengths of light from a single element, such as hydrogen.

Above: An electron drops back to its ground state from a higher orbit and gives off a photon of light in the process.
Common Filters
The two most common elements contributing to emission lines in nebulae are hydrogen and oxygen. Other elements such as sulfur and nitrogen also create prominent lines. Listed below are the common emission lines and filter types used in narrowband imaging.
Hydrogen-Alpha - 656.3nm
The most dominant emission line in a star-forming region such as the Orion Nebula is called hydrogen-alpha, or H-alpha. This light is created by atomic hydrogen, the primary constituent of the Universe and the basis of the nuclear fusion that powers stars. H-alpha is in the red part of the spectrum and contributes to the overwhelming red color of most nebulae as seen in normal RGB images.
Hydrogen-Beta - 486.1nm
Hydrogen gives of light at several wavelengths. The second most common, after H-alpha, is the H-beta line in the blue part of the spectrum. Since the dark-adapted human eye is sensitive to blue and green but not red, H-beta filters are sometimes used for visual observations of certain nebulae.
Oxygen-III - 500.7nm
This line is given off by doubly-ionized oxygen atoms, meaning the electrons are dropping two energy levels. This line is in the blue-green portion of the spectrum. It corresponds, by happy coincidence, to the peak sensitivity of the dark-adapted human eye, so OIII filters are common visual accessories. The OIII line is the dominant emission from planetary nebulae. (By the way, OI is non-ionized oxygen, and OII is singly-ionized oxygen. Hence doubly ionized gets the designation oxygen-III.)
Sulfur-II - 672.4nm
Singly ionized sulfur emits light in the deep red part of the spectrum, beyond H-alpha. It is a weaker emission than H-alpha and OIII, but it is the most common filter used after these two.
Nitrogen-II - 658.4nm
Singly ionized nitrogen, like H-alpha and SII, also gives off light in the red part of the spectrum. NII is a less commonly used filter, but its use is seen often in famous Hubble Space Telescope pictures and it is occasionally used by amateur imagers as well.
Advantages of Narrowband Imaging
The primary advantages of narrowband imaging are the ability to detect more detail and the ability to image from a light-polluted area since the filters do not pass the light emitted by most types of street lights (or moonlight, for that matter). Also, narrowband images isolate the light given off by specific kinds of gas, so the images are also scientifically interested in and can tell a lot about what is going on inside a nebula. Another advantage is for users of non-antiblooming CCD cameras. Since the filters let through less starlight (but still pass most of the nebula's light), you can take a much longer, and hence more detailed, exposure without blooming the brighter stars in the picture.
Combining the Colors
Narrowband filters do not attempt to replicate the spectral sensitivity of the human eye. Therefore, color images created from these filters are called false color images. Typically, three filters are used and each is assigned to one channel of an RGB image. One filter becomes the red part of an image, one becomes the green part, and the third is the blue part. Once combined, each color represents a particular wavelength of light and hence a particular element in the gas cloud. In addition to being a pretty picture, a narrowband image is also scientifically interesting (which is why these types of filters are used on the Hubble Space Telescope and other professional instruments).
The most commonly used filters are H-alpha, OIII, and SII. The order in which the narrowband filters are combined in an RGB image is arbitrary. The most common two methods are listed below. Keep in mind that H-alpha is almost always the dominant emission from star-forming regions, so whatever channel you assign H-alpha to will be the primary color of the final image.
HOS
H-alpha = Red OIII = Green SII = Blue
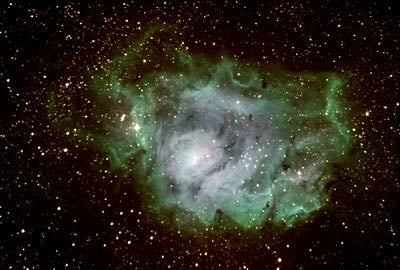
In this method, the dominant emission line (H-alpha) is assigned to the red channel. Since this emission line is what normally contributes to the red color in normal RGB-filtered images on nebulae, this method leads to an approximation of true color, i.e., emission nebulae look predominantly reddish. However, in this method, the blue channel is coming from SII, which is actually in the red part of the spectrum -- redder than H-alpha, in fact -- and so there is not really any part of the blue spectrum involved in the image.

Above: Lagoon Nebula in HOS. Red is from H-alpha emission, magenta from a combination of H-alpha and SII, and yellow from a combination of H-alpha and OIII.
SHO ("Hubble" Colors)
SII = Red H-alpha = Green OIII = Blue
At first, this doesn't seem like a logical combination, since we think of OIII as green light and H-alpha as red. But, this method actually puts the filters in order from bluest to reddest. Again, there is no blue part of the spectrum involved, but OIII is closest to the blue end of the spectrum, SII is closest to the red end, and H-alpha is in between. This combination is used in some of the famous Hubble images such as the "Pillars of Creation". Since H-alpha is assigned to the green channel, images combined this way tend to look predominantly green.

Above: Swan Nebula in SHO. Green is from H-alpha, turquoise from a combination of H-alpha and OIII, and yellow from a combination of H-alpha and SII.
Other Methods
HaOHb
H-alpha = Red OIII = Green H-beta = Blue
The basis for this combination is that each filter represents one part of the visual spectrum. H-beta is actually in the blue part of the spectrum, OIII in the green, and H-alpha in the red. SII or NII could easily be substituted for the H-alpha, but H-alpha is still the dominant emission in most nebulae, so its use is usually recommended.
SNH
SII = Red NII = Green H-alpha = Blue
This method uses all three of the emission lines in the red part of the spectrum. It leaves the lines in order from bluest to reddest, like the HOS method. Since H-alpha is the blue channel, and since NII is second more prominent line, the images tends to be more bluish-green. Another possibility is to use the same filters but make H-alpha red which will give a reddish-yellow cast to the nebula.
HOO
H-alpha = Red OIII = Green OIII = Blue
There are a couple advantages to this method. First, it requires 1/3 fewer images, as only two filters are used. The OIII image is used for both the green and blue channels of the final RGB image. Also, many objects have very little emission outside of these two lines, so there often is not much advantage to spending extra time capturing those other emission lines. This method works particularly well on the Veil Nebula and is a good choice for planetary nebula as well, since their emission is mostly from excited oxygen.
4+ Channel Color
Programs such as Photoshop and MaxIm DL allow you to combine more than three colors, so it is possible to combine four or five or more different filters. This is also a technique used in many Hubble pictures. Typically you would start by assigning three channels to red, green, and blue, as usual, and then progress to the secondary colors cyan, magenta, and yellow. But again, this is an arbitrary system, so do whatever looks best to your own eye.
This technique can also be used to assign colors other than red, green, and blue to the standard three filter set. For example, OIII is actually in the blue-green part of the spectrum, so it could be assigned a turquoise color. Or H-alpha could be given red while SII is assigned a dark brick red closer to its actual spectral color (although the results may or may not be desirable!).
Above: A color combination in the Lagoon Nebula you've never seen before...and probably don't want to see again!
Really any combination is feasible, and again the combinations are arbitrary, so do whatever strikes your fancy! The image below uses the HOS method but adds a blue-filtered image to capture the reflection nebula above the main Orion Nebula which is invisible through narrowband filters.

Above: Orion Nebula through H-alpha, OIII, SII, and blue filters. Image was taken from a suburban backyard and with a first quarter moon out. This demonstrates a couple of the advantages of narrowband imaging.
Taking Narrowband Images
The most obvious difference between taking narrowband images and taking regular RGB images is that the required exposure times are much longer. In practice, exposure times can increase by as much as 10 times over standard RGB exposures. So, if you are used to taking 3 minute exposures, get ready for half hour ones now! In the end, the amount of detail that can be achieved is well worth the extra time invested.
The methods employed are basically the same as normal RGB imaging, with a few modifications.
Filters
The filters used in narrowband imaging typically have bandpasses in the range of 3-5nm. The most popular filters are made by Astrodon and Custom Scientific. Older Custom Scientific narrowband filters had a bandpass of 3nm. Current filters typically have a bandpass of 4.5nm, while the popular Astrodon H-alpha filter has a 6nm bandpass. The bandpass was expanded to allow the use of the popular faster-focal-ratio scopes such as the Takahashi and TeleVue refractors, etc. At fast focal ratios, narrowband filters shift off band, meaning they shift away from the wavelength they are designed to capture. The effect is a significant decrease in sensitivity. A wider bandpass allows the required emission line to remain within the filter's highest transmission zone even if it has shifted slightly. For very fast systems, an even wider bandpass is required. For telescopes faster than f/4, such as the Takahashi Epsilon astrographs (f/3 to f/3.8) and Celestron HyperStar-equipped SCTs (f/1.9), a 10nm bandpass filter is required.
Exposure Times
Very long exposure times are often used with narrowband filters. Several hours spent imaging each color is not uncommon. Typical individual exposures might be in the range of 10-20 minutes, with 5 or 6 exposures of that duration taken in each filter. Spending a whole night imaging one or two objects is typical.
Usually exposures are kept the same for each filter, but as with RGB imaging it is possible to determine the camera's sensitivity at each wavelength being imaged and adjusting the exposure times accordingly. In general, 1:1:1 exposure times are used.
Guiding
Finding a guide star can be tricky with narrowband imaging. Many imagers forego self-guiding CCDs when it comes to narrowband imaging and choose to use a separate camera on a guidescope instead. This has several advantages. The biggest is that since the guide CCD is not looking through the narrowband filter, the stars appear considerably brighter and finding a suitable guide star is easy. Also, the guidescope does not need to be aimed at the exact target the primary scope is on, so the available area from which to choose a guide star is expanded.
The potential drawback to a guidescope is flexure, which causes the main telescope to not be perfectly aligned with the guidescope during the course of the exposure. This is potentially a problem when an SCT is used as the main scope and a small refractor is used as the guidescope. However, a good number of imagers are using this setup with quite a bit of success, but caution is advised. If using this setup, be sure to use sturdy hardware to lock down the guidescope, and try to avoid crossing the meridian while imaging as this can cause the primary mirror of the SCT to shift.
In practice, it is usually possible to find a suitable guide star using a self-guiding CCD through a narrowband filter. This is good news for those who prefer not to shell out extra money for a second CCD and guidescope setup. However, patience is a virtue when it comes to finding a guide star this way. Some searching may be required, and a guide exposure of 10 seconds or more is not unheard of. Fortunately, most of the targets for narrowband imaging are located in the plane of the Milky Way along with thousands of potential guide stars!
Focusing
Focusing is done in the same way for narrowband imaging as for regular imaging, but again the exposures are longer. To get an accurate focus, be sure the exposure is long enough that the star is very distinct from the background noise. This is easy to distinguish when looking at the star profile, for example in the Inspect tab in MaxIm DL. The star profile should be clearly visible above the background noise.
There tends to be a large difference between the thickness of the standard clear and RGB filters and typical narrowband filters. This means if the telescope is focused with the clear filter it will be fairly far out of focus when a narrowband filter is put in place. There is also some difference from filter to filter within the narrowband filters, so refocusing for each filter is often necessary. Once the difference between filters is known it is easy to input this information into a computerized focuser, another reason autofocusers are handy to have.
Some RGB filter sets, such as the Astrodon filters, are designed to be parfocal with H-alpha filters, but there still may be some slight difference between, say, the H-alpha and the OIII filters.
HyperStar Imaging
The HyperStar imaging system offers a revolutionary way to take narrowband images. The advantage of HyperStar for regular RGB imaging is primarily in its speed -- faster than f/2! Applying this speed increase to narrowband images can take the excessively long exposures down to very manageable times. Instead of spending an entire night capturing just one or two objects, a dozen targets can be imaged in a single night.
Another huge advantage is that self-guided CCDs can easily detect a guide star. In four full nights of testing the HyperStar 14 system with narrowband filters, every target imaged had a suitable guide star visible without losing ideal placement of the primary target or even having to search for a guide star. One was on the guide chip every time.
An important note concerning bandpass with the HyperStar and other fast systems: At fast focal ratios (faster than about f/4), the bandpass of a filter shifts. So, an H-alpha filter is no longer centered at 656.3nm. The easiest way to correct for this (and still have a filter that is usable on multiple systems) is to use a filter with a wider bandpass. This allows the filter to shift bandpass slightly and still capture the proper wavelength of light. For systems faster than f/4, including the HyperStar, a bandpass of 10nm is recommended.
See HyperStar 14 Narrowband Images Here
Processing Narrowband Images
The standard processing methods such as stretching, filtering, etc., still apply to narrowband images the same as they do to regular images. The primary factor in processing narrowband images is in deciding which color channels to assign to each filter and in properly weighting the channels to achieve a pleasing color (which is somewhat subjective due to the fact that these are false color images). The method below assumes the use of a CCD image processing program like MaxIm DL. However, a more sophisticated method using layer clipping masks in Adobe Photoshop is outlined in the Software Instructions section (Layer Clipping Mask method), as are two new methods for improved narrowband color.
Color Combining
For a typical emission nebula, you can achieve an approximation of true color by combining the colors using the HOS method (H-alpha = red, OIII = green, SII = blue). This is due to the fact that in true color, emission nebulae are primarily red. By assigning the H-alpha image -- which should be the brightest image -- to the red channel, the nebula will appear mostly red. Each channel is normally weighted equally (1:1:1), unless the CCD is particularly deficient in one part of the spectrum. For example, the ST-2000XM is only half as sensitive in red as in green and blue, so it might be weighted 2:1:1. Either way, the balance is normally the same as you would use for your RGB images.
Many images look spectacular using the Hubble Color Mix (SHO method). In this method, the H-alpha image is assigned to the green channel, so green will be the dominant color. With most CCDs, a 1:1:1 balance will usually be too green. A 2:1:2 balance (or 1:0.5:1) balance is usually preferable. Again, a camera like the ST-2000XM, which is less sensitive to H-alpha already, will probably look fine using a 1:1:1 balance with the SHO method.
Certain nebulae that are not as bright in H-alpha, such as planetary nebulae, can look great in several different color combinations. The HOO method, using OIII for both blue and green channels, is particularly good as it simulates the standard true color view fairly well. This method works well on certain emission nebulae as well.
Examples

Above: M27 using HOS at 1:1:1

Above: M27 using SHO at 1:0.5:1

Above: M27 using HOO at 1:1:1. This provides a close approximation to true color.