Spider Mites! How to Prevent, Identify & Control
Spider mites. They're every grower's worst nightmare! And every summer the stealthy little blighters try to sneak into your grow room. Here's how to prevent, spot and kill the little horrors.
How to Spot Spider Mites
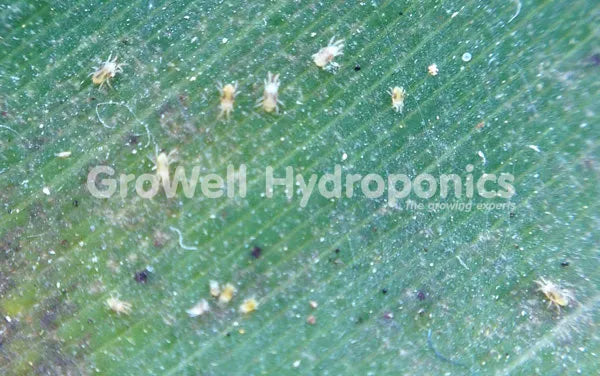
Spider mites are tiny - almost invisible to an untrained, naked eye. To see them, you'll want an eye magnifier.
They're around 1mm and are white, cream, yellow or red in colour.
If you really squint, you'll see two dark spots on the back of some – these are 'Two-Spotted Spider Mites' (Tetranychus urticae). If you see white spider mites, more often than not you're looking at the same species at an earlier stage of development.
Leaf damage
Spider mites feed off the sap of plants, causing the leaves to discolour. Usually, this damage appears as small white dots on the upper surface of the leaf.


If the initial destruction is allowed to continue, a whole leaf turns a speckled white/yellow, sometimes also with golden brown patches.
Furthermore as the mites remove the chlorophyll and a severe attack hits full flow, the leaves will begin to die off.
Webbing
Spider mites also produce webs. First, you'll see them between leaves. Before you know it, your entire plant will be completely covered.
So, what's with the webs? First, they're a great transport path! Spider mites use them to swarm all over your plant. Mature webbing is also a great defensive barrier. It protects the mite colonies underneath. This thatch webbing is really bad news for plants - air flow's restricted, water is lost...sometimes leads it leads to fungal pathogens – e.g. botrytis (bud rot).


Don't be Tricked
Spider mites reproduce rapidly. They don't waste any time, especially at temperatures higher than 28-30°C and humidity lower than 40%
At 25°C, a freshly laid egg will hatch, grow into an adult mite and lay more eggs after only 10 days.
At 30°C, it's 7 days!
Females can produce up to 150 eggs in their life, laying around 10 eggs per day. These are 0.14mm in diameter and transparent at first. Eventually, they turn white to light yellow.
When it suits them, female spider mites enter a period of hibernation known as ‘Diapause’. Trigger effects include:
- Falling temperatures
- A decline or deterioration in food supply
A lot of people terminate their crop after a severe attack, thinking the spider mites will hunt for food elsewhere. .
Sorry folks, the spider mites will just stick around. You think they're dead, but really they're just dormant. These things can survive a year with no food and without laying eggs. Then, as soon as conditions pick up, the females awaken and restart egg production.
Dealing with Spider Mites
At GroWell, we believe in Integrated Pest Management (IPM). This involves:
- Prevention: through good hygiene and general monitoring
- Biological control (natural predators): to control pest populations (most effective as a preventative or at first sign of attack)
- Pest sprays: to reduce numbers quickly and efficiently in moderate to extreme cases
IPM stresses how important it is to be proactive when dealing with pests.
The steps below will help you to adopt this approach, advising on what you can do to block out spider mites and instructing on how to react upon attack.
Preventing Spider Mites
If you prevent, with any luck you won't have to treat!

1. Sterlise
Clean your room before every new crop cycle. A decent product to use is Silver Bullet Mist Spray, a plant friendly room cleaner and disinfectant.

2. Take your Own Cuttings
Take your own cuttings when you can. Other people's can carry spider mites. If you do use somebody else's cuttings, treat each cutting before putting it in your grow room.

3. Use Insect Traps
For early identification of pests and to reduce the chance of them reaching your plants, we recommend that you use Horti-Shield Yellow Sticky Traps. Place the traps near all entry points, such as air inlets, and also in the middle of your room hanging above the plants.
It’s also a sound idea to remove the protective layer from one side only and place the sticky traps at the base of your plants to monitor and trap fungus gnats.

4. Check yourself!
Spider mites love to hitch a ride on you, your clothes or your hair. If you go outside to places where there are loads of plants (even parks!), take a shower and change your clothes before entering your own grow room. A paper suit will help, just step in it and zip up (Walter White style) to prevent any pests from jumping off you

5. Use Bug Blockers
Pests can also enter your room through your intake fan. We highly recommend installing a Horti-Shield Bug Blocker to prevent this from happening – simply attach one to your intake fan to establish a barricade that is effective against all sorts of pests including spider mites.

6. Inspect Often
Make sure you inspect your plants for pests on a regular basis, checking the tops, but mainly the undersides of leaves. We recommend an on-going ‘5 Day Bug Check’, generally looking for spider mite and associated mite damage. A magnifier will help with the task, like our convenient, pocket-sized Active Eye model.
7. USE PREDATOR SACHETS (PREVENTATIVE)
Spider mite predator sachets (Amblyseius californicus) are great. Hang 1 - 2 sachets from each plant every 3 - 4 weeks. If any spider mites infiltrate your grow room, these preds gobble 'em right up.
| Hint |
|---|
|
These preds also snack on other pests - like thrips larvae! To encourage feeding, aim for 24-26oC temperature & 60-65% humidity. This'll also slow spider mies down. |
Biological Treatment
Basically, this is where youfill your grow room with little critters that feast on spider mites. They're harmless to plants but love to munch on spider mites,

SPIDER MITE PREDATOR BOTTLES
For small break outs, you want phytoseiulus persimilis. They're more aggressive than the preventative Amblyseius californicus.
In the right conditions, they breed faster than spider mites so will wipe them out in no time.
Remember, these predators establish faster and eat more under a longer day. So you'll get best results during the vegetative growth cycle (18hrs of light).
| Hint |
|---|
|
When your bottle's stood up, all preds climb to the top - so end up being sprinkled in the same area. For even distribution, lie your bottle on a flat surface for 10 - 15 mins before opening. When ready, sprinkle them over the top of plants. |
Pesticide Sprays
If you don't notice spider mites until they've caused severe damage and are starting to create webs, you need to get spraying.
A Professional Lance Sprayer is normally your best bet - it'll help you reach all areas of your plant.
If you have a larger grow room or just an easier ride, grab a Nebuliser Foliar Fogger. It m mists yourr entire room to cover every nook and cranny. Since the spray's a fine mist, you can use less to cover the same space.
| Hint |
|---|
|
When spraying, cover the top and bottom of leaves evenly. Most spider mites and their eggs will be on the underside. Spray from underneath to get 'em! |
Try to spray when during lights off. Otherwise you can dim and raise lights. Use an Active Eye Head Lamp so you can see what you're doing.
During late flowering, ensure there's good air movement and your humidity is low. This'll help leaves dry leaves quickly and prevent rot.

SB Plant Invigorator is awesome value at 10ml per litre.
It suffocates mites! Since it also contains a mild foliar feed of nitrogen and iron, it nourishes leaves too!

Spider Mite Control is another one that suffocates. It kills eggs as well as mites and makes up 4 litres of spray (at 25ml per litre).

Pyrethrum 5 EC contains natural pyrethrum – an extract from chrysanthemum flowers that is deadly to spider mites. It quickly evaporates and leaves minimal residues. You only need 4ml per litre (2-3ml per litre for young, small or tender plants).
If there's a lot of webbing, it'll shield the spider mites. Spray heavily with one product (like SPBI to remove the webbing) then quickly with another to take down the mites!
Fumigate With Vapourised Sulphur

Ever heard of vapourised sulphur? It annihilates spider mites (and fungus, mildew, black spots & more!).
To fumigate your grow room with it, Hotbox Sulfume is the way to go!
You can use it to treat current problems and prevent future ones.
This sulphur vapour disrupts how the spider mites feed and reproduce - it'll wipe out the large pest populations quickly. It's safe to use whilst your plants are in the room (just not in the last two weeks of flowering). It'll treat areas between 2M3 and 10M3
| Hint |
|---|
|
It's best to use during lights off. Simply turn fans off and fumigate for 3-6 hours. Don't release any predators at the same time – it'll kill them as well as the pests. |