Table of Contents
Advertisement
Quick Links
Model STF-8300M/C
CCD Camera
Operating Manual
SBIG Astronomical
Instruments, A Division of Diffraction Limited.
59 Grenfell Crescent, Unit B, Ottawa, ON Canada, k2G 0G3
Tel: 613.225.2732 | Fax: 225.225.9688| E-mail: tpuckett@sbig.com |
www.sbig.com
© 2015 Diffraction Limited. All rights reserved. The SBIG wordmark and logo are trademarks of
Diffraction Limited, All other trademarks, service marks and tradenames appearing in this brochure are
the property of their respective owners.
Advertisement
Table of Contents

Related Manuals for SBIG STF-8300M


Summary of Contents for SBIG STF-8300M
- Page 1 Tel: 613.225.2732 | Fax: 225.225.9688| E-mail: tpuckett@sbig.com | www.sbig.com © 2015 Diffraction Limited. All rights reserved. The SBIG wordmark and logo are trademarks of Diffraction Limited, All other trademarks, service marks and tradenames appearing in this brochure are the property of their respective owners.
- Page 2 DECLARATION OF CONFORMITY We, Santa Barbara Instrument Group, a division of Aplegen, Inc., 147-A Castilian Drive, Goleta, CA 93117 USA, (805) 571-7244, declare under our sole responsibility that the Model STF-8300 CCD camera complies with Part 15 of the FCC Rules. Operation is subject to the following two conditions: (1) this device may not cause harmful interference, and (2) this device must accept any interference received, including interference that may cause undesired operation.
-
Page 3: Table Of Contents
Table of Contents Introduction ..................... 1 Getting Started....................1 Overview and Connections................2 Installing the Software on 32-bit or 64-bit Windows Systems...... 4 Migrating Old Drivers from 32-bit to newer 64-bit Systems......7 Using the Camera Inside ................10 Running CCDOps..................10 Getting Help .................... -
Page 4: Introduction
"Hot" plugging the locking connector into the camera could damage your camera and require it to be sent to SBIG for repair. Very Important: Before you attach the STF-8300 to your computer for... -
Page 5: Overview And Connections
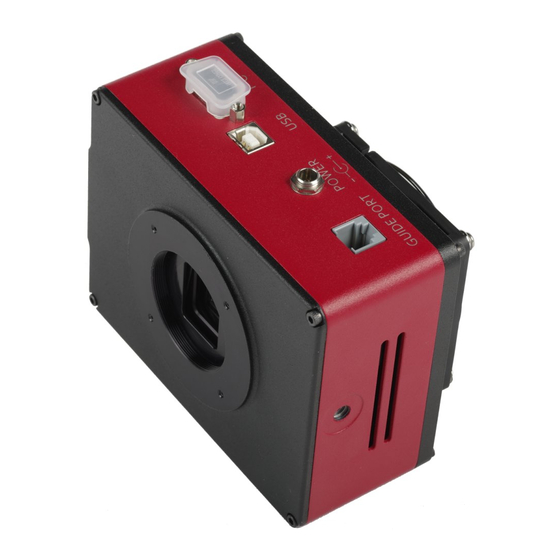
2 Inch T-Thread Nosepiece – This screws into the front of the camera for telescope work and includes a soft rubber dust cap. Optional Visual Back adapters are available from SBIG. In addition a screw-in T-to-C adapter and 35mm camera lens adapters are available. - Page 6 USB: Attach the 15 foot USB cable to any USB port on your computer AFTER you have installed the drivers and software for the STF-8300. C: This special port is for connection of an SBIG filter wheel. The filt wheel will get its power and commands through this port. No other cab re needed for the filter wheel to function.
-
Page 7: Installing The Software On 32-Bit Or 64-Bit Windows Systems
SBIG STF-8300 Manual 2. Installing the Software on 32-bit or 64-bit Windows Systems This section tells you how to do a fresh install of SBIG Cameras on your 32-bit or 64-bit Versions of Windows XP, Vista or Windows 7. The Driver Checker program will automatically install 32-bit or 64-bit drivers based on your version of Windows. - Page 8 6. Click the Update button and the Driver Checker will start to install the SBIG drivers into your system. 7. Once the drivers have finished installing, the Driver Checker will show the following. At this point you can quit the Driver Checker.
- Page 9 SBIG STF-8300 Manual 8. Now it's time to try out the new drivers. With your camera disconnected from the PC, power it up and then plug it into the PC with the USB Cable. In the lower-right hand corner of the screen you see...
-
Page 10: Migrating Old Drivers From 32-Bit To Newer 64-Bit Systems
Device Manager as shown below: 11. Run CCDOps and verify that you can establish a link to the camera. Note: If you previously installed SBIG 32-bit drivers using the old 32- bit Driver Checker program and now want to install 64-bit drivers... - Page 11 6. Click the Update button to copy the new drivers to your system. Link your old cameras to the new drivers. For each type of SBIG Camera you own (ST, STL, ST- 402), power up the camera one at a time and then attach it to the PC with the USB cable.
- Page 12 Click Finish and then you’ll have to go through steps b through d one more time for this camera. Repeats steps a through f for each SBIG camera. When you’re all done your camera should show up in the Device Manager...
-
Page 13: Using The Camera Inside
You’ll be presented with the startup About Dialog that shows the SBIG logo and the version of CCDOps. To dispense with it click anywhere in the dialog other than the two blue fields or simply wait and the dialog will close itself. - Page 14 SBIG STF-8300 Manual This is what’s referred to as a dark frame and it’s what you get when you take a picture with the nosepiece covered and the shutter closed. It’s a picture in the dark. Although there’s not much interesting to look at in this image there are some very important features that you need to understand.
- Page 15 SBIG STF-8300 Manual Hot pixels are simply the pixels where the dark current is higher than the average and thus they show up as white specs against the salt and pepper background. Again, this is completely normal for CCD images.
-
Page 16: Brightness And Contrast
SBIG STF-8300 Manual pixels are definitely obscuring it. Now use the Dark Subtract command in the Utility menu. This brings up the Open File dialog where CCDOps wants you to select which image to subtract. Double-click on Image 2, the 10-second dark frame. -
Page 17: Establishing A Link
SBIG STF-8300 Manual and decrease. Click the ones adjacent to the Range setting and you’ll see the image contrast increase and decrease. Here’s a summary of how this works: Increasing the Back decreases the image brightness and vice-versa. Increasing the Range decreases the image contrast and vice-versa. -
Page 18: Camera Info
SBIG STF-8300 Manual Use the Graphics/Comm Setup command in the Misc menu to make sure USB is selected for the Interface. Click OK to set/confirm that and then use the Establish COM Link command in the Camera menu. CCDOps will try to connect to your camera, which can take several seconds to complete. -
Page 19: Camera Setup
SBIG STF-8300 Manual memory. To make sure you have the latest firmware periodically run the Driver Checker, which checks our servers for later drivers and updates your system accordingly. Serial Number – If you ever need to know this, here it is. It’s on the label on the back of the camera as well. -
Page 20: Grab Command
SBIG STF-8300 Manual Setpoint – When the Temperature Regulation is on, set this to the absolute temperature in degrees C to which the CCD should be cooled. We know that cooling reduces dark current but there is a limit as to how much the CCD can be cooled by the TE cooler. -
Page 21: Focus Command
SBIG STF-8300 Manual Here we’re asking for a 1.0-second dark frame of the full CCD. Click the OK button and in a few seconds you’ll see an image that looks a lot like the Image 1 from the tutorial. Hot pixels, readout glow and salt-and-pepper noise, they’re all there. - Page 22 SBIG STF-8300 Manual automatically. Use the Focus command in the Camera menu and set it up in the Focus Setup dialog as shown below: Click OK and the camera will go into Focus mode. You’ll see image after image appear in a single window with a new image about every second.
- Page 23 SBIG STF-8300 Manual some dim objects though, checking this item, which uses dark subtracted images for Focus mode can help to pull the object out of the noise. It’s slightly slower when using dark frames so only use this when you need to.
-
Page 24: At The Telescope
SBIG STF-8300 Manual 4. At the Telescope Connect the camera to the computer and start CCDOps. Establish a link to the camera and run the Camera Setup command. Enable the cooling to ~30 degrees below ambient and then watch the Link Status field to see the temperature come down. -
Page 25: Finding And Centering The Object
At f/6 the depth of focus is only 0.005 inch, so focus is critical. An adapter may be necessary to allow the eyepiece to be held at the proper focus position. SBIG sells extenders for this purpose. -
Page 26: Taking An Image
Saving Images Save the images using the Save command in the File menu. We strongly recommend you save images in the SBIG Compressed format as it is the most compatible. Use the TIFF and JPEG formats only when you are done with the image as you won’t be able to reopen it with CCDOps. -
Page 27: Acessories For Your Ccd Camera
SBIG STF-8300 Manual 5. Acessories for your CCD Camera This section describes several of the common Accessories designed to work with the STF-8300. Color Filter Wheels Color filter wheels enable collection of LRGB color images, narrowband and photometric images with the STF-8300. The FW5-8300 is a 5-position filter wheel that holds 36mm diameter filters for unvignetted images at fast focal ratios. -
Page 28: Extension Power Cable
SBIG STF-8300 Manual Extension Power Cable This low loss extension cable lets you put the universal power supply well away from the camera and mount. It is 8 feet long and has locking plugs on both ends. Relay Adapter Box Older telescopes may not be compatible with our optically isolated telescope driver. - Page 29 SBIG STF-8300 Manual Options for STF-8300 Cameras: A. T-thread to c-mount adapter B. C-mount lens (user supplied) C. CLA7-8300 35mm camera lens adapter for use without filter wheel (Specify Nikon, Canon FD or Minolta manual focvus) D. Nikon 35mm camera lens (user supplied) E.
-
Page 30: Glossary
Astrometry - Astrometry is the study of stellar positions with respect to a given coordinate system. Autoguider - All SBIG CCD cameras have auto guiding or "Star Tracker" functions. This is accomplished by using the telescope drive motors to force a guide star to stay precisely centered on a single pixel of the CCD array. - Page 31 SBIG STF-8300 Manual dark. The shutter covers the CCD. Dark Frames are subtracted from normal exposures (light frames) to eliminate fixed pattern and dark current noise from the image. Dark Frames must be of the same integration time and temperature as the light frame being processed.
- Page 32 CCDOps can save image files in this format but unless they’re color images it can not read them. Track and Accumulate - The Track and Accumulate function is a SBIG patented feature of CCDOps that allows the user to automatically...
- Page 33 SBIG STF-8300 Manual of images of an object. These exposures can be taken unguided as long as the "Snapshot time" does not exceed the length of time before tracking errors of your clock drive become apparent. This allows you to image and track without guiding or the need to connect the CCD Relay port to your drive motors.
-
Page 34: Appendix A - Connector And Cables
SBIG STF-8300 Manual Appendix A – Connector and Cables Power Jack The Power Jack is used to supply 10.0 – 14.5 Volts DC at 3 amps to the camera. The jack is locking and center-positive. The mating plug is the locking model Switchcraft S760K with 0.218 inch outer diameter and 0.080 inch inner diameter (5.5/2.0 mm). -
Page 35: Appendix B - Maintenance
SBIG STF-8300 Manual Appendix B – Maintenance This Appendix describes the periodic maintenance items you need to perform on your camera to keep it in optimal condition. Cleaning the Window and Filters 1) Get a can of compressed air from a photo store, as well as a small... - Page 36 SBIG STF-8300 Manual 1. Unscrew the desiccant container from the side of the camera opposite the connectors and remove the O-ring. 2. Plug the resulting hole by screwing in the supplied bolt or plug 2 or 3 turns. Finger tight is adequate. Don't put a wrench on it.
-
Page 37: Appendix C - Camera Specifications
SBIG STF-8300 Manual Appendix C – Camera Specifications The table below lists the specifications for the STF-8300 camera. Specifications are typical and can vary from camera to camera and are subject to change without notice. STF-8300 Typical Specifications Kodak KAF-8300 (mono or color) -
Page 38: Appendix D - Stf-8300Cm Color Camera Supplement
SBIG STF-8300 Manual Appendix D – STF-8300CM Color Camera Supplement The raw single-shot color image: The first thing you notice about the raw images from your single-shot color camera is that they are not in color! This is normal - the color data is being displayed as greyscale values in a raw single-shot color image You might also notice a grid or “screen door”... - Page 39 SBIG STF-8300 Manual camera control software to acquire your single-shot color images, make sure to save them in either SBIG or 16-bit FITS file format. You should not crop, resize, or flip the image (using 3rd party software) before importing it into CCDOPS for one-shot color processing.
- Page 40 SBIG STF-8300 Manual Easy Processing of Single-shot Color Images with CCDOPS Once you have captured the image, from the Utility drop-down menu in CCDOPS select Single Shot Color --> Color Process and you are ready to go. Processing of Single-Shot Color Camera images is easy. Start by clicking the Defaults button and selecting RGB or DDP for the Method (DDP works great on galaxies with bright cores).
- Page 41 SBIG STF-8300 Manual If you don't like the color balance of the result, simply modify the color balance pointers and click the "process" button again. For more in-depth color image processing, you can extract the RGB color channels and perform more traditional tri-color image processing techniques (see Processing Separate RGB Images, below).
- Page 42 CCDOPS also offers you the option to extract individual color channels from the raw frame. If you want follow along with this example, a copy of the M33 raw image is available on the SBIG software CD-ROM in the Images folder.
- Page 43 SBIG STF-8300 Manual To do this using CCDOPS select Utility --> Single Shot Color --> Extract Color Channel(s)... The Color Extraction dialog box will open and give you the option to extract any (or all) of the individual color channels (Red,...
- Page 44 SBIG STF-8300 Manual 2. Normalize the Sky Background - Normalizing the Sky Background means making sure it comes out a neutral gray in the final image, not having a subtle color tint. Bring the Red image to the foreground and then position the Crosshair on an area of the image that represents the Sky Background, free of any stars or faint nebulosity.
- Page 45 It is recommended however that you keep your original data file in SBIG format in the event that some step along the way results in an irreversible change to your image file(s) that is not to your liking.
- Page 46 SBIG STF-8300 Manual...