Advertisement
Quick Links
Handbook for the SXVR-H694
Issue 1 March 2012
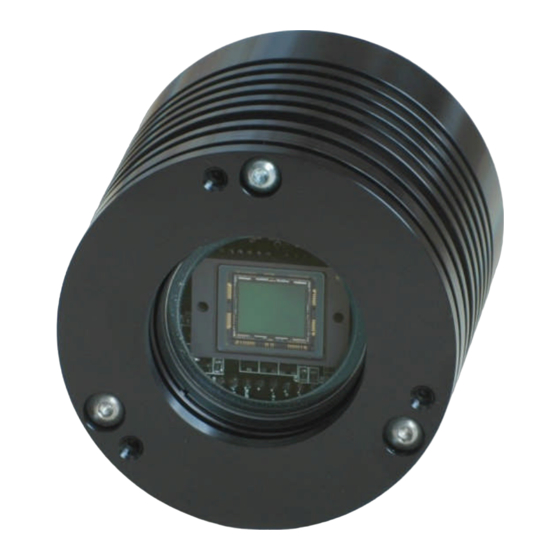
The SXVR-H694 USB2 CCD camera
Thank you for purchasing a Starlight Xpress CCD camera. We hope that you will be
very satisfied with the results.
The SXVR-H694 is an advanced, high-resolution cooled CCD camera, especially
designed for astronomical imaging. It uses a third generation version of the very
popular Sony 'EXview' CCDs that offer very high QE and extremely low thermal
noise. Other features include a built-in, fully programmable, USB 2 super-fast
computer interface, an autoguider control port and output and optional integrated dual
serial ports for filter wheel and telescope control. It also includes a CCD temperature
monitoring circuit that provides regulated set-point cooling of the chip, adjustable
chip alignment and a very compact overall size.
The SXVR-H694 uses a Sony ICX694ALG 'EXview' progressive scan CCD, with
2750 x 2200 x 4.54uM pixels in a 12.48 x 9.98mm active area. This EXview device
has an excellent quantum efficiency, with a broad spectral response peaking at around
1
Advertisement

Related Manuals for Starlight Xpress SXVR-H694


Summary of Contents for Starlight Xpress SXVR-H694
- Page 1 Handbook for the SXVR-H694 Issue 1 March 2012 The SXVR-H694 USB2 CCD camera Thank you for purchasing a Starlight Xpress CCD camera. We hope that you will be very satisfied with the results. The SXVR-H694 is an advanced, high-resolution cooled CCD camera, especially designed for astronomical imaging.
- Page 2 5) An adaptor for 2” drawtubes and M42 Pentax thread lenses. 6) A guider output to guider port lead. 7) A disk with the SXVR-H694 control software and this manual. Optional extra items include: 1) A serial port adaptor and cable.
- Page 3 Handbook for the SXVR-H694 Issue 1 March 2012 Installing the USB system: First, find a free USB socket on your PC and plug in the USB cable (do not connect the camera at this time). If you do not have a USB2 capable computer, it is normally possible to install a USB 2 card into an expansion slot.
- Page 4 ‘BlockIOClass’ and clicking on the ‘+’ sign will reveal it to be a ‘Starlight Xpress USB 2.0 SXV-H9 BlockIO camera driver’. If this device shows as faulty, try clicking on it and selecting ‘properties’ and then ‘update driver’.
- Page 5 There are two simple options, one of which is available to everyone with a sheet of aluminium baking foil: 1) Attach a standard ‘M42’ SLR camera lens to the SXVR-H694, using the 26mm spacer to achieve the correct focal distance.
- Page 6 Handbook for the SXVR-H694 Issue 1 March 2012 2) Create a ‘Pin hole’ lens by sticking a sheet of aluminium baking foil over the end of the adaptor and pricking its centre with a small pin. If you use a normal lens, then stop it down to the smallest aperture number possible, (usually F22), as this will minimise focus problems and keep the light level reasonable for daytime testing.
- Page 7 Handbook for the SXVR-H694 Issue 1 March 2012 Point the camera + lens or pinhole towards a well-lit and clearly defined object some distance away. Now enter the ‘File’ menu in the SXV_Hmf software and click on ‘SX camera interface’. Select an exposure time of 0.1 seconds and press ‘Take Photo’.
- Page 8 ‘crispness’. At this point, you will have a working knowledge of how to take and process an SXVR-H694 image. It is time to move on to astronomical imaging, which has its own, unique, set of problems!
- Page 9 F = Pixel size * 205920 / Resolution (in arc seconds) In the case of the SXVR-H694 and a 2 arc seconds per pixel resolution, we get F = 0.00454 * 205920 / 2 = 467mm For a 200mm SCT, this is an F ratio of 467 / 200 = F2.34, which is much less than can...
- Page 10 Handbook for the SXVR-H694 Issue 1 March 2012 F = 0.00545 * 205920 / 0.25 = 4489mm This is approximately F22 when used with a 200mm SCT and so we will need a 2 or 3x Barlow lens. Barlow lenses are less critical than focal reducers and most types can be used with good results.
- Page 11 Handbook for the SXVR-H694 Issue 1 March 2012 focus frame for best visibility of the star image. It defaults to maximum stretch (12 bits), which is generally ideal for stars, but a lower stretch value is better for focusing on planets.
- Page 12 CCD, so that these defects are largely removed when the dark frame is subtracted from the light frame. The SXVR-H694 CCD is quite different from those used in other brands of camera and generates an extremely low level of dark noise.
- Page 13 Handbook for the SXVR-H694 Issue 1 March 2012 Processing a deep-sky image: The following instructions include the subtraction of a dark frame, but this may be regarded as optional. 1) Make sure the ‘Auto Contrast Stretch’ is switched off and load your image into SXV_hmf_usb.
- Page 14 Handbook for the SXVR-H694 Issue 1 March 2012 3) The resulting image will probably look faint and dull, with a pale background due to light pollution. It is now time to process the ‘luminance’ (brightness and contrast) of the image to get the best visual appearance. First, use the ‘Normal’ contrast stretch to darken the background by setting the ‘Black’...
- Page 15 Handbook for the SXVR-H694 Issue 1 March 2012 Other things to try, include summing several images for a better signal to noise ratio. Summing can be done in the ‘Merge’ menu and involves loading the first processed image, selecting a reference point (a star) then loading the second image and finding the same star with the mouse.
- Page 16 Handbook for the SXVR-H694 Issue 1 March 2012 press a computer key. The images will be saved in FITs format with sequential names such as ‘Img23, Img24….’ and will be found in the ‘Autosave’ directory (or a sub- directory of Autosave, set up in the program defaults menu).
- Page 17 Handbook for the SXVR-H694 Issue 1 March 2012 After the application of an ‘Unsharp mask’ In general terms, the larger the image and the worse the seeing, then the wider the radius for best results. My Jupiter shots are usually about one third the height of the CCD frame and I find that the ‘radius 5, power 5’...
- Page 18 If ‘active high’ inputs are needed, or a very low control voltage drop is essential, then you will need to add a Starlight Xpress ‘relay box’ between the guider output and the input to the mount. Please contact your local distributor if a relay box is required.
- Page 19 The autoguider installed on a 70mm refractor guide ‘scope in the author’s garden (the camera shown is the older SXVF version, but the connections are the same). To use the autoguider, please proceed as follows: 1) Having started the SXVR-H694 software, open the autoguider control panel by clicking on the autoguider menu button.
- Page 20 Handbook for the SXVR-H694 Issue 1 March 2012 The autoguider control panel with a guide star selected 2) Press the ‘Start’ button and a series of 1 second exposure guider images will begin to appear in the picture frame. If the images look too dim, use the ‘Stretch Image’...
- Page 21 ********************************************************************* Using the built-in serial ports The SXVR-H694 incorporates two fast serial ports for use with external accessories. The ports are available on 5 pins of the 18 way connector that is provided for the autoguider and may be accessed by plugging in a ‘serial port divider box’. The divider box and cables are available as an accessory and may be chained in series with the autoguider cable, when the guider is in use, or may be used on its own.
- Page 22 Using 2x2 binning, you can considerably improve the sensitivity of the SXVR-H694 without losing a great deal of resolving power, so you may like to use this mode for many faint deep-sky objects. Other binning modes (3x3 and 4x4) are available and will further increase the image brightness and reduce its resolution.
- Page 23 Handbook for the SXVR-H694 Issue 1 March 2012 Flat fields are images, which display only the variations of illumination and sensitivity of the CCD and are used to mathematically modify a wanted image in such a way that the errors are removed. Common flat field errors are due to dust motes on the camera window and vignetting effects in the optical system of the telescope.
- Page 24 5mA per output. This socket may be used for telescope control if the SXVR-H694 is employed as an autoguider, but is primarily intended to be the control output for the optional add-on autoguider...
- Page 25 ********************************************************************* Camera maintenance: Very little maintenance is needed to keep the SXVR-H694 in excellent operating order, however two problems, which are common to all CCD equipment, might show up on occasion. These are dust and condensation.
- Page 26 7) Replace all the camera parts in reverse order and the job is done. Dealing with condensation: The SXVR-H694 is designed to avoid condensation by minimising the volume of air trapped within the CCD cavity and by preventing moisture ingress. This normally works very well, but storage of the camera in a humid location can lead to the trapped air becoming moist by diffusion through the optical window mounting thread etc.
- Page 27 Handbook for the SXVR-H694 Issue 1 March 2012 CCD pixels: 2750 x 2200 pixel array. Each pixel is 4.54 x 4.54uM square Well depth: Full res. mode 18,000e. Binned 2x2 mode approx. 22,000e Mean visual QE: 70%, 77% at peak (580nM) Useful spectral response: 360nM –...
-
Page 28: Conditions Of Guarantee
Issue 1 March 2012 Dear Observer, Thank you for purchasing a Starlight Xpress CCD Imaging System. We are confident that you will gain much satisfaction from this equipment, but please read carefully the accompanying instruction manual to ensure that you achieve the best performance that is capable of providing.