Advertisement
Quick Links
Handbook for the SXVR-H694C
Issue 1 March 2012
The SXVR-H694C colour CCD camera
Thank you for purchasing a Starlight Xpress CCD camera. We hope that you will be
very satisfied with the results.
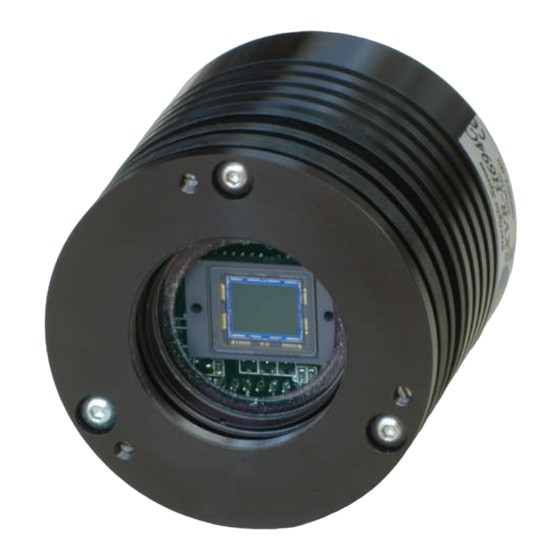
The SXVR-H694C is an advanced, high-resolution one-shot colour, cooled CCD
camera, especially designed for astronomical imaging. It uses a third generation
version of the very popular Sony 'EXview' CCDs that offer very high QE and
extremely low thermal noise. Other features include a built-in, fully programmable,
USB 2 super-fast computer interface, an autoguider control port and output and
optional integrated dual serial ports for filter wheel and telescope control. It also
includes a CCD temperature monitoring circuit that provides regulated set-point
cooling of the chip, adjustable chip alignment and a very compact overall size.
The SXVR-H694C uses a Sony ICX694ALG 'EXview' progressive scan CCD, with
2750 x 2200 x 4.54uM pixels in a 12.48 x 9.98mm active area. This EXview device
1
Advertisement

Related Manuals for Starlight Xpress SXVR-H694C


Summary of Contents for Starlight Xpress SXVR-H694C
- Page 1 Handbook for the SXVR-H694C Issue 1 March 2012 The SXVR-H694C colour CCD camera Thank you for purchasing a Starlight Xpress CCD camera. We hope that you will be very satisfied with the results. The SXVR-H694C is an advanced, high-resolution one-shot colour, cooled CCD camera, especially designed for astronomical imaging.
- Page 2 5) An adaptor for 2” drawtubes and M42 Pentax thread lenses. 6) A guider output to guider port lead. 7) A disk with the SXVR-H694C control software and this manual. Optional extra items include: 1) A serial port adaptor and cable.
- Page 3 Handbook for the SXVR-H694C Issue 1 March 2012 Installing the USB system: First, find a free USB socket on your PC and plug in the USB cable (do not connect the camera at this time). If you do not have a USB2 capable computer, it is normally possible to install a USB 2 card into an expansion slot.
- Page 4 ‘BlockIOClass’ and clicking on the ‘+’ sign will reveal it to be a ‘Starlight Xpress USB 2.0 SXV-H694C BlockIO camera driver’. If this device shows as faulty, try clicking on it and selecting ‘properties’ and then ‘update driver’.
- Page 5 There are two simple options, one of which is available to everyone with a sheet of aluminium baking foil: 1) Attach a standard ‘M42’ SLR camera lens to the SXVR-H694C, using the 26mm spacer to achieve the correct focal distance.
- Page 6 Handbook for the SXVR-H694C Issue 1 March 2012 2) Create a ‘Pin hole’ lens by sticking a sheet of aluminium baking foil over the end of the adaptor and pricking its centre with a small pin. If you use a normal lens, then stop it down to the smallest aperture number possible, (usually F22), as this will minimise focus problems and keep the light level reasonable for daytime testing.
- Page 7 Handbook for the SXVR-H694C Issue 1 March 2012 Point the camera + lens or pinhole towards a well-lit and clearly defined object some distance away. Now enter the ‘File’ menu in the H694C software and click on ‘SX camera interface’. Select an exposure time of 0.1 seconds and press ‘Take Photo’.
- Page 8 Handbook for the SXVR-H694C Issue 1 March 2012 Converting your images to colour: The images from your camera are monochrome at the moment and they need to be converted into true colour before enhancing them. Any processing of the image, other than calibration with dark frames etc., will distort the colour rendering of the result...
- Page 9 Handbook for the SXVR-H694C Issue 1 March 2012 The synthesis control panel contains several options for correcting colour bias and noise. 1) Daylight Image? – If an unfiltered lens is used, the infra-red content of the light will tend to produce a Green – Blue shift in the balance. A partial correction of this bias is provided by selecting this option, but the best option is to use an infra-red blocking filter when taking daylight shots (see 5 below).
- Page 10 Handbook for the SXVR-H694C Issue 1 March 2012 If the colour is roughly correct, then all is well. However, the colour decoding is reliant on the filter pattern being properly registered with the processing software and this can vary. Colour conversion involves running a software routine which uses the brightness data from each pixel to generate colour values.
- Page 11 ‘crispness’. At this point, you will have a working knowledge of how to take and process an SXVR-H694C image. It is time to move on to astronomical imaging, which has its own, unique, set of problems!
- Page 12 It is fairly easy to find the correct focus setting for the camera when using a standard SLR lens, but quite a different matter when the SXVR-H694C is attached to a telescope! The problem is that most telescopes have a large range of focus adjustment and the CCD needs to be quite close to the correct position before you can discern details well enough to optimise the focus setting.
- Page 13 F = Pixel size * 205920 / Resolution (in arc seconds) In the case of the SXVR-H694C and a 2 arc seconds per pixel resolution, we get F = 0.00454 * 205920 / 2 = 467mm For a 200mm SCT, this is an F ratio of 467 / 200 = F2.34, which is much less than can...
- Page 14 Handbook for the SXVR-H694C Issue 1 March 2012 a sharp focus. If the focus is still poor, then it may appear as a pale disk of light, often with a dark centre (the secondary mirror shadow in an SCT, or Newtonian). Now select the ‘File’...
- Page 15 CCD, so that these defects are largely removed when the dark frame is subtracted from the light frame. The SXVR-H694C CCD is quite different from those used in other brands of camera and generates an extremely low level of dark noise.
- Page 16 Handbook for the SXVR-H694C Issue 1 March 2012 To take a dark frame, just cover the telescope objective with the lens cap and take another exposure with the same length as that of the light frame. This image will be a picture of the dark signal generated during your exposure and it should be saved with your image for use in processing the picture.
- Page 17 Handbook for the SXVR-H694C Issue 1 March 2012 M42 – 30 seconds exposure at F2 with a C8 Hyperstar 2) Once you have subtracted any dark frame, you can convert the raw image to colour. 3) The resulting image will probably look faint and dull, possibly with a pale yellowish background, due to light pollution so it is now time to process the ‘luminance’...
- Page 18 Handbook for the SXVR-H694C Issue 1 March 2012 another ‘Normal’ stretch, in which you bring down the ‘White’ slider to just above the main image peak. The best setting for this is rather more difficult to guess and you may need several attempts before the result is ideal. Just use the ‘Undo last filter’...
- Page 19 Handbook for the SXVR-H694C Issue 1 March 2012 directly, or average the images together. Averaging is generally better, as you are less likely to saturate the highlights of the picture. The signal-to-noise ratio will improve at a rate proportional to the square root of the number of summations (summing 4 images will double the signal-to-noise), but different exposures must be used.
- Page 20 Handbook for the SXVR-H694C Issue 1 March 2012 The exposure time needed for good planetary images is such that the image histogram has a peak value at around 200 and does not extend much above 220 (Ignore the major peak near zero, due to the dark background). If you use too short an exposure time, the image noise level will be increased, and if too long a time is used you will saturate the highlights and cause white patches on the image.
- Page 21 If ‘active high’ inputs are needed, or a very low control voltage drop is essential, then you will need to add a Starlight Xpress...
- Page 22 The autoguider installed on a 70mm refractor guide ‘scope in the author’s garden (the camera shown is the older SXVF version, but the connections are the same). To use the autoguider, please proceed as follows: 1) Having started the SXVR-H694C software, open the autoguider control panel by clicking on the autoguider menu button.
- Page 23 Handbook for the SXVR-H694C Issue 1 March 2012 The autoguider control panel with a guide star selected 2) Press the ‘Start’ button and a series of 1 second exposure guider images will begin to appear in the picture frame. If the images look too dim, use the ‘Stretch Image’...
- Page 24 ********************************************************************* Using the built-in serial ports The SXVR-H694C incorporates two fast serial ports for use with external accessories. The ports are available on 5 pins of the 18 way connector that is provided for the autoguider and may be accessed by plugging in a ‘serial port divider box’. The divider box and cables are available as an accessory and may be chained in series with the autoguider cable, when the guider is in use, or may be used on its own.
- Page 25 Other features of the SXVR-H694C hardware and software ‘Slew & Sum’ imaging: The SXVR-H694C can be used in an automatic image-stacking mode, called ‘Slew & Sum’. The camera is set to take several sequential exposures, which are automatically ‘slewed’ into alignment and then summed together by the software. This mode can help to overcome a poor RA drive by summing images that have exposure times shorter than the drive error period.
- Page 26 Handbook for the SXVR-H694C Issue 1 March 2012 will further increase the image brightness and reduce its resolution. However, generally, these are more useful for finding faint objects, than for imaging. Taking and using a flat field: Flat fields are images, which display only the variations of illumination and sensitivity of the CCD and are used to mathematically modify a wanted image in such a way that the errors are removed.
- Page 27 5mA per output. This socket may be used for telescope control if the SXVR-H694C is employed as an autoguider, but is primarily intended to be the control output for the optional add-on...
- Page 28 ********************************************************************* Camera maintenance: Very little maintenance is needed to keep the SXVR-H694C in excellent operating order, however two problems, which are common to all CCD equipment, might show up on occasion. These are dust and condensation.
- Page 29 7) Replace all the camera parts in reverse order and the job is done. Dealing with condensation: The SXVR-H694C is designed to avoid condensation by minimising the volume of air trapped within the CCD cavity and by preventing moisture ingress. This normally works very well, but storage of the camera in a humid location can lead to the trapped air becoming moist by diffusion through the optical window mounting thread etc.
- Page 30 ********************************************************************* Some details of the camera and CCD characteristics The SXVR-H694C uses a Sony ICX694ALG ‘EXview’ progressive scan CCD, with 2750 x 2200 x 4.54uM pixels in a 12.48 x 9.98mm active area. This EXview device CCD type: Sony ICX694ALG EXview interline imager.
-
Page 31: Conditions Of Guarantee
Issue 1 March 2012 Dear Observer, Thank you for purchasing a Starlight Xpress CCD Imaging System. We are confident that you will gain much satisfaction from this equipment, but please read carefully the accompanying instruction manual to ensure that you achieve the best performance that is capable of providing.