Key concepts
Physics
Potential energy
Kinetic energy
Conservation of energy
Simple machine
Introduction
Admit it, you’ve probably launched a rubber band at least once—pulled one end back, and let it go flying. Did you ever suspect that rubber bands could also be a fun way to learn about physics and engineering? Find out in this project where you’ll build a rubber band–powered car.
Background
When you stretch a rubber band it stores potential energy. Specifically it stores elastic potential energy—the type of energy stored when a material is deformed (as opposed to gravitational potential energy, the type you get when you raise an object off the ground). When you release it all, that stored energy has to go somewhere. If you launch a rubber band across the room, the potential energy is converted to kinetic energy, the energy of motion.
On supporting science journalism
If you're enjoying this article, consider supporting our award-winning journalism by subscribing. By purchasing a subscription you are helping to ensure the future of impactful stories about the discoveries and ideas shaping our world today.
But what about putting all that stored energy to use? You can attach your rubber band to a simple machine—a wheel and axle—to build a simple rubber band–powered car. In real cars, gasoline’s chemical energy or the electrical energy in a battery is converted to kinetic energy of the moving car. Your model car will use a rubber band as the source of energy. It will take a little engineering to get your vehicle working—challenge yourself to see how far your car can go!
Materials
(Note: This is an engineering design project. The following is a suggested list of materials, but you can substitute different ones.)
Corrugated cardboard
Two drinking straws
Two wooden skewers
Four CDs (that are okay to get scratched)
Sponge
Paper clip
Assorted rubber bands
Tape
Scissors
Flat, hard surface for testing your car
Hot-glue gun (optional)
Preparation
Carefully cut a piece of corrugated cardboard that is slightly longer and wider than the length of one straw.
Tape the two straws to the cardboard, parallel to each other, one at each end.
Cut a rectangular notch in the cardboard on one end, about one inch by one inch. This will also cut a segment out of the middle of one of the straws.
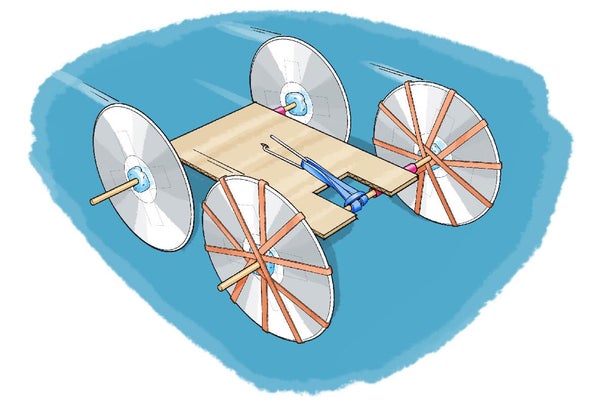
Insert a wooden skewer through each straw. These will be your car’s axles.
Cut four small squares from the sponge and carefully press them onto the ends of the skewers.
Attach CDs to the axles to form wheels. Do this by stuffing a piece of sponge into the hole in the middle of the CD, then using tape to secure the CD and prevent it from wobbling.
Make sure your car can roll smoothly. Put it down on a flat surface and give it a push. If necessary, adjust the wheels so they are all parallel and don’t wobble. How far do you think your car will go when you power it with elastic rubber band energy?
Procedure
Loop a rubber band through itself around the middle, exposed part of the wooden skewer (where you cut out a notch in the cardboard and straw).
Tape the rubber band to the skewer to prevent it from slipping—when the skewer rotates, the rubber band should rotate with it.
Cut a small slot in the middle of the piece of cardboard.
Hook a paper clip through the slot.
Hook the free end of the rubber band onto the paper clip.
Wind up the axle that’s connected to the rubber band. If necessary, pinch the rubber band on the axle when you start, to prevent it from slipping.
Put your car down and release the axle. What happens? Does your car move forward? How far does it go?
If your car didn’t move, it’s time for some troubleshooting.
If the rubber band didn’t unwind at all, wind it more tightly and try again. You can also try changing the location of the slot for the paper clip to adjust the rubber band’s tightness.
If the rubber band unwound but the axle didn’t spin, then the rubber band might not have been attached securely enough to the skewer. Try attaching it to the skewer by tying a tight knot or using hot glue.
If the wheels spun but the car didn’t move forward at all, there might not have been enough friction between the CDs and the ground. Try using the car on a different surface. If that still doesn't work, try giving your CDs more grip by stretching rubber bands around them or by putting a bead of hot glue along the edges. (Let the glue dry completely before you test your car again.)
Keep experimenting with your car. Make small changes to it and test it again. How far can you get the car to go?
Extra: Think of the “fuel economy” for your rubber band–powered car. Gasoline-powered cars calculate their fuel economy in miles per gallon, or how many miles the car can travel on one gallon of fuel. Your car uses a stretched rubber band as the energy source instead of gasoline. How could you measure the "fuel economy" for different designs? For examplehow many feet can your car travel per initial windup rotation of the axle? How does this change with different rubber bands or different paper clip positions? What gives you the best fuel economy?
Extra: Test different types of rubber bands to power your car. Does it work better with long or short ones? Thick or thin ones?
Extra: Try using different materials to build your car. What happens if you use bottle caps instead of CDs for wheels or pencils instead of skewers for axles?
Extra: Do this project with friends or family. Everyone can build their own car and then see whose can go the farthest.
Extra: You can build a car powered by a balloon instead of a rubber band. See the "More to explore" section below for instructions.
Observations and results
When you wind up the car’s axle you stretch the rubber band and store potential energy. When you release it the rubber band starts to unwind, and the potential energy is converted to kinetic energy as the car is propelled forward. The more you stretch the rubber band, the more potential energy is stored, and the farther and faster the car should go.
That all sounds great in theory—but in practice you might have found it difficult. Several things can prevent your car from working well. If the wheels are not aligned properly, they can wobble or jam and prevent the car from rolling smoothly. The rubber band can slip relative to the wooden axle, preventing the wheels from spinning. Even if the wheels do spin, there might not be enough friction with the ground, causing them to spin in place without moving the car. These are all challenges you can overcome with a little engineering effort!
More to explore
Build a Balloon-Powered Car, from Scientific American
Balloon-Powered Car Challenge, from Science Buddies
Snappy Science: Stretched Rubber Bands Are Loaded with Potential Energy!, from Scientific American
Absorb the Shock!, from Scientific American
Science Activities for All Ages!, from Science Buddies
This activity brought to you in partnership with Science Buddies
