
Kali Linux has been at the forefront of operating systems catered to penetration testers. It is a Linux distribution based on Debian designed for sophisticated penetration testing and security audits. With many tools and scripts available out of the box, the Kali Linux installation has been a perennial struggle for many beginners in this field. Today, we are going to cover the entire installation procedure using VMWare on a Windows 10 machine.
Where to Download Kali Linux From?
To install our operating system on a VMWare machine, we need to get the ISO file. This ISO file acts as the installation setup and can be found on the official website at https://www.kali.org/get-kali/.

Once we visit the link, scroll down to the Live-Boot section and download the 64-bit ISO file using the small downward arrow at the bottom. It is recommended to download the versioned image instead of the weekly image for a more stable experience.
Once the ISO file is downloaded, we can move on to the next segment, preparing VMWare for the installation.
How to Set Up VMware for Kali Linux Installation?
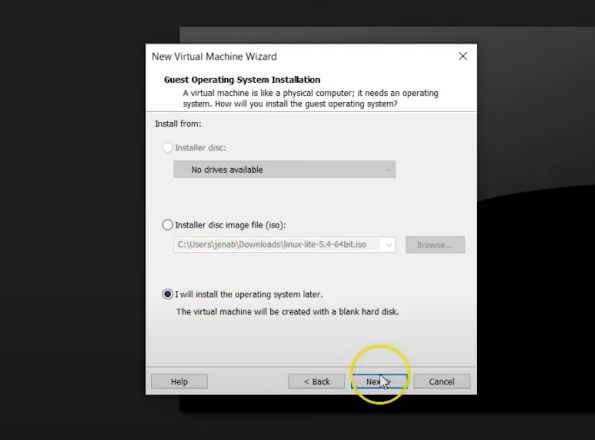
After you've downloaded the ISO file, you'll need to use VMware to build a virtual machine. Launch VMware and select “Create a New Virtual Machine”. Select the "Typical" installation category and move on. In the next section, click on "I will install the operating system later" and click Next. We are not providing the ISO in this section to make our installation process manual and a little more user-friendly.
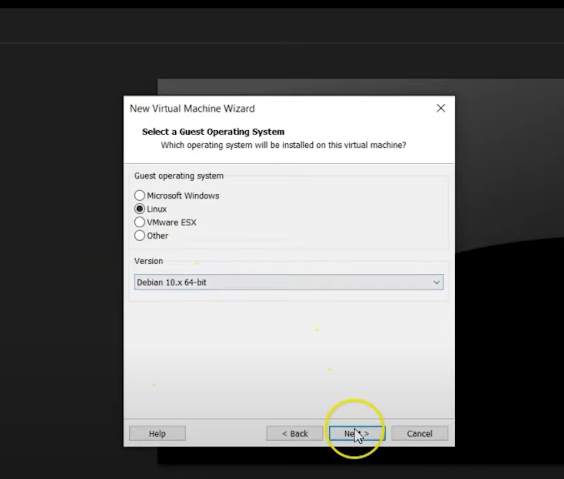
On the next page, select the guest operating system. As the guest operating system, you must pick Linux. As our Kali Linux installation is indeed a Debian-derived Linux distribution, choose the most recent version of Debian in the Version selection, then click Next.
Next, we provide a name and location where VMware will install the virtual machine on the host machine. It is recommended to install the OS in the documents subfolders for easy access.
Specify the disc capabilities, i.e., the total amount of hard drive space available to the virtual machine when it is created. For most people, It is advisable to leave the default settings, i.e., 20GB, alone. You can change the size of the area based on the parameters of your system. We can store the virtual disk as a single file to get the best performance for our system or split it into multiple files if we need to port the virtual machine.
When everything is in order, click Finish to finish creating your virtual machine.
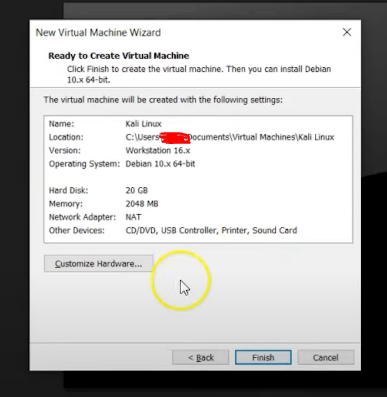
Next, click on the "Edit virtual machine settings" button and adjust the RAM and processor capabilities. While these depend heavily on the host machine specification, a minimum of 1GB RAM and a dual-core processor is recommended to get optimum performance.
In the CD/DVD section, select the downloaded ISO file as a boot drive connection. Once the correct file has been assigned, select Ok and finalize the changes.
Now that the VMWare configuration is complete, let us run the virtual machine and start the Kali Linux installation.
Running the Kali Linux Installer
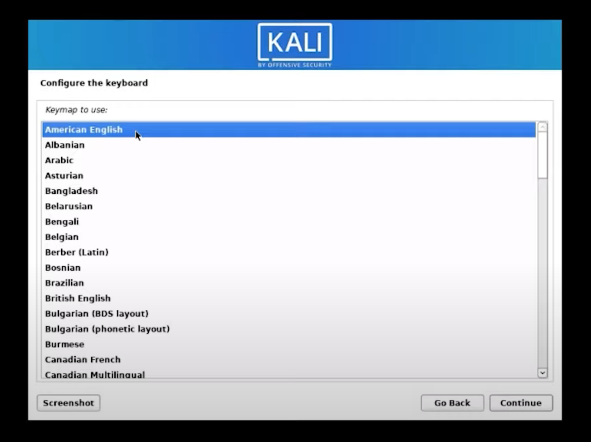
Power on the virtual machine and select the "Start Installer" option on the blue screen that pops up. We can select our new operating system's language, location, and keyboard orientation on the following few screens. These basic settings will be set system-wide, so extra care must be taken to avoid messing up the preliminary tweaks.
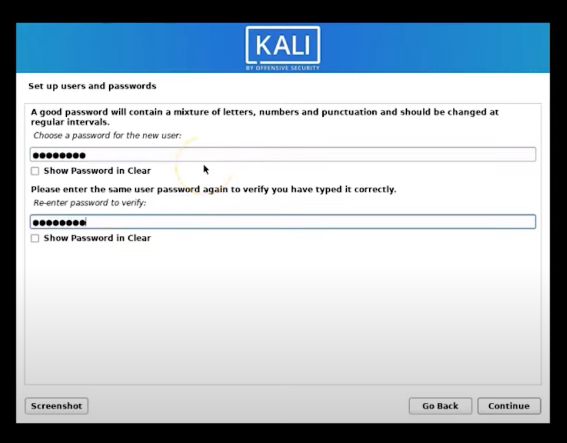
On clicking next, you can see the installer setting up installation components and a blue progress bar. The next page will ask for hostname, which acts as an identifier for the installed operating system when scanned on a local network. The domain name field can be left empty for this stage. On the next page, we can set up the root/admin username and password. This set of credentials will be used in system administration and application management.
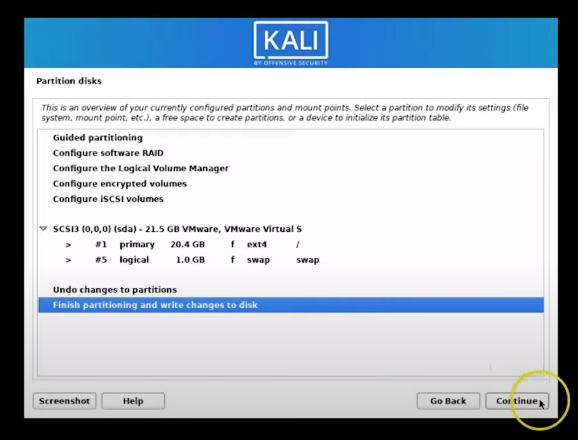
On the next page, we select the "Guided - Use entire partition disk" option and click on "continue." You should be able to see a single drive in the next section’s drop-down menu, which we can select as our virtual drive for the installation and continue. For beginners, we recommend choosing the first option of using the entire partition for all files. If you have experience working on virtual machines, you can assign flags accordingly. Once we press continue, it will show a summary of our settings. Review the necessary options, and continue to install. When prompted, grant the access to partition the disks, and the installer will start unloading the OS files onto the virtual drive.
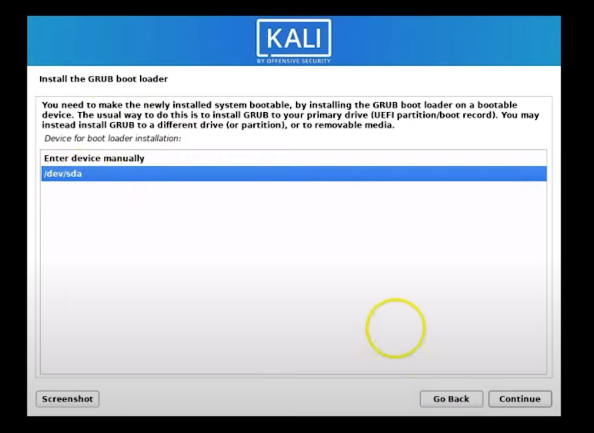
After a few minutes, you should get the option of initializing a network mirror for the package mirror. Allow the installation and move forward. The HTTP proxy field can be left blank for now. Next, we need to install the bootloader. This is necessary for the virtual machine so it can find the right OS when booting up. Make sure you select the drive where your Kali Linux installation is taking place, like 'dev/sda' as shown in the picture, and continue.
After waiting for a few minutes, you will see the installation is complete, and the continue button will bring you back from the installation screen.
The virtual machine will now restart into the freshly installed operating system.
Verify Kali Linux Installation
When we start the virtual machine, we are prompted to enter our credentials. Enter the root username and password specified during installation, and you should be able to see the desktop with all the tools installed in the menu.

With this, we have reached the end of our lesson on Kali Linux installation.
Learn to manage information security with more clarity with the Ethical Hacking Certification Training. Enroll today!
How Can Simplilearn Help You?
Before starting using Kali Linux, we need to ensure the installation is complete and there is no data corruption in the process. With the installation done correctly, we can move forward with learning the appropriate techniques and scripts that allow ethical hackers to perform vulnerability assessments. A trained, ethical hacker is substantially valuable and in demand in the IT industry as per the latest trends.
Simplilearn's Cybersecurity Expert certification course provides a culmination of multiple training paths, ranging from wireless attacks to securing organizational data. Built for professionals and beginners alike, the program will train you in every facet of cybersecurity that the world's most prominent organizations look for.
Conclusion
In this tutorial on the Kali Linux installation, we started by learning to download the correct ISO file and setting up VMware before installation, run the live boot installer of Kali Linux, and configure our virtual machine's partitions to install the operating system finally. To watch a video tutorial on kali Linux installation, you can watch the detailed video on our youtube channel here : How To Install Kali Linux On Windows 10 | Kali Linux Tutorial 2021 | Kali Linux Install |Simplilearn
If you have any doubts regarding this tutorial or need further explanation, please share your queries in the comments below, and our experts will address them soon.
