

Lodestar-C imager/guider handbook - Starlight Xpress
Lodestar-C imager/guider handbook - Starlight Xpress
Lodestar-C imager/guider handbook - Starlight Xpress
- No tags were found...

Create successful ePaper yourself
Turn your PDF publications into a flip-book with our unique Google optimized e-Paper software.
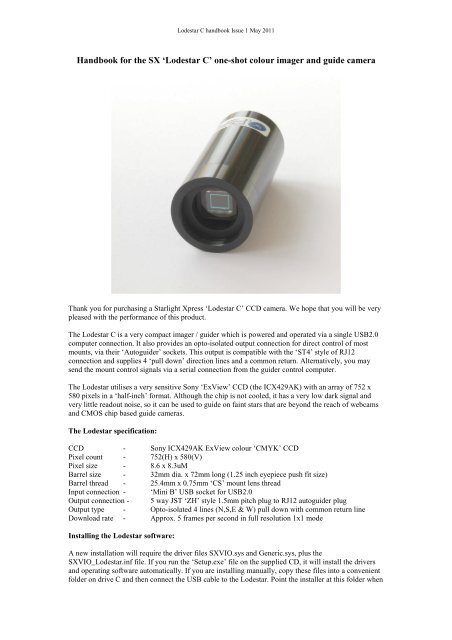
<strong>Lodestar</strong> C <strong>handbook</strong> Issue 1 May 2011be very ‘washed out’ (chlorophyll reflects infrared very strongly). Also, the infrared focusing of manylenses and refractors is poor, leading to fuzzy star images, if the IR is not filtered out. Please bear thesepoints in mind when choosing a lens or telescope, you may find that an infrared blocking filter isessential for many such optics.Once you have decided on your lens or telescope, attach the <strong>Lodestar</strong> C so that the CCD is close to thefocal plane and then point the ‘scope at a bright star. Start the <strong>Lodestar</strong> C software and select thecamera symbol from the top row of icons. The camera control panel should open, but if you see ‘USBdevice not found’ please check that the <strong>Lodestar</strong> is connected correctly and, if so, try opening ‘SetProgram Defaults’ from the ‘File’ menu and select ‘Ignore VID/PID’. Save this setting and try openingthe camera dialog again.Once you see the camera control panel, as above, select ‘Continuous Mode’, 1 second exposure and‘Binned 2 x 1’. You can now press ‘Take Photo’ and you will see a steady stream of images appear inthe display panel. With luck, you will see one or two out of focus stars and you can then refine thetelescope focusing to get the sharpest possible result. Press ‘Esc’ to end the Continuous Modesequence.Once the focus is optimum, switch the imaging mode to High Res (Progressive) and increase theexposure time to about 30 seconds (switch off Continuous Mode). You should now see a star field witha wide range of star brightness – you might also detect a hint of a ‘grid’ across the image, but this isnormal. The grid is caused by the filter matrix on the CCD, but will disappear when the images areconverted to colour.I suggest that you now try imaging something with good colour, such as M42 or M27. M42 needsabout 60 seconds exposure at F5, while M27 will need about 5 minutes for a reasonable image density.Save a selection of unprocessed image frames for experimenting with and practising your processingtechniques. Don’t spend much time colour processing at the ‘scope – this will waste good imagingtime! Once you have some good images to experiment with, you can try some colour processing, asfollows:Open an image and then select ‘Set program defaults’. Make sure that the Pixel and Line offsets in‘Camera Offsets’ are both unchecked – this affects the way that the colour filters on the CCD areassumed to be organised and both ‘off’ is usually correct. You can confirm this by taking a daylight
<strong>Lodestar</strong> C <strong>handbook</strong> Issue 1 May 2011image and confirming that the colours are essentially correct when using this setting. If the colours arebadly wrong, try other offsets until they are correct. It is possible that future firmware updates couldchange the correct settings, so beware of this.Now save the changes and then go to the main menu. Select ‘Colour’ followed by ‘Colour Synthesis’.
<strong>Lodestar</strong> C <strong>handbook</strong> Issue 1 May 2011The settings shown in the picture are generally suitable for getting the best results, so try these first.Here is a typical daylight image, taken through an infrared blocking filter:Once you have some good astronomical images, try using the same settings and you should get somenice results:The raw image:
<strong>Lodestar</strong> C <strong>handbook</strong> Issue 1 May 2011After colour conversion and some power law contrast stretching:Post processing of your images is necessary, if you are to see the best results. Most astronomicalimages have a very wide ‘dynamic range’ (brightness from very dim to very bright in the same image)and so you may need to compress this range. This is quite easy to do by applying a ‘Power LawStretch’ with a power setting of less than 1. Call up ‘Power Law Stretch’ in the ‘Contrast’ menu and setthe slider to 0.3. Apply this and your image will brighten a lot and show much more dim detail. A‘Normal’ stretch will allow you to restore the background to a darker level and you can apply thepower law again, if necessary. The picture of M42 above was processed in this way.Guiding with the <strong>Lodestar</strong> C:The <strong>Lodestar</strong> C is generally used with a separate guide telescope, or via an off-axis <strong>guider</strong>. It isdesigned to be inserted into a standard 1.25” focuser assembly, but also has a 25mm ‘C’ type cameralens thread in the front to allow standard CCTV lenses to be attached. Please note that the chip to lensdistance is only 12.5mm and so a ‘CS’ to ‘C’ extension will be needed to permit a standard C lens toreach focus. Lenses designed for ‘CS’ mount cameras will focus without an extension tube, but manyof these lenses cannot fully illuminate a half-inch format CCD, so take care when selecting a lens forthis purpose.A typical set up might consist of an inexpensive 80mm F5 refractor ‘piggybacked’ onto an SCT, withthe <strong>Lodestar</strong> fitted directly into its focus barrel. Many such telescopes are designed to be used with aninverting prism ahead of the eyepiece and so the focuser may be too short when the <strong>Lodestar</strong> is inserteddirectly. In this case, an extension tube may often be made from a cheap Barlow lens assembly with thelens removed. This configuration can be seen in the picture below.
<strong>Lodestar</strong> C <strong>handbook</strong> Issue 1 May 2011The <strong>Lodestar</strong> C attached to an 80mm F5 guide ‘scopeThe focal length of your guide telescope is not especially critical for good guiding, as the guidingsoftware searches for the ‘centroid’ of the guide star image and can resolve shifts of far less than 1pixel. Using a guide scope with a relatively short focal length (between 300 and 500mm) makes guidestar finding very easy and this is a recommended setup for general purpose guiding.The control of your telescope mount will depend on what inputs are provided. The <strong>Lodestar</strong> outputconnector supplies 4 pull-down lines and a common return line to simulate an ‘ST4’ style auto<strong>guider</strong>output. The lines are isolated from the <strong>Lodestar</strong> electronics by opto-isolator chips and so there is norisk of damage when connecting the outputs to mounts with unprotected electronics. A standard ‘RJ12’style output lead is supplied with the <strong>Lodestar</strong> and this may be connected to any ST4 compatibleauto<strong>guider</strong> input socket on the mount. It is also possible to guide by using serial data from the computerto an RS232 input on the mount, but this will be covered later and is less effective than the directhardware connection.The preferred guiding mode is 2x2 binned, as this gives both fast downloads and high sensitivitywithout any ‘interlacing’ issues. The ‘Fast’ 2x1 mode is also useful if you are working with a short
<strong>Lodestar</strong> C <strong>handbook</strong> Issue 1 May 2011focal length guide ‘scope, as it offers somewhat finer RA guiding resolution in the X axis if this isoriented East-West.Guiding with the <strong>Starlight</strong> <strong>Xpress</strong> <strong>Lodestar</strong> softwareWith the <strong>Lodestar</strong> C connected to the PC and mount, open ‘<strong>Lodestar</strong>.exe’ and find the ‘Set programdefaults’ menu under the ‘File’ heading. If this is the first run of the software, you will get a warningabout the ‘ini file not found’, but ignore this and click on OK. You should now see a screen similar tothe one shown below:The settings shown above are generally satisfactory as a starting point, although some will probablyneed refinement for best results. In the example shown, the ‘auto<strong>guider</strong> socket’ on the <strong>Lodestar</strong> isproviding the control signals to the mount, but you might alternatively use the ‘LX200’ mode via theserial port of the computer, if this is preferred. The Guiding Parameters are set to 6 pixels per second,which corresponds to the typical drift rate of a 1000mm focal length guide telescope when the mount isguiding at 0.5x sidereal speed. Longer focal lengths and/or higher guiding rates will require a largervalue to be set so as to avoid excessively fast corrections, which can cause erratic guiding or evenoscillation of the guiding errors to either side of the guide star.Once the defaults have been set to values which you think will be approximately correct, save thesettings and open the ‘View’ menu. In this you will see an option called ‘Max palette stretch’. Openthis and check the ‘Activate stretch display’ check box. This will automatically boost the imagebrightness so that faint guide stars can be easily seen – if necessary, you can adjust the slider for thebest results.Now click on the camera icon to open the <strong>Lodestar</strong> control dialog, as below:
<strong>Lodestar</strong> C <strong>handbook</strong> Issue 1 May 2011After a brief delay, the Guiding Info window will open, as above, and you will see the guide star, alongwith error values and a reticule showing the guide star location with respect to the reference position. Ifall is well, you should see the guide star location being forced towards the centre position with eachsuccessive guide image. However, it is quite likely that it will be pushed away from the correctposition, due to an error in the guiding default settings. If this is the case, note the direction of travel,and then reverse the appropriate direction setting in the guiding defaults menu. For example, if the starmoves away to the left or right, try reversing the ‘Swap e/w direction’ setting. If guiding works, but issluggish, try reducing the ‘Rate’ setting in the <strong>guider</strong> settings, or increase it if the guiding oscillatesfrom one side of the guide star to the other.<strong>Lodestar</strong> maintenanceThe <strong>Lodestar</strong> head is designed for a long and reliable lifespan and needs very little maintenance to keepit in good working order. The only common issue is with dust particles which collect on the CCDwindow and can shade areas of the image field. These are best removed with a quick blast ofcompressed air from a ‘Dust off’ aerosol, or similar air blower. More permanent marks may beremoved with a drop of alcohol on a ‘microfibre’ lens cloth.
<strong>Lodestar</strong> C <strong>handbook</strong> Issue 1 May 2011Dear User,Thank you for purchasing a <strong>Starlight</strong> <strong>Xpress</strong> CCD Imaging System. We are confident that you will gainmuch satisfaction from this equipment, but please read carefully the accompanying instruction manualto ensure that you achieve the best performance that is capable of providing.As with most sophisticated equipment a certain amount of routine maintenance is necessary to keep theequipment operating at its optimum performance. The maintenance has been kept to a minimum, and isfully described in the manual.In the unfortunate instance when the equipment does not perform as expected, may we recommend thatyou first study the fault finding information supplied. If this does not remedy the problem, then contact<strong>Starlight</strong> <strong>Xpress</strong> for further advice. Our message board service on the <strong>Starlight</strong> <strong>Xpress</strong> web site willoften provide solutions to any problems.The equipment is covered by a 12-month guarantee covering faulty design, material or workmanship inaddition to any statutory Consumer Rights of Purchasers.CONDITIONS OF GUARANTEE1) The equipment shall only be used for normal purposes described in the standard operatinginstructions, and within the relevant safety standards of the country where the equipment is used.2) Repairs under guarantee will be free of charge providing proof of purchase is produced, and that theequipment is returned to the Service Agent at the Purchaser’s expense and risk, and that the equipmentproves to be defective.3) The guarantee shall not apply to equipment damaged by fire, accident, wear an tear, misuse,unauthorised repairs, or modified in any way whatsoever, or damage suffered in transit to or from thePurchaser.4) The Purchaser’s sole and exclusive rights under this guarantee is for repair, or at our discretion thereplacement of the equipment or any part thereof, and no remedy to consequential loss or damagewhatsoever.5) This guarantee shall not apply to components that have a naturally limited life.6) <strong>Starlight</strong> <strong>Xpress</strong>’s decision in all matters is final, and any faulty component which has been replacedwill become the property of <strong>Starlight</strong> <strong>Xpress</strong> Ltd.For further info. or advice, please call:Mr Michael Hattey,<strong>Starlight</strong> <strong>Xpress</strong> Ltd.,The Office, Foxley Green Farm,Ascot Road, Holyport,Berkshire,England. SL6 3LATel: 01628 777126Fax: 01628 580411e-mail: michael.hattey@starlight-xpress.co.ukWeb site: http://www.starlight-xpress.co.uk


