
8/10
Difficulty 2
Playthroughs 50
Hours
Difficulty 2
Playthroughs 50
Hours
Roadmap
Stage 1: Complete the game on any difficulty and find all of the collectables
The first stage to obtaining this platinum will simply require you to complete the game on any difficulty, though I really don't suggest playing on anything higher than normal for a first playthrough. Along the way, you will want to find all of the collectables and knock out any of the miscellaneous trophies that you can. You can try to complete each section of the game without dying, but you will likely be better off going for that after you familiarize yourself with the game. Just enjoy this first playthrough and try to learn the levels as well as you can. This step will probably take about 4 hours.
Complete Corinth River on any difficulty level
Complete Blood Meridian on any difficulty level
Complete Visari Square on any difficulty level
Complete Salamun District on any difficulty level
Complete Salamun Bridge on any difficulty level
Complete Suljeva Village on any difficulty level
Complete Tharsis Refinery on any difficulty level
Complete The Cruiser on any difficulty level
Complete Maelstra Barrens on any difficulty level
Complete all missions on any difficulty level
Collect all intel within the game
Destroy all Helghast symbols within the game
Stage 2: Complete each chapter of the game without dying
Next up, you will want to return to any missions you died on and replay them on the easiest difficulty until you complete them without dying. Refer to this specific trophy for tips and additional information.
Complete all missions on any difficulty level without dying
Stage 3: Clean up the remaining miscellaneous single player trophies
Now, you will want to complete the remaining single player trophies. Most of them aren't too difficult, though some of them are a bit of a grind. You will probably have already earned at least a few of these trophies, but chances are that many will still need to be unlocked.
Kill 500 Helghast Soldiers
Kill 1000 Helghast soldiers
Kill 1500 Helghast soldiers
Revive your buddies a total of 25 times
Kill the Tharsis Refinery ArcTrooper in under 1 minute 30 seconds
Kill the Blood Meridian heavy in under 1 minute
Destroy the Salamun Bridge ATAC in under 1 minute 30 seconds
Kill Radec at Visari Palace within 20 minutes
Kill one of each enemy infantry type with a melee attack
Kill 5 Helghast in 15 seconds whilst on foot and maintaining at least 85% health
Manually reload your weapon 150 times
Shoot off 100 Helghast helmets during battle
Kill 25 Helghast using melee attacks
Kill 3 Helghast at once using the surrounding environment
Get 3 headshots in a row using the same clip of M4 Revolver ammunition
Kill 5 Helghast at once using a single frag grenade
Kill 2 Helghast at once and take your own life using a single frag grenade
Get 15 headshots using the VC32 Sniper Rifle
Kill 75 Helghast using the knife
Nail 20 Helghast to a wall using the Boltgun VC-21
Electrocute 3 Helghast with a single burst from the VC5 Electricity Gun
Kill 3 Helghast using an M82 or StA52 assault rifle without releasing the trigger
Kill 30 Helghast using the StA3 fixed gun emplacement
Destroy any Helghast APC during battle
Destroy all Leech Pods in The Cruiser
Take 30 Helghast lives whilst using the ISA tank
Stomp 10 Helghast with your Exoskeleton in Maelstra Barrens
Stage 4: Online
The servers shut down on March 29, 2018, so these trophies and the platinum are now unobtainable!
This is where you will be putting in the majority of your time, as the multiplayer trophies are basically impossible to complete anymore without boosting (and are still quite challenging even with boosting). Refer to the specific trophies for more information on how to unlock them, and how to boost everything in the multiplayer. You will be dedicating a full week to this step, so don't go for it until you have a week where you don't have to work or do anything else.
Achieve an online rank of General
Achieve weekly online honor rank #4
Achieve weekly online honor rank #3
Achieve weekly online honor rank #2
Achieve weekly online honor rank #1
Acquire all badge specific medals
Acquire all mission specific medals
Acquire all combat specific medals
Acquire all remaining medals
Win 50 online matches
Stage 5: Balls of steel: Elite difficulty playthrough
You've come far, having earned the many miscellaneous trophies as well as the time consuming multiplayer. Now, you must complete the game on the highest difficulty: elite. Elite is no joke, it is a very tough hardest difficulty. Refer to this specific trophy and the trophies for each level of the game for additional tips and information. Once you complete this step, you should have the platinum.
Collect all Killzone 2 trophies
Complete all missions on Elite difficulty level
Tips & Strategies
- Killzone 2 is different from a lot of other FPS games in terms of its controls and the strength of the enemies. The controls are very odd, with
 being your aim down sight,
  being crouch, and a few other strange differences. You can change them around in the pause menu; alternative option 2 is more similar to a Call of Duty game.
 - As for the enemies, you won't be getting a lot of one shot kills. The Higs (how I will often reference the Helghast in this guide) are armored and mutated, so they can take quite a few more bullets. Just be ready for this, as its a bit of a change from a lot of games.
- Your teammates in this game are almost entirely useless. Though you can kill them to take their weapons and ammo, they don't serve any other real purpose. Sometimes, they will draw enemy fire away from you, but that's about the only way they can help.
- On that note, you actually DON'T have to revive your fallen partners. If one goes down, he will stay on the ground until you either revive him or reach the next section of the level.
- Always use special weapons (such as the flamethrower and boltgun) when you get the chance, as they are all very powerful, though fairly uncommon.
- You don't always have to kill every enemy in your path. Sometimes, you can actually just run through or around a group of Helghast to the next checkpoint, completely bypassing some large battles. This can even be done at times on elite difficulty, so try it out if you have trouble with a section.
- Each level below will have specific strategies listed, as well as a general overview of the level. These strategies should help out on all difficulties, including elite.
- Not every section of the game contains infinite numbers of enemies; more often than not, it is a finite number. When you do encounter an infinite spawn point, you will need to move a certain distance ahead to stop the spawning.
- You can only carry two weapons at a time, and one always has to be a sidearm. However, both the ISA and Helghast pistols have infinite ammo, so they can be useful if you ever run out of primary weapon ammo.
- In the multiplayer, the medals work this way: you unlock a medal by getting eight of a specific type of ribbon; each ribbon also has its own requirements and can only be earned once per match (though there is no limit on the number of different ribbons you can obtain per match).
- Classes (weapons and abilities) in multiplayer are unlocked by simply leveling up, but you will need all classes unlocked in order to complete some of the ribbons.

|
War Hero Collect all Killzone 2 trophies |
|
|

|
Corinth Ribbon Complete Corinth River on any difficulty level |
|
|
Corinth River is the first level of the game, and is, predictably, quite simple. You will learn the controls, try out a few different weapons, and complete other tutorial-like actions. This mission probably won't cause much trouble on Elite provided you follow the general strategies.
As for the level itself, you will walk around on a space ship before crash landing on the surface of the planet. You will fight across a beach, then through a warehouse, and a few other indoor locations. Eventually, you will be out in the open in a massive battle between the ISA and Higs. After killing a few machine gunners on a high up walkway, you will drop down to the ground and take control of an ISA tank for the rest of the mission.
As for the level itself, you will walk around on a space ship before crash landing on the surface of the planet. You will fight across a beach, then through a warehouse, and a few other indoor locations. Eventually, you will be out in the open in a massive battle between the ISA and Higs. After killing a few machine gunners on a high up walkway, you will drop down to the ground and take control of an ISA tank for the rest of the mission.

|
Blood Ribbon Complete Blood Meridian on any difficulty level |
|
|
Blood Meridian is the second level of the game. It is shorter than the first but offers a similar level of difficulty. Your main objective will be to reach and destroy an arc tower, though you will fight a heavy for the first time early on. This mission isn't any worse than the first, so you shouldn't have to worry too much.

|
Visari Ribbon Complete Visari Square on any difficulty level |
|
|
Visari Square is the third mission of the game. The majority of the mission isn't all that difficult; it is a lot of close quarters fighting in semi-destroyed buildings, as well as fighting through narrow alleyways. The only tough part on elite is the last section, where you have to defend Visari Square itself from a massive Helghast assault.
The first couple waves of the assault are nothing you haven't seen before, just follow the general elite difficulty strategies and you should be able to get through without a whole lot of difficulty. The main challenge with this section is the wave that includes two heavy troopers. I was stuck on this part for a good two hours until I figured out a strategy.
You will want to grab either an SMG or a light machine gun (if you have ammo for it) and then go down the stairs on the right. Take cover behind the dumpster and kill the heavy as quickly as possible. Then, run back to the central area and, if the area is fairly clear, revive anyone that has gone down. That is where luck comes into this mission, as 90% of the time all of your team will have gone down (making every enemy focus on you), or it will be too dangerous to revive. Your lucky run will be when only one or two of them go down, allowing the enemies to focus on the survivors and giving you enough time to kill the second heavy. Once you kill the second heavy, carefully hunt down the remaining enemies and revive your partners if you get the chance. This section will probably take a while, but you will eventually get through it.

|
Salamun Ribbon Complete Salamun District on any difficulty level |
|
|
Salamun District is the fourth level of the game. You will be fighting through shantytowns and buildings for the most part, making it a fairly close quarters based level. About midway through, you will have to clear out two large mortar cannons, both of which are heavily guarded. However, there is a lot of cover you can use, and you generally won't be attacked by more than one or two enemies at a time. This mission probably won't cause too much trouble on elite, considering you get a flamethrower during much of it. The flamethrower is fairly overpowered, so use it as long as you have ammo.

|
Bridge Ribbon Complete Salamun Bridge on any difficulty level |
|
|
Salamun Bridge is the fifth level of the game, and it contains some very challenging parts. At the beginning, you will have to cross a well guarded bridge. There are a lot of respawning enemies, as well as mounted machine guns. The best strategy is to rush right at the beginning and run up the right side of the bridge. Eventually, you will be able to take cover behind a destroyed vehicle with weapons and ammo laying nearby. At this point, reload your weapons and heal, then quickly rush forward until one of the ISA soldiers says that they are retracting the bridge. Then, run back to cover as quickly as you can. It will take a bit of luck and a well timed grenade to make this work, and you will probably die quite a few times in the process.
Immediately after this, you will have to go under the bridge. There are a ton of enemies, but the only way to stop them from spawning is advancing far enough; launch grenades and fire your weapons as accurately as possible, but you can't really stop moving until you reach the giant machine gun. Once again, this will probably take a few tries and a lucky run, but you will eventually get to the gun. When you reach the machine gun, I don't suggest using it, as the Higs will take you out almost instantly. Instead, peek out from cover and kill the soldiers with rocket launchers, then attempt to move into the shantytown area. The cover doesn't work too well, as enemies will come at you from multiple directions, so moving quickly is necessary.
Eventually, you will have to fight through Radec Academy and kill a flying ATAC vehicle. The fight in the academy courtyard itself isn't all that bad; just stay in cover and check every direction for hiding enemies. When you reach the ATAC fight, jump down to the area below where you can enter a bunker style area containing a rocket launcher. At that point, wait until the ATAC is above the blue towers sticking out of the side of the area, then shoot them. If you do it right, the ATAC will be stunned, allowing you to fire a missile at it. Just repeat this cycle until you can bring it down, retreating to cover whenever necessary.
This is one of the tougher missions of the game, so be ready.

|
Suljeva Ribbon Complete Suljeva Village on any difficulty level |
|
|
Suljeva Village is the sixth level of the game. It is set in the desert and introduces a seldom mentioned enemy: the Helghan spider. The spiders are very big, will chase you, and explode when shot or when they get near you. However, the level itself isn't all that bad, even on elite. A few sections don't even contain any enemies, and you generally won't get attacked by more than two or three at a time. You will also have access to the boltgun if you want to use it. On this level, you can actually avoid a lot of the fights by running around the enemies, so you don't have to kill that many of them. Compared to the previous level, this one probably won't cause you as much trouble.

|
Tharsis Ribbon Complete Tharsis Refinery on any difficulty level |
|
|
Tharsis Refinery is the seventh level of the game. Aside from the very first section, the mission isn't bad at all, as you will get access to the electricity gun (the most overpowered weapon in the game). However, the first section is a challenge.
The first section (when you're on the train) is tough because you have to destroy a tank while surrounded by infinitely respawning enemies. However, heavy wind will be blowing in your face, making grenades much harder to throw, and making it tougher to run forward. To get through this section, as soon as you can see the tank, cook a grenade for a long time and then throw it into the newly spawned enemies. Pick up a launcher and shoot it at the tank twice. At this point, more enemies will likely spawn, and if they get close to you, you'll be surrounded with nothing but a rocket launcher. Instead, run back to the previous tank on the previous traincar that has a machine gun mounted on it. When you take cover while using this machine gun, enemies won't actually be able to hit you. This will allow you to peek out and kill them more easily. Then, move forward and shoot the tank one or two more times to destroy it, allowing you to move forward. Don't let your guard down, as you will have to kill a few more enemies and advance a little farther to get a checkpoint.
After that section, like I said, the level isn’t bad at all. Just keep using the electricity gun as soon as you get it, and you can power through the rest of the level, even on elite.

|
Cruiser Ribbon Complete The Cruiser on any difficulty level |
|
|
The Cruiser is the eighth level of the game. It is somewhat long, but isn't necessarily more challenging than the earlier levels. Generally, you won't end up fighting that many enemies at one time, and I don't remember there being any infinite spawn points either. Also, the checkpoints are surprisingly generous on this level, as you seem to get more than normal.
You will begin by riding an elevator up to a higher floor before being ambushed by a breeching group of Helghast. You will then have to clear a large multi story room containing a few Higs per floor. You have plenty of cover and constant access to light machine guns, so make use of them. You will have to kill at least one heavy in this section, but you will generally have the high ground and strong weapons, so he shouldn't cause you too much trouble. You will eventually make your way to an AA gun where you will have to destroy as many Helghast ships as possible. Shortly after, you will have to escape the ship, fighting through burning and exploding parts of the ship.
Overall, very few sections of this mission will put you up against large numbers of enemies, so it shouldn't cause you all that much trouble.

|
Maelstra Ribbon Complete Maelstra Barrens on any difficulty level |
|
|
Maelstra Barrens is the ninth level of the game, and is arguably the easiest. You will take control of a powerful exo-skeleton, with access to machine guns and missiles, both of which have infinite ammo (though the machine guns can overheat). The mission is based around moving forward in the exo and destroying Helghast vehicles so that your allies can advance. There are also quite a few enemies with rocket launchers. This level can be completed in under ten minutes without dying, even on elite, so you should have no problem clearing it.

|
Survivor Complete all missions on any difficulty level |
|
|
You will unlock this trophy upon completion of the tenth and final level of the game, "Visari Palace". This mission is very difficult on elite, especially the final two sections. Since there is no specific trophy for the final level, I will describe it here.
The first two sections of this level actually aren't all that bad. The first section requires you to fight past near infinitely spawning enemies on a raised platform. The best thing to do is to pop out and kill one enemy every 15-20 seconds, then return to cover until you have managed to kill at least a few of the enemies. Then, rush to the platform, crouch down, and kill everyone on it. Your team will then move up to help clear the bottom. After that, you will have to take out a tank and a few more enemies, though you get a rocket launcher and lots of ammo for the tank.
The second section is based around destroying four machine gun nests surrounding a central tower. You have to advance very slowly here, but there is plenty of cover, so use that to your advantage. Take out the enemies manning the machine guns as quickly as you can, as they don't seem to respawn. There will be one or two heavies to fight in this area, but the Helghast LMGs scattered throughout the level will make quick work of them. Play this section like any other on elite and you should get through it without too much trouble.
The difficulty begins with the third section, as you have to fight through a massive courtyard to reach the entrance to Visari's palace. There are literally hundreds of enemies in this section, but only one or two checkpoints. Rushing isn't always a bad idea, as you might get lucky and manage to make it to the first checkpoints (it should pop around the time you reach the little tunnel in the center of the courtyard). If you don't want to rush, then you need to advance very slowly and check everywhere, as enemies will be coming at you from multiple directions and elevations. You will get a checkpoint when you reach the final push into the palace, and the area will be guarded by dozens of respawning enemies, as well as rocket launcher soldiers. I suggest taking out the ATAC from cover, then moving to the right into the lower area. You will have a second to rest here and let a few of your allies catch up. Then, advance slowly toward the entrance, using every piece of cover you can. You will have a few moments between spawns of the enemies, so try to use those to your advantage and advance at those times. Finally, when you reach the last open area guarded by a pair of machine guns, toss all your grenades toward the guns, then sprint like crazy to the doors. If you do it right, you should make it to the doors before being killed, allowing you to head into the final section of the level.
Once you enter Visari's Palace, you will have to fight Radec and his massive number of guards. I explain the fight in greater detail under Demonslayer, a trophy earned for completing the final battle in 20 minutes or less. However, that trophy is written for speeding through the fight on a low difficulty. This fight is incredibly difficult on elite, and will require a great deal of skill, luck, and patience.
Or does it?
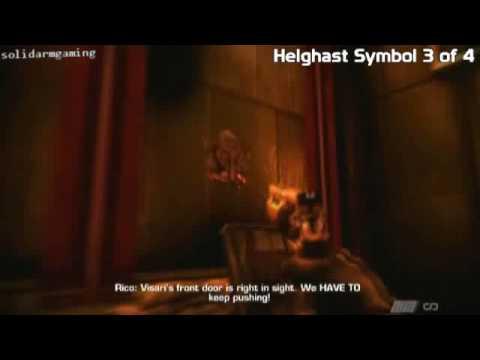
There is actually a very cheap strategy that can be used for this fight that makes it very simple on any difficulty, but ridiculously time consuming on elite. As soon as Rico opens the door that leads to the room where the battle takes place, knife him until he goes down (preferably behind the newly opened door). Then, begin the fight by entering the room, watch the cutscene, and sprint back to the entrance. If you do this correctly, the door will remain open due to Rico still standing behind or just in front of it. Now, you can hide in the previous area behind the doors, but the enemies will not come through the doors (aside from the flamethrower soldiers in the third wave). Because of this, you can remain behind the doors and pick off enemies with your infinite ammo revolver or main weapon. The revolver always seemed to be more accurate when not aiming down the sights, so that may not be a bad idea for attacking (even at long range). The doors will only close if you go too far past them into the room, so just stay where you are until you get down to the last few enemies. Like I said, only the flamethrower enemies will actually come through the door, so once you kill them, you will be quite safe. Though this will make the section take an extremely long time (possibly two hours or more), you won't truly have to deal with the fight in the main room, where enemies will fire on you from every direction. The actual fight against Radec is still fairly easy on elite, just follow the strategy listed in Demonslayer, and you should have no problem with that last portion.
Ultimately, this mission is both time consuming and very difficult, but it is possible, so keep trying and you will eventually get through. I have included a video of the trick for the Radec fight as well (its edited to only show the important parts of the fight).
The first two sections of this level actually aren't all that bad. The first section requires you to fight past near infinitely spawning enemies on a raised platform. The best thing to do is to pop out and kill one enemy every 15-20 seconds, then return to cover until you have managed to kill at least a few of the enemies. Then, rush to the platform, crouch down, and kill everyone on it. Your team will then move up to help clear the bottom. After that, you will have to take out a tank and a few more enemies, though you get a rocket launcher and lots of ammo for the tank.
The second section is based around destroying four machine gun nests surrounding a central tower. You have to advance very slowly here, but there is plenty of cover, so use that to your advantage. Take out the enemies manning the machine guns as quickly as you can, as they don't seem to respawn. There will be one or two heavies to fight in this area, but the Helghast LMGs scattered throughout the level will make quick work of them. Play this section like any other on elite and you should get through it without too much trouble.
The difficulty begins with the third section, as you have to fight through a massive courtyard to reach the entrance to Visari's palace. There are literally hundreds of enemies in this section, but only one or two checkpoints. Rushing isn't always a bad idea, as you might get lucky and manage to make it to the first checkpoints (it should pop around the time you reach the little tunnel in the center of the courtyard). If you don't want to rush, then you need to advance very slowly and check everywhere, as enemies will be coming at you from multiple directions and elevations. You will get a checkpoint when you reach the final push into the palace, and the area will be guarded by dozens of respawning enemies, as well as rocket launcher soldiers. I suggest taking out the ATAC from cover, then moving to the right into the lower area. You will have a second to rest here and let a few of your allies catch up. Then, advance slowly toward the entrance, using every piece of cover you can. You will have a few moments between spawns of the enemies, so try to use those to your advantage and advance at those times. Finally, when you reach the last open area guarded by a pair of machine guns, toss all your grenades toward the guns, then sprint like crazy to the doors. If you do it right, you should make it to the doors before being killed, allowing you to head into the final section of the level.
Once you enter Visari's Palace, you will have to fight Radec and his massive number of guards. I explain the fight in greater detail under
Or does it?
There is actually a very cheap strategy that can be used for this fight that makes it very simple on any difficulty, but ridiculously time consuming on elite. As soon as Rico opens the door that leads to the room where the battle takes place, knife him until he goes down (preferably behind the newly opened door). Then, begin the fight by entering the room, watch the cutscene, and sprint back to the entrance. If you do this correctly, the door will remain open due to Rico still standing behind or just in front of it. Now, you can hide in the previous area behind the doors, but the enemies will not come through the doors (aside from the flamethrower soldiers in the third wave). Because of this, you can remain behind the doors and pick off enemies with your infinite ammo revolver or main weapon. The revolver always seemed to be more accurate when not aiming down the sights, so that may not be a bad idea for attacking (even at long range). The doors will only close if you go too far past them into the room, so just stay where you are until you get down to the last few enemies. Like I said, only the flamethrower enemies will actually come through the door, so once you kill them, you will be quite safe. Though this will make the section take an extremely long time (possibly two hours or more), you won't truly have to deal with the fight in the main room, where enemies will fire on you from every direction. The actual fight against Radec is still fairly easy on elite, just follow the strategy listed in
Ultimately, this mission is both time consuming and very difficult, but it is possible, so keep trying and you will eventually get through. I have included a video of the trick for the Radec fight as well (its edited to only show the important parts of the fight).
Cheap Strategy for the Radec Boss Battle (Elite Difficulty)
Credit to hunhatrix78 for the video.

|
Heroic Survivor Complete all missions on Elite difficulty level |
|
|
Elite is the hardest difficulty in Killzone 2, and it is unlocked after beating the game once on any difficulty. Elite is a true challenge; it is a test of both skill and patience. While some sections aren't all that tough, many parts of the game will cause you a lot of trouble. I have described each mission in their respective trophy descriptions, but I will list some general information about the difficulty here.
- Like most other games' toughest difficulties, enemies will kill you very fast on elite. However, they don't appear to take any more damage on elite than on easier difficulties, so that is nice.
- Always use cover. I can't stress this enough; cover is your greatest asset. You can peek out, fire on one or two enemies, then go back into cover until you heal. Always look for good pieces of cover.
- Grenades can be aggrivating on elite, as the enemies will throw them with pinpoint accuracy, and like to throw two or even three at a time. You can't throw grenades back, so you have to run away.
- The checkpoint system in this game absolutely sucks. There are very few checkpoints on elite, generally from either reaching another section of the level, or occasionally in the middle of one. Because of this, you will often have to complete entire sections without dying, which is very challenging at times.
- Your teamates are fairly useless for actually killing enemies, but they make great human shields. If you have allies around, the Higs will split their fire between you and them, which can be helpful at times. If all else fails, crouch behind one and use him as a shield; you might have enough time to heal before he goes down.
- Crosshairs are eliminated on elite, but hipfiring is still fairly accurate, so I still suggest firing from hip. It may take a bit of getting used to but you will eventually realize that you don't need the crosshair to be accurate.
- Always use the light machine guns, as they do a lot of damage, have great range, and have huge magazine sizes.
- Don't neglect your infinite ammo revolver, it can save your life if your primary's clip runs out.
- Grenades are still excellent for taking out or wounding large groups of enemies, so use them whenever you can.

|
Pallbearer - Kill 500 Helghast Kill 500 Helghast Soldiers |
|
|
Simply kill 500 Helghast over the course of the game to earn this trophy. You will probably get this during your first playthrough.

|
Undertaker - Kill 1000 Helghast Kill 1000 Helghast soldiers |
|
|
Simply kill 1000 Helghast over the course of the game to earn this trophy. You will probably get this during your clean up of the miscellaneous trophies, or, at latest, during your elite difficulty playthrough.

|
Reaper - Kill 1500 Helghast Kill 1500 Helghast soldiers |
|
|
Killing 1500 Helghast may take more than two playthroughs and the trophy clean up to unlock, so its a bit of a grind. I suggest grinding out kills by replaying the final mission of the game (Visari Palace) on easy, as there are multiple sections with infinite enemy spawn points.
Also note that Pallbearer, Undertaker, and this trophy stack between playthroughs; killing 1500 Higs during one playthrough would be impossible unless you sit at an infinite spawn point for hours to grind the kills.
Also note that

|
Field Agent - Collect all intel Collect all intel within the game |
|
|
See Iconoclast for information about both collectable types as well as their locations.

|
Iconoclast - Destroy all symbols Destroy all Helghast symbols within the game |
|
|
There are two types of collectibles in this game: intel briefcases and Helghast symbols. I have included two videos below of the locations of each and every collectible in the game. Note that the ninth level (Maelstra Barrens) does not have any collectibles, as you are in an exoskeleton for the entire mission.
The collectibles are actually fairly well hidden, so watching these videos is highly recommended.
Intel briefcases look just like normal briefcases and they will glow a bit (like weapons do).
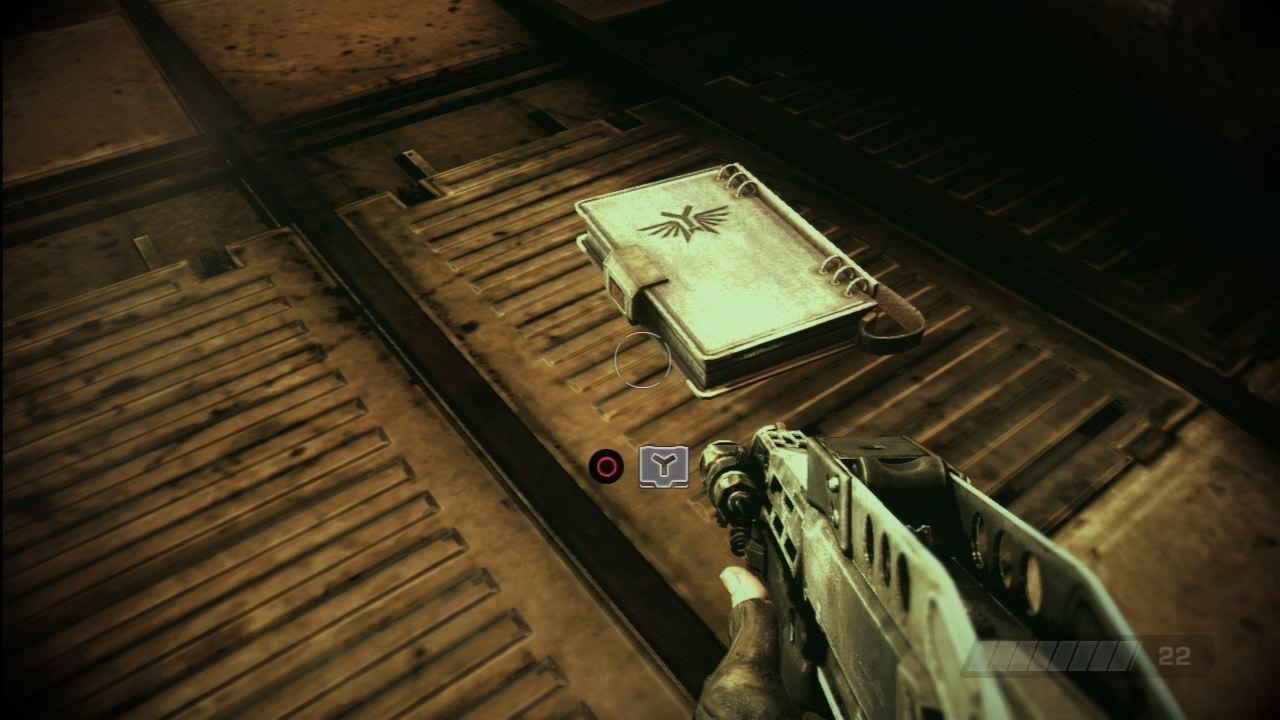
Helghast symbols basically look like a triangle or three arrows implanted within a circle, and they glow as well.
Credit to xBuTcHeRx for the video.
The collectibles are actually fairly well hidden, so watching these videos is highly recommended.
Intel briefcases look just like normal briefcases and they will glow a bit (like weapons do).
Helghast symbols basically look like a triangle or three arrows implanted within a circle, and they glow as well.
Intel Locations Video Guide
Helghast Symbol Locations Video Guide
Credit to xBuTcHeRx for the video.

|
Untouchable Complete all missions on any difficulty level without dying |
|
|
This trophy may seem difficult at first, but it actually isn't that bad because it can be done on the easiest difficulty. If you die on a mission, you don't have to replay the entire mission. Instead, you can go to mission select and see exactly which section you died in, and then you can simply replay that section until you do it without dying. The mission select feature is very helpful, as it shows your statistics for each section of each level (collectables found, difficulties it has been completed on, total time, and number of deaths). Most sections won't take longer than ten minutes on easy, so this shouldn't cause you too much trouble.

|
Babysitter - Revive 25 Buddies Revive your buddies a total of 25 times |
|
|
Whenever one of your teammates goes down (either Garza, Rico, or Nakto), get near them and hit  to revive them. You are completely defenseless while reviving, so try to do it from behind cover. Your teammates will go down A LOT, way more than friendly AI should, so this trophy will probably come during your first playthrough.
Fun fact, in Killzone 3 and Shadow Fall, your teammates or OWL drone (respectively) can revive you. In this game, your friends can't revive you. Seems the ISA are prioritizing these three over Sev...
Fun fact, in Killzone 3 and Shadow Fall, your teammates or OWL drone (respectively) can revive you. In this game, your friends can't revive you. Seems the ISA are prioritizing these three over Sev...

|
Elementalslayer - Kill the ArcTrooper within 1 minute 30 seconds Kill the Tharsis Refinery ArcTrooper in under 1 minute 30 seconds |
|
|
About a third of the way through the seventh mission (Tharsis Refinery), you will have to fight the ArcTrooper. He's a lot like a standard heavy trooper, but tougher, and wielding an electricity gun. Unlike the standard heavy trooper, in order to kill this guy you have to shoot one of the giant electric containers as it goes over him. If you time it right, the container exploding will stun the ArcTrooper, giving you time to shoot the tanks on his back. Do this a few more times and you will bring him down. I suggest going for this trophy on easy, as you may have to run around behind him to get him to walk under the containers, and his electricity gun causes a lot of damage. I have included a video guide as well.
Elementalslayer Video Guide
Credit to riskmod1 for the video.

|
Giantslayer - Kill the Heavy within 1 minute Kill the Blood Meridian heavy in under 1 minute |
|
|
Early on during the second mission of the game (Blood Meridian), you will enter a canal where you will be introduced to the heavy trooper. You will fight a lot of them throughout the game, especially in later levels, but only this one will give you a trophy. To kill a heavy trooper, fire at his head until he turns around and crouches. When he does this, fire as many bullets as you can into the red tanks on his back. Once he turns back around and starts firing again, repeat this process until he goes down. It generally only takes one or two headshots to make him turn around, and then a few magazines of ammo to destroy the tanks on his back for the kill. You might get this one without trying, especially if you play on easy, but I've also included a video.
Giantslayer Video Guide
Credit to NextGenTactics for the video.

|
Dragonslayer - Destroy the ATAC within 1 minute 30 seconds Destroy the Salamun Bridge ATAC in under 1 minute 30 seconds |
|
|
At the very end of the fifth level (Salamun Bridge), you will have to fight an ATAC (basically a big flying drone that can take a lot of damage). I already discussed this fight during my description of Bridge Ribbon, but I will list the general strategy again here.
As soon as you regain control of your character, pick up the rocket launcher in front of you, then jump down and go into the tunnel area. You will be much safer here. Now, wait until the ATAC hovers above the blue pylons coming out of the roof, then shoot one of the pylons with your pistol. This will temporarily stun the ATAC, allowing you to fire a rocket at him. If you're fast, you may be able to hit him twice, but you will generally on be able to land one hit. On easy, he only takes three rockets to kill, but takes four on normal, and I believe he takes five on veteran, and six on elite. Because of this, there is basically no way you can get this trophy on the higher difficulties, so go for it on easy. I have included a video that mixes up the strategy a bit (as the player also shoots the pylons with the launcher), but it still works just fine for unlocking the trophy.
As soon as you regain control of your character, pick up the rocket launcher in front of you, then jump down and go into the tunnel area. You will be much safer here. Now, wait until the ATAC hovers above the blue pylons coming out of the roof, then shoot one of the pylons with your pistol. This will temporarily stun the ATAC, allowing you to fire a rocket at him. If you're fast, you may be able to hit him twice, but you will generally on be able to land one hit. On easy, he only takes three rockets to kill, but takes four on normal, and I believe he takes five on veteran, and six on elite. Because of this, there is basically no way you can get this trophy on the higher difficulties, so go for it on easy. I have included a video that mixes up the strategy a bit (as the player also shoots the pylons with the launcher), but it still works just fine for unlocking the trophy.
Dragonslayer Video Guide
Credit to PringlesForAidan for the video.

|
Demonslayer - Kill Radec within 20 minutes Kill Radec at Visari Palace within 20 minutes |
|
|
This is not as difficult as it may sound. Radec is the final boss of the game, but to get to him, you will have to fight through many waves of Helghast soldiers. This is very difficult to do on any difficulty other than easy, so I highly suggest attempting it on easy. The timer starts when you enter the big room and get a cutscene of Radec, and ends when the cutscene plays that shows him committing suicide. Also, if you die, you will respawn at the last checkpoint and the timer will reset to the time you had when you reached said checkpoint.
The first two waves are just standard soldiers carrying various weapons; deal with them like any other group of enemies. The third wave will include a trio of flamethrower soldiers in addition to the normal enemies, and the fourth will contain a few rocket launcher wielding soldiers. There isn't a whole lot of cover during these first four waves, but the area just beyond the doors you entered through are a good area to try and hide in. Try to remember where the flamethrower soldiers are killed at, as the flamethrower is an excellent weapon for the actual boss fight. As for the soldiers carrying rocket launchers, they camp out on the far staircase, firing nonstop rockets until they are killed. Be careful as you approach them, and try to kill them from as far away as possible.
After these four waves go down, you will be able to go to the upper floor, and you will get a checkpoint. The upper floor has a lot more cover, though enemies will come at you from doors above the entrance to the area. I suggest trying to camp out on the upper floor, preferably with Rico nearby so he can draw some enemy fire. After a few more mixed waves of soldiers, an Intruder (the small ISA troop transport ships) will crash through the window. There will be a few ISA assault rifles on it, and it provides a bit more cover. You will get another checkpoint here.
The last few groups of enemies come mainly in the form of rocket launchers and Higs camping on the upper floor. However, the crashing Intruder will actually destroy a pile of rubble that prevented you from reaching the far staircase. That will allow you to get closer to the rocket launcher soldiers to take them out. Once you take them out, Radec will appear for the actual boss fight.
The Radec fight itself is actually really easy. Radec can turn invisible (though his outline will still be visible), can teleport around the room, and attacks with a knife and shock grenades. Simply pick up a flamethrower and fire it at Radec's outline. When he is hit by the flames, he will run around screaming for a good 15 seconds, and will be semi-visible. Switch to your sidearm or knife and deal as much damage as you can while you can see him. As soon as Radec finishes burning, light him up again and repeat this cycle until he goes down.
The actual fight shouldn't take more than three minutes if done correctly, leaving you a good 17 minutes to deal with the many waves of enemies. There is no true video guide for this trophy, so I hope I explained it well enough. This can be done in 15 minutes, so you should be able to get it after a couple of tries.

|
Safari Hunter - Kill each enemy infantry type with a melee attack Kill one of each enemy infantry type with a melee attack |
|
|
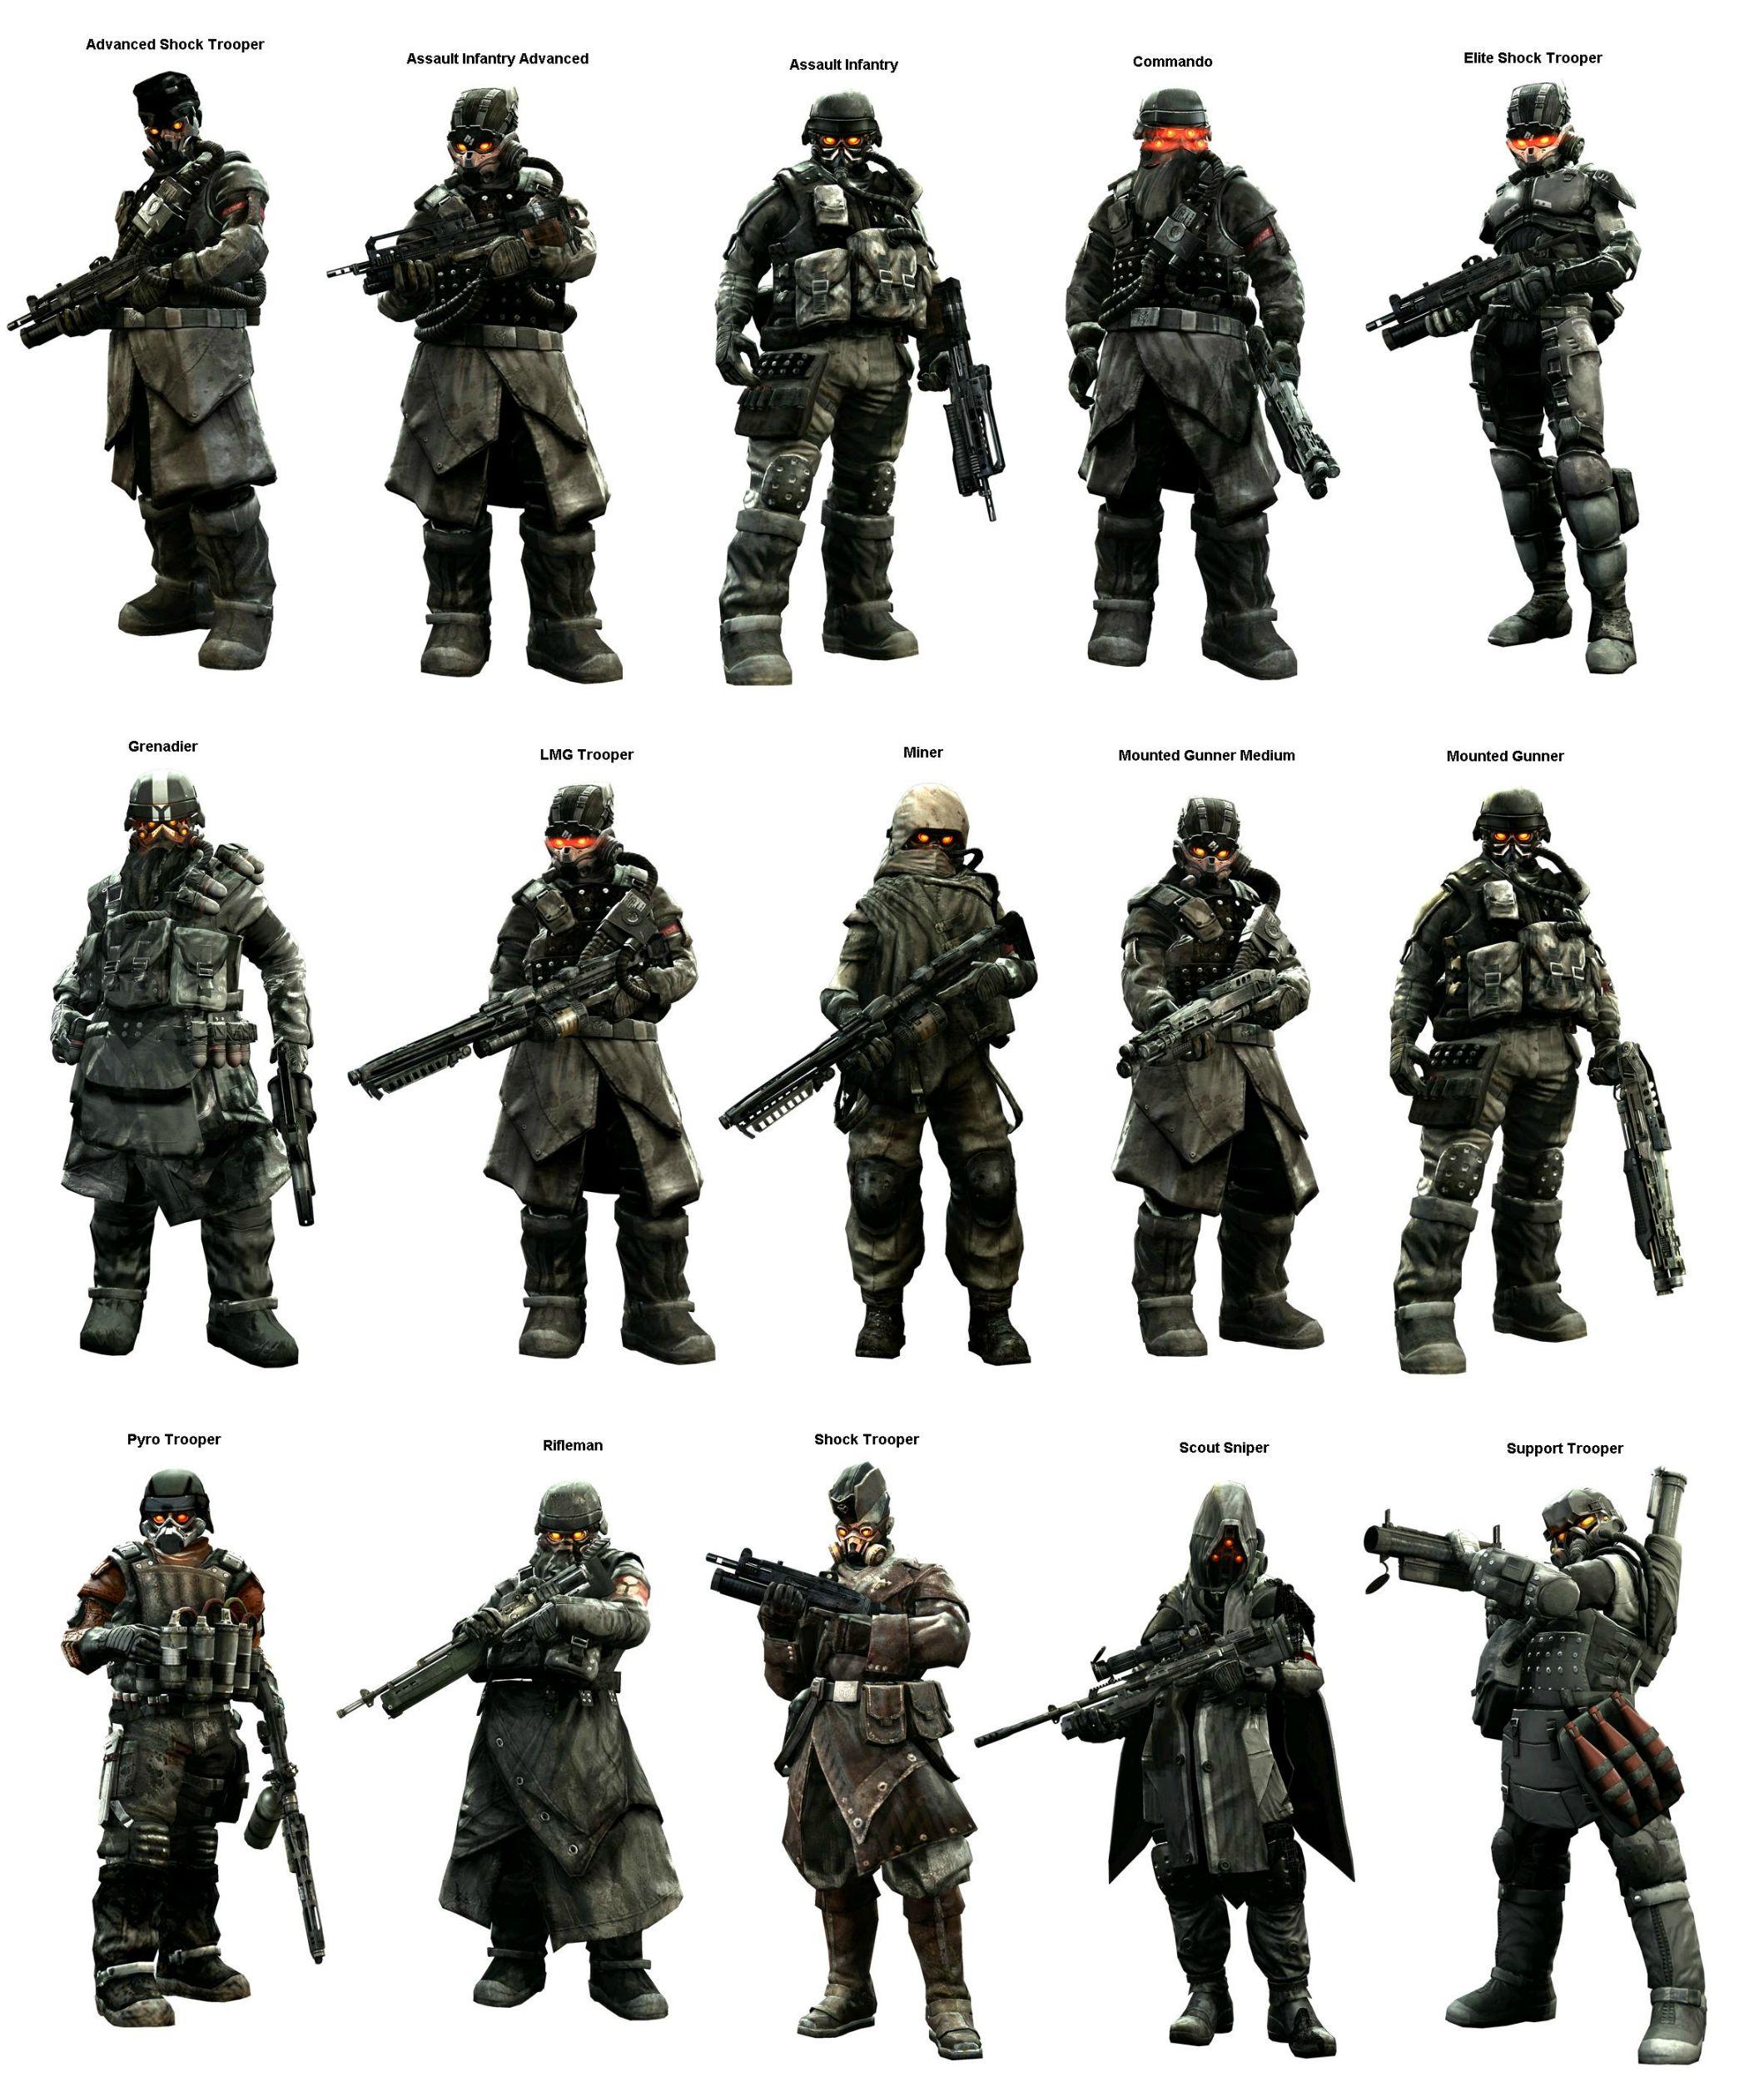
This one is tough, as there are 15 different enemy types in this game, and the game doesn't tell you which ones you have killed (though it keeps track of how many different types you have killed). I have listed locations where each type can be found, but since most of them look the same, it can be very difficult to tell which types you still need to kill. However, most of these enemy types can be found in other sections and missions; these are just some confirmed locations where they can be knifed/melee'd.
Below is an image of what each type of Helghast infantry type looks like, so you can try to keep track of them yourself.
| Enemy Type | Mission | Section of mission |
|---|---|---|
| Advanced Shock Trooper | Tharsis Refinery | Central Observatory |
| Assault Infantry Trooper | Visari Palace | Inner Courtyard |
| Assault Infantry | anywhere | any |
| Commando | Salamun District | Dushan Tower Courtyard |
| Elite Shock Trooper | The Cruiser | Landing Bay |
| Grenadier | Visari Palace | Inner Courtyard |
| LMG trooper | Visari Palace | Lazar Highway |
| Miner | Suljeva Village | Suljeva North |
| Mounted Gunner Medium | Visari Palace | Lazar Highway |
| Mounted Gunner | Corinth River | Korovis Dam |
| Pyro Trooper | The Cruiser | Landing Bay |
| Rifleman | anywhere | any |
| Shock Trooper | Tharsis Refinery | Suljeva Minetrain |
| Scout Sniper | Suljeva Village | Vojislav Mining Facility |
| Support Trooper | Corinth River | Verdun Overlook East |
Below is an image of what each type of Helghast infantry type looks like, so you can try to keep track of them yourself.

|
Killing Spree - Kill 5 Helghast in 15 seconds Kill 5 Helghast in 15 seconds whilst on foot and maintaining at least 85% health |
|
|
This trophy may seem difficult, but it actually isn't all that tough. The best place to earn this trophy is in the same section that you should go for Fragmerchant, Run and Gunner, and Fragmartyr (The Cruiser, section Landing Bay). As soon as the enemies emerge from the leech pod, throw a grenade and unload on the survivors with your assault rifle. As long as you are playing on easy, you should have no problem maintaining at least 85% health, and all five will definitely fall within 15 seconds.
Now, it appears that this trophy actually unlocks upon killing only four enemies, as is seen in this video. I personally don't remember how many I killed to get it, but multiple players have reported this glitch, so it seems to be fairly common. You will probably kill four enemies with the grenade alone, making this trophy even easier.
Now, it appears that this trophy actually unlocks upon killing only four enemies, as is seen in this video. I personally don't remember how many I killed to get it, but multiple players have reported this glitch, so it seems to be fairly common. You will probably kill four enemies with the grenade alone, making this trophy even easier.
Killing Spree Video Guide
Credit to NextGenTactics for the video.

|
Bullet Counter - Manually reload 150 times Manually reload your weapon 150 times |
|
|
You will probably earn this just by playing through the game. Once you have fired at least one bullet from any gun, hit  to reload the weapon manually. If you empty the magazine, you will automatically reload, which doesn't count for this trophy.

|
Safety First - Shoot off 100 helmets Shoot off 100 Helghast helmets during battle |
|
|
Most weapons in this game aren't strong enough to kill an enemy in a single shot, even to the head. Generally, you will need to shoot an enemy in the head/face once to knock off their helmet, and a second time to get the kill. As long as you go for headshots most of the time (which you should always be doing anyway) you will easily get this by the end of your first playthrough or early into your second.

|
Berserker - Kill 25 Helghast with melee attacks Kill 25 Helghast using melee attacks |
|
|
You can melee attack by hitting  . Melee is always a good alternative at close range if you run out of ammo in your clip. Simply kill 25 enemies with melee attacks to get this trophy. Alternatively, you can hit
  on the directional pad to switch to your knife and get kills with it instead.

|
Barrel of Death - Kill 3 Helghast using your environment Kill 3 Helghast at once using the surrounding environment |
|
|
Killing 3 Helghast with the surrounding environment means that you have to kill 3 at once with either an explosive or electric barrel. The explosive barrels are red and scattered throughout many levels of the game, while the electric barrels will glow blue. This trophy can be earned as early as the first level (Corinth River), but can also be done quite easily in the mission "Tharsis Refinery".
Barrel of Death Video Guide
Credit to PringlesForAidan for the video.

|
Professional - 3 revolver headshots in a row Get 3 headshots in a row using the same clip of M4 Revolver ammunition |
|
|
The M4 revolver is the standard ISA sidearm. It only holds six rounds but does a ton of damage per shot, so it is an effective backup weapon. However, getting three headshots with it in a row isn't the easiest thing to do, as the sights are big and bulky, and you will move slowly while aiming down the sights. You will want to do this on easy, as it will make it easier to get up close to the Higs, as well as take them down more easily.
The description is a bit misleading. You are allowed to miss shots, but you can only shoot the Higs in the head, anywhere else will reset your trophy progress. You only have six bullets, so there isn't much room for error. It is arguably easier to just not use the sights, as your hip fire accuracy with this weapon is actually very good.
Although this can be done in any part of the game with three or more enemies, I found that the best place to do it is in the "Verdun Alley" section of the level "Blood Meridian" (the second level of the game). There will be a group of at least four enemies that rush down some scaffolding in a near straight line. Just try to bring down at least three with consecutive M4 headshots and the trophy is yours. If you mess up, just let them kill you so you can reload the checkpoint.
Professional Video Guide
Credit to PringlesForAidan for the video.

|
Fragmerchant - Kill 5 Helghast using a single grenade Kill 5 Helghast at once using a single frag grenade |
|
|
This trophy, Fragmartyr, Run and Gunner, and Killing Spree can all be earned in the same location at the start of level 8 (The Cruiser: Landing Bay). At the very beginning, there will be a leech pod that crashes into the ship (just after you get off the elevator). It will release five Higs. At this point, run toward the group, cook a grenade for a few seconds, then let it go just before it detonates. This may take a few tries, as the enemies will sometimes spread out before the grenade detonates, but you will eventually get it. Fortunately, you can just reload the checkpoint if you miss it, as you will get one as you exit the elevator. I have also included a video guide.
Fragmerchant Video Guide
Credit to PringlesForAidan for the video.

|
Fragmartyr - Kill 2 Helghast whilst taking your own life Kill 2 Helghast at once and take your own life using a single frag grenade |
|
|
Just like Fragmerchant, head to the section "Landing Bay" of level 8 (The Cruiser) where the leech pod lets out five enemies. This time, arm a grenade, run into the group of Higs, and hold onto it until it detonates. You should easily kill two enemies with the detonation, unlocking this trophy.

|
Melonpopper - 15 headshots using the sniper rifle Get 15 headshots using the VC32 Sniper Rifle |
|
|
The sniper rifle isn't available all that often, but it's high power and stellar accuracy make it a deadly long range weapon. The fifth and sixth levels (Salamun Bridge and Suljeva Village) both give you access to sniper rifles, as well as long range targets, so I suggest going for this trophy during those missions.

|
Blade Runner - 75 kills with the knife Kill 75 Helghast using the knife |
|
|
You can access your knife by hitting on the directional pad. The knife is actually quite powerful, as it can kill the Higs in one or two slices. If you are playing on easy, you can run through a few of the levels using only the knife. However, the knife can be tough to use on elite because you have to be right next to an enemy to kill him with it. I suggest grinding this out by replaying the first couple levels on easy using the knife as much as possible. It shouldn't take more than a couple runs to reach 75 kills and unlock this trophy.

|
Stick Around - Nail 20 Helghast to the wall Nail 20 Helghast to a wall using the Boltgun VC-21 |
|
|
This trophy is a lot of fun to go for, as the boltgun is a pretty cool weapon. You will gain access to a boltgun during a few of the missions, including "Suljeva Village" and "Tharsis Refinery". The boltgun is basically a pump action rifle with ten rounds per magazine, but it actually fires explosive bolts. Sticking an enemy with a bolt will generally result in an instant kill, though splash damage from hitting near an enemy will still do a decent amount of damage. To get this trophy, you have to actually stick the enemies to walls while using this weapon. Line up an enemy with a wall or similar surface and then fire; it should stick him to it for an entertaining kill. An enemy hit by a bolt will fly a few feet, so they don't have to be right next to a wall to get stuck.
You may get this during your first playthrough if you utilize the boltgun whenever you have access to it. If you don't, it shouldn't take more than one additional playthrough of a level containing the weapon to reach 20 kills.
You may get this during your first playthrough if you utilize the boltgun whenever you have access to it. If you don't, it shouldn't take more than one additional playthrough of a level containing the weapon to reach 20 kills.

|
Master Conductor - Electrocute 3 Helghast Electrocute 3 Helghast with a single burst from the VC5 Electricity Gun |
|
|
You will only gain access to the VC5 Electricity gun during one level of the game (Tharsis Refinery). It is arguably the most overpowered weapon in the entire game, as it releases a stream of deadly electricity for as long as you hold down the trigger. Even better, it has infinite ammo, though it has to be reloaded/recharged when the ammo bar is empty. You are likely to get this trophy without even trying for it, but if you don't, the best place is in the final section (Central Observatory), right after Rico screws up an ambush on Radec.
As soon as you start climbing the tower, you will come across a group of three Higs. Aim at any one of the three (as the weapon arcs electricity between targets), and don't let off the trigger until the trophy pops. I suggest keeping it held down for this long because the blast will sometimes take an extra second or two to kill an enemy, so just be safe and keep holding it down. I have also included a video guide.
As soon as you start climbing the tower, you will come across a group of three Higs. Aim at any one of the three (as the weapon arcs electricity between targets), and don't let off the trigger until the trophy pops. I suggest keeping it held down for this long because the blast will sometimes take an extra second or two to kill an enemy, so just be safe and keep holding it down. I have also included a video guide.
Master Conductor Video Guide
Video by PringlesForAidan

|
Run and Gunner - Kill 3 Helghast with one burst of assault rifle fire Kill 3 Helghast using an M82 or StA52 assault rifle without releasing the trigger |
|
|
Yet again, you will want to go for this trophy during level 8 (The Cruiser), section "Landing Bay". This time, when the leech pod hits and releases the Higs, fire off an entire magazine of assault rifle ammo into the group without letting go of the trigger. You are basically guaranteed to kill at least three, so this trophy should not cause you any trouble.

|
Defensive Fighter - Kill 30 Helghast with an emplaced weapon Kill 30 Helghast using the StA3 fixed gun emplacement |
|
|
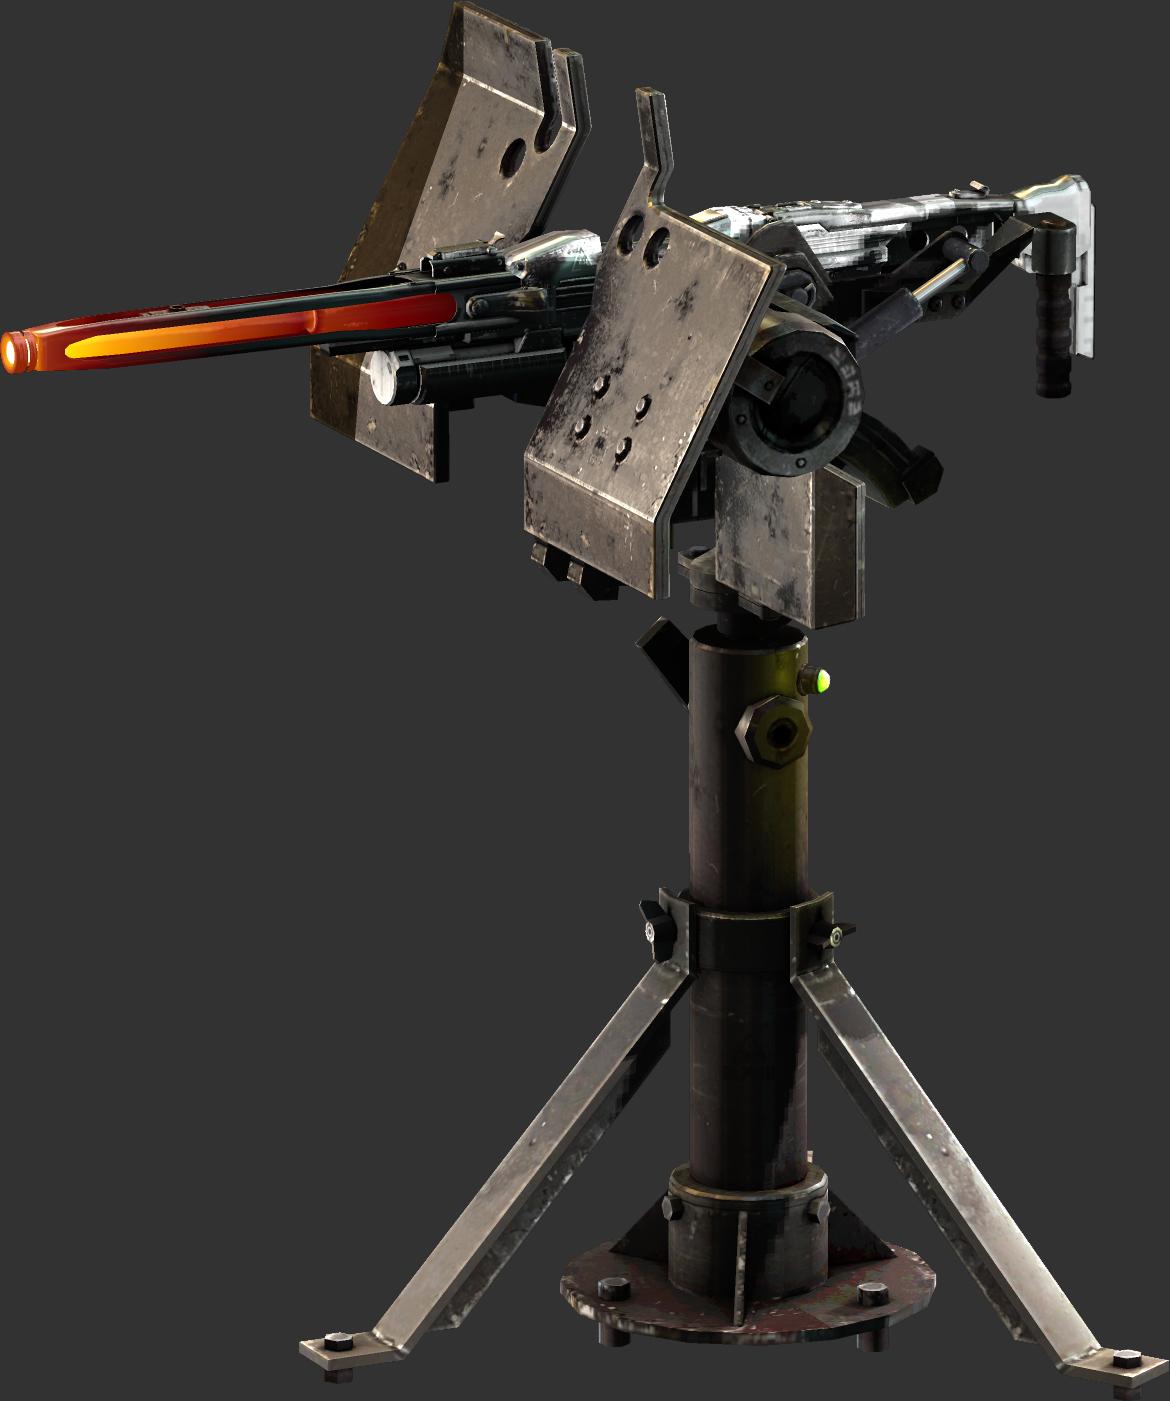
You will encounter fixed STA3 gun emplacements in quite a few missions. As long as you use the weapon whenever you find one, you should have this by the end of your first playthrough. Note that mounted guns on tanks or the AA guns you will sometimes find don't count. The weapon is depicted in the picture below (the barrel only turns red when the weapon overheats).

|
Can Opener - Destroy a Helghast APC Destroy any Helghast APC during battle |
|
|
This trophy is quite easy, and you will probably get it just by playing through the ninth mission of the game (Maelstra Barrens). You will encounter multiple APCs throughout the mission; just shoot one with a few rockets to destroy it.

|
Spare Parts - Destroy all Leech Pods Destroy all Leech Pods in The Cruiser |
|
|
This is one of the toughest miscellaneous trophies in the game, but it still isn't too tough. Later on during the level "The Cruiser", you will be using an AA gun to fight off attacking Helghast ships and leech pods. The leech pods are the boarding ships. To get this trophy, you have to destroy all of them. This trophy DOES NOT include the attack ships, just the pods that come out of the larger Helghast ships. There are approximately 30-40 leech pods that must be destroyed to unlock this trophy. You will have access to a machine gun, as well as a limited supply of homing missiles to fight these ships.
Never fire a missile until it has locked on to a leech pod (when the red outline glows a bit), and use them sparingly. I suggest completing this trophy on easy, so that you don't take as much damage from the attack ships. This trophy will probably take a few tries, so be patient and eventually you will get it. I have included a video guide as well.
Never fire a missile until it has locked on to a leech pod (when the red outline glows a bit), and use them sparingly. I suggest completing this trophy on easy, so that you don't take as much damage from the attack ships. This trophy will probably take a few tries, so be patient and eventually you will get it. I have included a video guide as well.
Spare Parts Video Guide
Credit to GamingGuy118 for the video.

|
Treadhead - Kill 30 Helghast whilst in the tank Take 30 Helghast lives whilst using the ISA tank |
|
|
At the end of the first level of the game (Corinth River), you will get to use a tank to stop advancing Helghast forces. You will need to kill 30 with either the machine gun or cannon to unlock this trophy. Though the tank is very overpowered and nearly indestructable, you probably won't get 30 kills during your first playthrough, so the remaining kills will probably come during your elite difficulty playthrough.

|
Mechspert - Stomp 10 Helghast Stomp 10 Helghast with your Exoskeleton in Maelstra Barrens |
|
|
You will get to use the exo-skeleton during the ninth level of the game; Maelstra Barrens. As soon as you get into the exo and learn the controls, begin moving toward the objective. You do not need to actually jump on the enemies to kill them, just step on them for a quick kill. This trophy can be tricky on the higher difficulties due to the damage rocket launcher wielding enemies can cause, so I highly suggest going for this on easy. As you advance through this level, there will be fewer enemies on the ground, so you will want to get this out of the way as quickly as possible.
Note: I'm not sure if this trophy carries over between playthroughs (as in I'm not sure if you can unlock it by stomping four enemies one time, and six the next or another similar combination). Just in case it doesn't, go ahead and get all ten kills in one run. I've also included a video guide.
Note: I'm not sure if this trophy carries over between playthroughs (as in I'm not sure if you can unlock it by stomping four enemies one time, and six the next or another similar combination). Just in case it doesn't, go ahead and get all ten kills in one run. I've also included a video guide.
Mechspert Video Guide
Credit to PringlesForAidan for the video.

|
Career Ribbon Achieve an online rank of General |
|
|
This trophy actually isn't that difficult, as you only need 2,800 points to reach this rank. You might even be able to make it just by boosting for the other trophies. If you want to go for it in a more legit way, I would suggest playing bodycount on the smaller maps (like Radec Academy). General is not the highest rank in the game, but it is the last rank that unlocks a class, so you will need to reach this rank anyway to get all the ribbons. This will probably take a good 15 - 20 hours of playing.
I have listed all the levels below, the points necessary to unlock them, as well as their rewards. Please note that "badge" means the class (so medic badge means the medic class and so on). The last three ranks (the ones listed in red) are not necessary for unlocking this trophy. Still, you might manage to reach as high as the "general of the army" rank by the time you finish boosting.
The information below discusses the five game modes a little more in detail:
I have listed all the levels below, the points necessary to unlock them, as well as their rewards. Please note that "badge" means the class (so medic badge means the medic class and so on). The last three ranks (the ones listed in red) are not necessary for unlocking this trophy. Still, you might manage to reach as high as the "general of the army" rank by the time you finish boosting.
| Rank | XP (points) required | Reward |
|---|---|---|
| Private | 0 | starting rank |
| Corporal | 30 | create squad option |
| Sergeant | 100 | create clan option |
| Sergeant first class | 200 | unlocks the SMG and shotgun |
| Master sergeant | 350 | medic badge |
| Sergeant major | 550 | unlocks both light machine guns |
| Lieutenant | 800 | engineer badge |
| Captain | 1100 | unlocks the VC9 missile launcher |
| Major | 1450 | tactician badge |
| Lieutenant-colonel | 1850 | assault badge |
| Colonel | 2300 | saboteur badge |
| General | 2800 | scout badge |
| Brigade general | 5000 | N/A |
| General of the army | 10000 | N/A |
| Commander in chief | 100000 | N/A |
The information below discusses the five game modes a little more in detail:
- Assassination: One player is selected to be the assassination target; his/her team tries to defend the target while the opposing team attempts to kill the target before time runs out.
- Search and Destroy: One team has to defend two locations on the map, while the other attempts to plant two bombs in those locations. If a bomb is planted, it can be defused by the defending team. Detonating one bomb extends the time of the round, while detonating both will end the round.
- Search and Retrieve: Basically capture the flag; each team attempts to reach a propaganda speaker and bring it back to their base
- Bodycount: Straight up team deathmatch; whichever team gets the most kills in the match, or reaches the kill threshold first is the winner.
- Capture and hold: Three locations on the map are designated as capture points. Each team will attempt to capture and then hold those locations. Holding the locations, as well as killing enemies that try to take control of it, will earn points. First team to reach the point threshold or whoever is leading when time runs out is the winner.

|
Valor Grand Cross Achieve weekly online honor rank #4 |
|
|
This is by far the most brutal of all the online trophies, as it requires you to rank in the top 1% of all players on the weekly leaderboard. There are only an average of about 5000-5500 people playing this game each week, meaning that you have to rank approximately 50th in the world for a week. Now, most of those players only play a match or two and don't pose a threat, but when I went for this trophy, there was one very intense group of about 20 other players I always ran into when I wasn't boosting. You will have to dedicate a full week of your life to this trophy, more specifically about three hours a day. Fortunately, the moderators no longer seem to exist, meaning you should be able to boost these trophies without any interference or risk of getting booted from the server.
The best method of boosting XP to rank in the top 1% that I tried is listed here (setup your own game but it MUST be public):
Once you have the lobby set up like this (and you have some boosting partners), go ahead and start boosting. Have all players go into the center of the map (the big open courtyard) and have at least one player on the larger team toss out a tactical spawn grenade (tactician class). Now, have the alone player just start killing the others until the match ends. Once the match ends, the winning player will recieve at least 100 points for kills (depending on what ribbons you have unlocked), and it will be multiplied by 1.5, leaving you with at least 150 points per match. Then, just repeat with the next player and so on. You will need to boost for a good three hours or so a day to be safe, so that will be about five wins each. Continue to repeat this cycle for a full week. However, if you see that you are in the top 20 or so after four or five days, you may be able to take a day or two off (or at least reduce the amount of boosting time per day).
While you will be dedicating a ton of time to this step alone, I don't really suggest boosting for the specific ribbons/medals until you have secured your place in the top 1%. Many of the ribbons are based around using specific, possibly harder to use weapons, or playing all the different game modes. You don't want to end up wasting many hours a day for a whole week going for the top 1% then end up missing it because you wasted too much time boosting for medals.
However, you DO want to go for three specific ribbons: Bodycount Specialist (get 10% of the kills during the match), Headshot Specialist (10 headshot kills in a match), and Sidearm Specialist (10 sidearm kills in a match). If you get eight of each ribbon, you will gain additional XP per bodycount kill and per headshot, as well as gain access to the superior M4 revolver sidearm. This will help secure your position in the top 1%.
The weekly leaderboards begin at 12:00 AM on Monday and end at 11:59 PM on Sunday (GMT). For me, it ended at 7:00 PM on Sunday nights (east coast United States timezone), and I was ranked around 30th. I had only boosted a lot for the first four days, but each day I was online for probably five hours (lets just say I had a lot of free time). I also played some real online matches, though not too many.
In the end, this trophy is extremely time consuming, but necessary for the platinum. Like I said, its basically impossible to get without boosting unless you are playing the actual online for like 10+ hours a day all week. Good luck.
The best method of boosting XP to rank in the top 1% that I tried is listed here (setup your own game but it MUST be public):
- First, find 1-3 boosting partners from the gaming sessions tab of this website
- Then agree on a week where at least two of you will be online for a few hours each day
- Map: Radec Academy
- Game mode: bodycount
- Number of players: 2-4 (depending on number of boosting partners)
- Protect it with an easy to remember password to avoid getting randoms
- Time limit: 30 minutes
- Kill limit: 50 if you only have 2 players, 100 if you have 3 or 4 players
- Allow all weapons and classes
- Don't balance teams
- Friendly fire: off
- Bots: disabled
- Have one player select one faction, and the other 1-3 select the opposing faction
Once you have the lobby set up like this (and you have some boosting partners), go ahead and start boosting. Have all players go into the center of the map (the big open courtyard) and have at least one player on the larger team toss out a tactical spawn grenade (tactician class). Now, have the alone player just start killing the others until the match ends. Once the match ends, the winning player will recieve at least 100 points for kills (depending on what ribbons you have unlocked), and it will be multiplied by 1.5, leaving you with at least 150 points per match. Then, just repeat with the next player and so on. You will need to boost for a good three hours or so a day to be safe, so that will be about five wins each. Continue to repeat this cycle for a full week. However, if you see that you are in the top 20 or so after four or five days, you may be able to take a day or two off (or at least reduce the amount of boosting time per day).
While you will be dedicating a ton of time to this step alone, I don't really suggest boosting for the specific ribbons/medals until you have secured your place in the top 1%. Many of the ribbons are based around using specific, possibly harder to use weapons, or playing all the different game modes. You don't want to end up wasting many hours a day for a whole week going for the top 1% then end up missing it because you wasted too much time boosting for medals.
However, you DO want to go for three specific ribbons: Bodycount Specialist (get 10% of the kills during the match), Headshot Specialist (10 headshot kills in a match), and Sidearm Specialist (10 sidearm kills in a match). If you get eight of each ribbon, you will gain additional XP per bodycount kill and per headshot, as well as gain access to the superior M4 revolver sidearm. This will help secure your position in the top 1%.
The weekly leaderboards begin at 12:00 AM on Monday and end at 11:59 PM on Sunday (GMT). For me, it ended at 7:00 PM on Sunday nights (east coast United States timezone), and I was ranked around 30th. I had only boosted a lot for the first four days, but each day I was online for probably five hours (lets just say I had a lot of free time). I also played some real online matches, though not too many.
In the end, this trophy is extremely time consuming, but necessary for the platinum. Like I said, its basically impossible to get without boosting unless you are playing the actual online for like 10+ hours a day all week. Good luck.

|
Valor Cross Achieve weekly online honor rank #3 |
|
|
Requires you to be in the top 3% (approximately top 150 if 5000 players) of all players on the weekly leaderboard. See  Valor Grand Cross for information about boosting and rankings.

|
Valor Medal Achieve weekly online honor rank #2 |
|
|
Requires you to be in the top 6% (approximately top 300 if 5000 players) of all players on the weekly leaderboard. See Valor Grand Cross for information about boosting and rankings.

|
Valor Citation Achieve weekly online honor rank #1 |
|
|
Requires you to be in the top 10% (approximately top 500 if 5000 players) of all players on the weekly leaderboard. See Valor Grand Cross for information about boosting and rankings.

|
Cross-Training Ribbon Acquire all badge specific medals |
|
|
Badge specific medals are based around using each class's special abilities. You will have to get eight of each ribbon to unlock the medals.
The assault class is a bit different from the others, as both abilities are unlocked from the start. The primary badge gives you 50% additional health but slows your movement speed. The secondary gives you 20% extra health, faster health regeneration, and increases your movement speed. When you unlock the medal "front runner", you will gain the ability to use the secondary badge with other classes.
As for boosting methods, I suggest playing Bodycount with maximum time and a 50 kill limit no matter the number of players (preferably either two or four total). Split into even teams, then have one player go for any ribbons he or she needs. Go for the ones that don't require kills first, then finish off with the kill based ribbons. Before the first player reaches the kill threshold, let another player get their ribbons, and keep this up through the end of the match. Each player should get all the same ribbons. However, "field medic", "trauma surgeon", and "spawn authority" all require you to do actions for teammates. For these, you will need at least one teammate. If you are attempting these three with just two total players, then I suggest turning friendly fire on and setting the time limit to no more than ten minutes.
| Medal | Ribbon | Ribbon Requirement | Class | Reward |
|---|---|---|---|---|
| Aerial supportive | Air support specialist | 5 kills with air support | tactician | use air support with other classes |
| Defensive specialist | Turret specialist | 5 kills with placed turrets | engineer | repair ability |
| Explosives expert | C4 specialist | 5 kills by placed C4 | saboteur | use C4 with other classes |
| Field mechanic | Repair specialist | repair 5 objects | engineer | use repair ability with other classes |
| Field medic | Healing specialist | heal 5 players | medic | use health packs with other classes |
| Forward observer | Spot and mark specialist | mark 5 enemy players | scout | use spot and mark with other classes |
| Front runner | Boost specialist | perform 10 boosts | assault | see below |
| Master of disguise | Disguise specialist | 5 kills while disguised | saboteur | C4 |
| Shadow marshall | Cloak specialist | 5 kills while cloaked | scout | spot and mark ability |
| Spawn authority | Spawn point specialist | 5 players spawn on your spawn point(s) | tactician | air support drones |
| Trauma surgeon | Revival specialist | revive 5 players | medic | health packs |
The assault class is a bit different from the others, as both abilities are unlocked from the start. The primary badge gives you 50% additional health but slows your movement speed. The secondary gives you 20% extra health, faster health regeneration, and increases your movement speed. When you unlock the medal "front runner", you will gain the ability to use the secondary badge with other classes.
As for boosting methods, I suggest playing Bodycount with maximum time and a 50 kill limit no matter the number of players (preferably either two or four total). Split into even teams, then have one player go for any ribbons he or she needs. Go for the ones that don't require kills first, then finish off with the kill based ribbons. Before the first player reaches the kill threshold, let another player get their ribbons, and keep this up through the end of the match. Each player should get all the same ribbons. However, "field medic", "trauma surgeon", and "spawn authority" all require you to do actions for teammates. For these, you will need at least one teammate. If you are attempting these three with just two total players, then I suggest turning friendly fire on and setting the time limit to no more than ten minutes.

|
Veteran Ribbon Acquire all mission specific medals |
|
|
Mission specific medals are based around performing certain actions in the different game modes. You will have to get eight of each ribbon to unlock the medals. Unlike the badge specific medals, these can be done as any class.
This set of medals takes longer to boost than some of the others, but I will list the setup you should use for each medal.
Every mode except for Assassination allows all players to get the ribbons in every match, meaning you will only need to play eight of each. Though you will have to play at least 16 assassination games, the matches only take a minute each, so it still isn't all that time consuming.
| Medal | Ribbon | Ribbon Requirement | Reward |
|---|---|---|---|
| Assassin's league | Assassination kill specialist | kill the target | increased points for killing assassination targets |
| Bodyguard alliance | Assassination defense specialist | survive as the target | increased points for surviving as the assassination target |
| Bomb squad | Search and destroy specialist | arm or disarm two bombs | increased points for arming and disarming bombs |
| Corpse counters | Bodycount specialist | make 10% of the kills | increased points per bodycount kill |
| Defense initiative | Capture and hold defend specialist | get ten kills while defending a capture point | increased points for defending capture points |
| Retrieval corps | Search and retrieve specialist | return two speakers | increased points for returning speakers |
This set of medals takes longer to boost than some of the others, but I will list the setup you should use for each medal.
- For Assassination: set the match for one minute survival time and three minutes total; the assassination target is randomely picked but whoever is the target should survive for the full minute, then repeat with everyone else. I highly recommend doing this in groups of two instead of three or four. Once everyone gets "Assassination Defense", go for "Assassination Kill" by trading off killing the assassination target.
- For Search and Destroy: set the match for three minutes and the lowest possible bomb plant and defuse times. Have the players on the offensive team plant both bombs, then have the players on the defensive side defuse both bombs. Do this twice and all players should get the ribbon.
- For Bodycount: you will get this while boosting for Valor Grand Cross.
- For Capture and Hold: set the match for 20 minutes, and to the maximum amount of points to win the match. Have all players crowd around the central capture point and trade off letting one player kill everyone in the vicinity of the capture point. After getting ten defensive kills, switch to the next player. If you find that you are doing this in well under 20 minutes, feel free to set the time limit to something lower.
- For Search and Retrieve: if you have two players, set the match for a three speaker limit; if you have three or four players, set the match for a five speaker limit. The time limit isn't really important as long as you have enough time for all players to return two speakers. Have the players on one team capture two speakers (each), and then repeat for the other team. One team will still need to grab one more speaker, but it doesn't matter who does this.
Every mode except for Assassination allows all players to get the ribbons in every match, meaning you will only need to play eight of each. Though you will have to play at least 16 assassination games, the matches only take a minute each, so it still isn't all that time consuming.

|
Expert Ribbon Acquire all combat specific medals |
|
|
Combat specific medals are based around getting specific types of kills. You will have to get eight of each ribbon to unlock the medals.
None of these are particularly difficult to boost; you should get "Quick Draw" and "Head Fetish" while boosting for Valor Grand Cross, and the other two can be boosted with a near identical method. For those two medals, just change the kill limit to 20, get ten kills with the sniper rifle, and ten more with melee.
| Medal | Ribbon | Ribbon Requirement | Reward |
|---|---|---|---|
| Black Belt | Close Combat Specialist | 10 melee kills in a match | increased points per melee kill |
| Hawk's Eye | Sniper Specialist | 10 sniper rifle kills in a match | increased sniper rifle zoom |
| Head Fetish | Headshot Specialist | 10 headshot kills in a match | increased points per headshot |
| Quick Draw | Sidearm Specialist | 10 sidearm kills in a match | the M4 revolver secondary weapon |
None of these are particularly difficult to boost; you should get "Quick Draw" and "Head Fetish" while boosting for

|
Wargod Ribbon Acquire all remaining medals |
|
|
There are only two medals that are required for this trophy: Example Soldier and Natural Born Killer. This trophy description is a bit misleading, as you don't need to collect all the other medals first. In the multiplayer menu, you can check your statistics as well as your progress toward each medal. These two are in a category of their own, so once you get both, you will get the trophy, regardless of your progress towards the other medals. Both of these are quite easy and don't require boosting, so you might as well try to get them in normal online matches. If you don't go for them in real online matches, you will basically be guaranteed to get them while going for Valor Grand Cross.
| Medal | Ribbon | Ribbon Requirement | Reward |
|---|---|---|---|
| Example soldier | good conduct | score at least 20 points in a game without killing a teammate or committing suicide | increased starting ammo |
| Natural born killer | kill count | kill 10 enemies in one game | increased grenade carrying capacity |

|
Blitzkrieg Ribbon Win 50 online matches |
|
|
You will probably get this while boosting for Valor Grand Cross. If you don't, it can easily be boosted by playing three minute long assassination games with a boosting partner. To check you progress, go to statistics from the multiplayer menu to see how many wins you have.
|
PS3
|
|