


How to Build a DIY Photo Light Box (BEST Way)
Follow this tutorial to create a DIY light box out of cheap household materials. Take incredible product photography at home!
Learn | Photography Guides | By Ana Mireles
Shotkit may earn a commission on affiliate links. Learn more.
If you’ve ever tried to take professional-looking product photos, I’m sure you’ve run into tutorials that recommend using a photo studio box, also known as a lighting box or light tent.
If you look for them on Amazon or in photography stores, you’ll find various choices.
(We even wrote an article on the best photo light boxes that you should check out.)
You can also make your own DIY lightbox if you want to save some money, try a DIY photography hack, or if you’re into crafts and enjoy up-cycling everyday items.
Here’s how.
What Are Light Boxes Used For?
Here’s how this lighting in a box comes in handy.
As you probably know, there are different types of light. One way of categorizing it is by differentiating between hard light and soft light.
Hard light is very focused and creates defined highlight spots and very dark and hard-edged shadows.
Soft light, on the other hand, is more diffused and therefore creates uniform less-contrasted lighting. You don’t get highlight hot spots or intense shadows.
Both artificial and natural light can be softened with light modifiers, such as umbrellas, diffusers, or light boxes, depending on the type of photography that you’re doing.
The average photo light box is usually used for product photography, although small still-life scenes could also be done with them.
You should also check out our guide on how to photograph jewelry, in which we recommend using the finished light tent from this project!
- Related: How to Make Photo Holders
Materials Required to Make a DIY Light Box
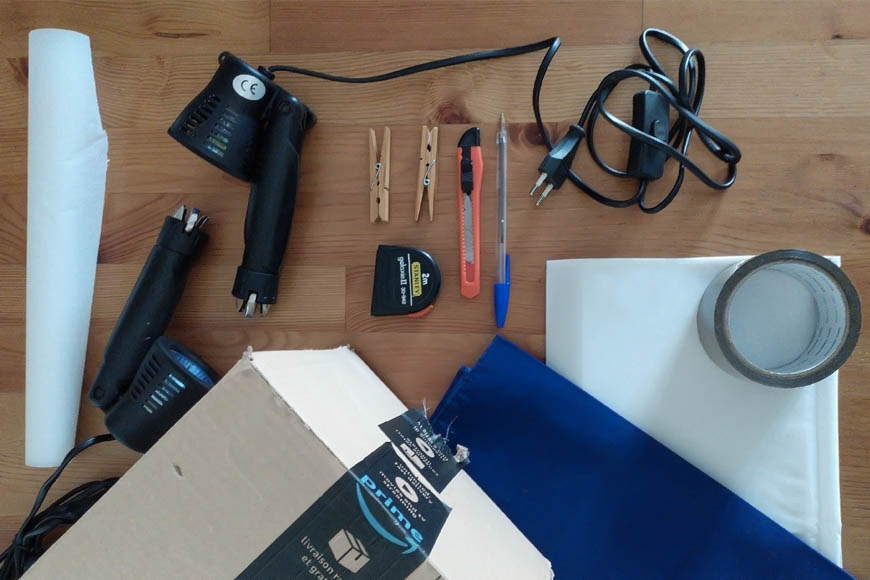
If you want to build a DIY light box to improve your product photography, here’s a list of what you’ll need:
Cardboard box – The size depends on the kind of products you’ll want to photograph. For jewellery, you can use a pretty small box, while photographing wine bottles will require a bigger one. This is entirely up to you, depending on the size of light box you require.
Wax paper – This can be substituted by parchment paper or tracing paper. It will be used to diffuse the light.
White poster board – A roll of paper, a poster board, or a piece of white fabric will serve as a backdrop. You can decide what you want to use. Just make sure it’s not shiny or else you’ll have many unwanted and unflattering reflections.
Colored paper (optional) – Different colored paper, poster board, or fabric will give you more versatility in your photographs as not all product photography needs to be on a white background.
Cutter – This can be any kind of utility knife or Exacto knife. It will be used to cut the cardboard box used for the light box.
Ruler (optional) – The cuts don’t need to be extremely precise, but it’s always better to do things with care if you want a good result. This is especially true because reflecting materials will show any defects.
Tape – This can be of any kind: scotch tape, duct tape, packing tape, masking tape, etc. You can also use a spray adhesive or glue stick, though tape is generally easier.
How Much Do You REALLY Know About Photography?! 🤔
Test your photography knowledge with this quick quiz!
See how much you really know about photography...

Clamps (optional) – Always useful to position and fix backdrops without damaging the light box. If you don’t have any, you can use the tape. Clothes pegs can also work.
Lights – These are not needed to make the light box, but you do need them to use it. You can decide if you want to use speedlights, LED lights, desk lamps, etc. You can also use natural sources in lighting the box.
- Related: 32 Homemade DIY photography props
How to Make a Homemade Light Box
Now that you have all the materials ready, let’s make a light box out of them! Here’s how to make a light box in a few easy steps.
Step 1: Tape the flaps
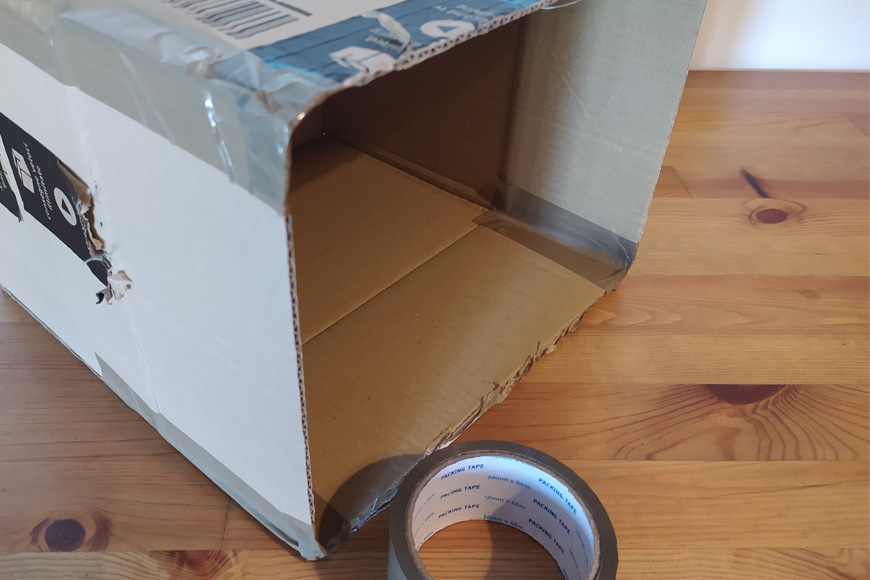
Find a cardboard box in the desired size. This can be easy to find for free, whether it’s because you received a parcel recently, or by asking your local supermarket if you can take home one they’ve discarded.
If you can’t get your hands on a used one, you can buy them at packaging and shipping supply stores or some home improvement retailers.
Once you have it, tape the bottom flaps to give it stability and make sure that there won’t be any light coming in from the cracks.
Then tape the flaps from the front to extend the depth of your light box. If you don’t want to make it bigger, you can just cut off the flaps.
Step 2: Trace windows on the sides
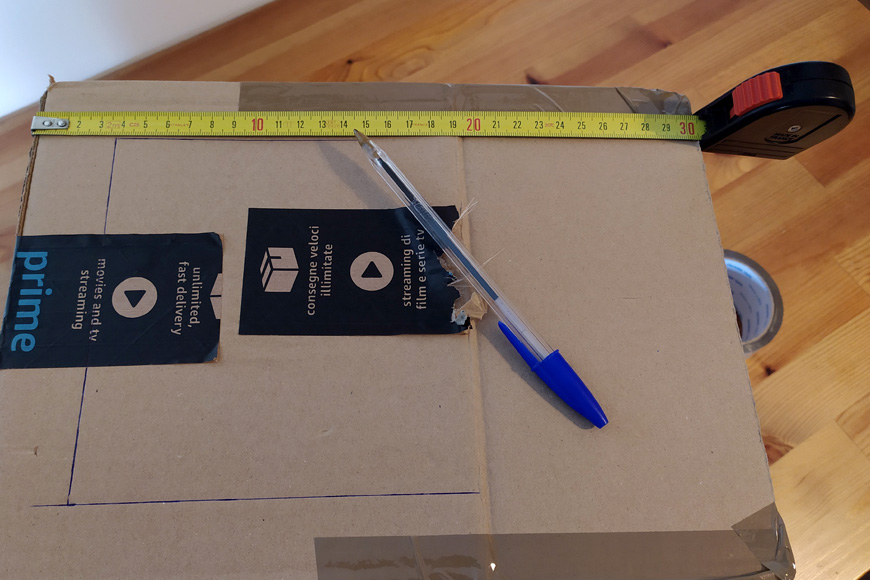
Now, flip the box onto one of the sides. Draw a rectangle about one inch from the edge. This way you’ll have a sort of frame for the window.
Now, turn it over onto the opposite side and repeat the process. The idea is that you have matching windows on both sides of the box.
As for the size of the windows, this should obviously correlate with the size of the product or sill-life scene you wish you photograph.
Step 3: Cut out the windows

Using the knife, cut out the windows on both sides of the box following the perimeter you just traced.
Keep the cardboard rectangles you just cut out because you can use them later as flags. Or, you can cover them with aluminum foil and make reflectors.
In any case, they can become another useful DIY light modifier.
Finally, tape any flaps at bottom of the box down to create a solid wall. This becomes the back of the light box.
Step 4: Cut the roof
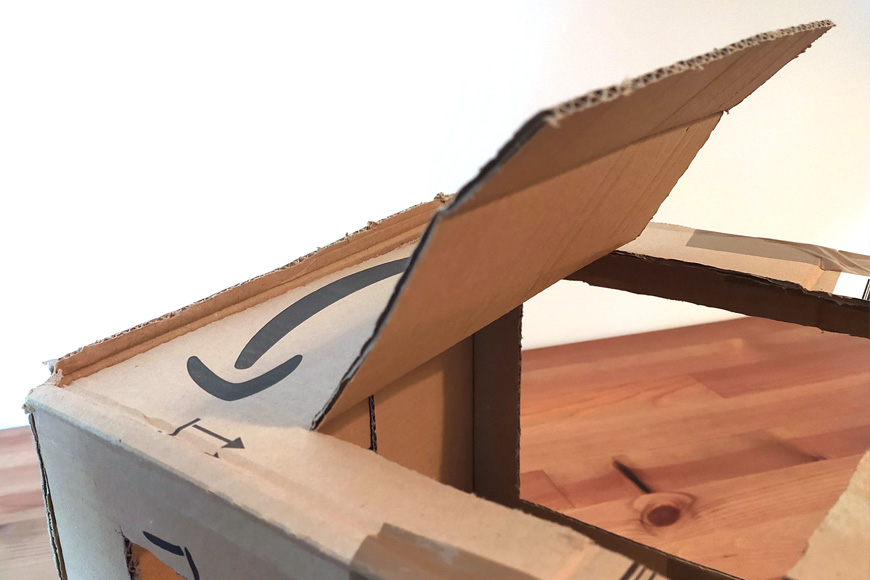
Two opposite sides now have windows where the light will come in. A third side will remain untouched to be the base, and all that’s missing is the roof.
Here you need to make two different cuts. One of them will remain as a door that can be opened if you want to light your subject from above, or closed if you don’t need that third light.
The other hole will be used to change and position different backdrops. So, as close to the back as you can, cut out an opening that almost reaches both edges.
From there you can slip backdrops in and out as you need. You can also use it to hold a sweep for a seamless background. (If you want to change the colour of the background using Photoshop, see here.)
Then, draw a door around the other three edges. In this case, you don’t need to be as close to the edge. It can be an inch or two towards the inside (it really depends on the size of the cardboard box).
Then mark the fourth side of the door without cutting it, just making a fold for the door to open if you need it.
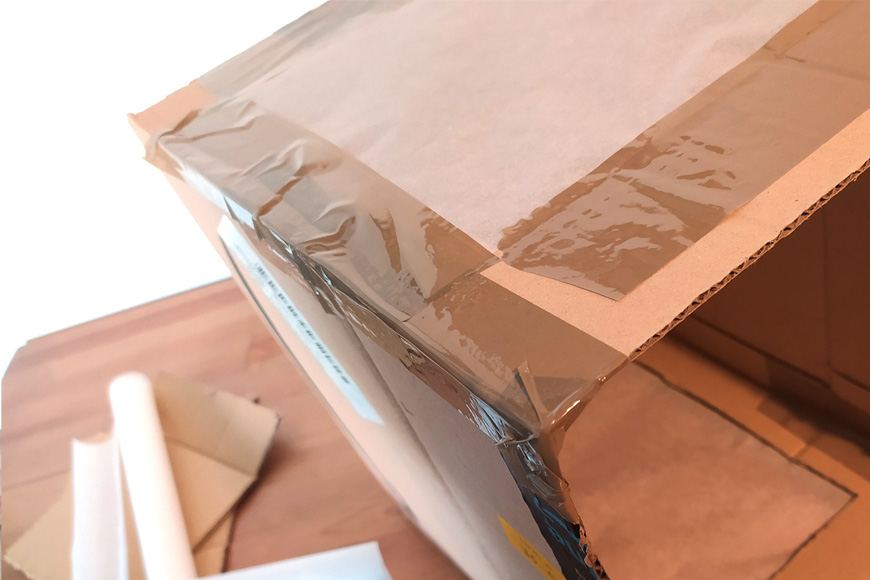
Step 5: Cover the windows and door
This is how a photography light box does its magic.
If you were to leave the box as it is, the product inside would receive hard light. So, you need to soften it by covering the window with a translucent paper or fabric.
The easiest and cheapest material you can find for this is an oven or parchment paper. They’re usually sold by the roll in any supermarket.
You can also use wax paper, also sold in the supermarket or baking shops. These might not be interchangeable in the kitchen, but they are in DIY photography.
If you can’t find either of these, you can also use tracing paper, usually sold in stationery shops or art supply stores. White tissue paper can even work.
Measure the size of the windows and the door holes, then cut the paper to slightly larger than that size (this leaves space for the tape) and stick it in place to cover each of them.
Step 6: Place the backdrop
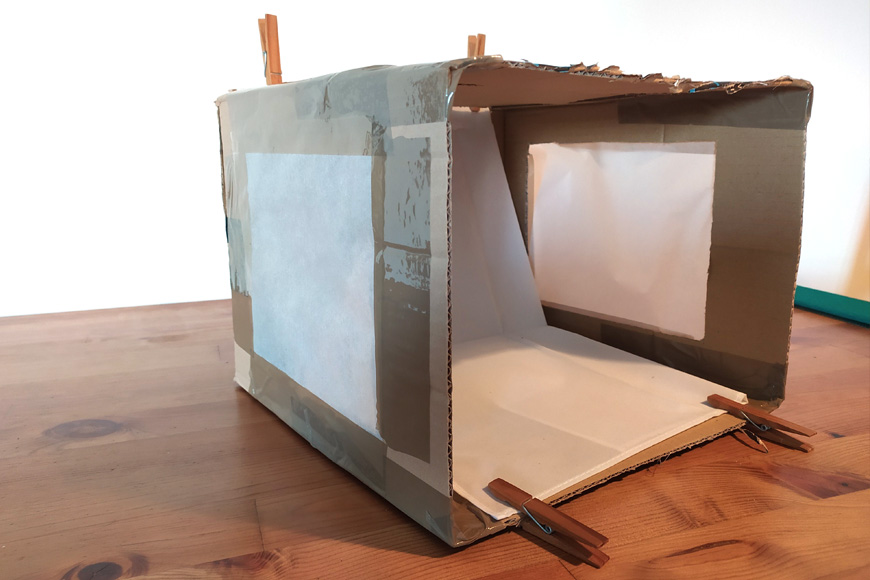
If you want a seamless background you need a long piece of paper like poster board or fabric. It’s important that you use materials that won’t reflect the light.
If you’re using fabrics, velvet is great because it absorbs light. If you’re using paper, a white poster board is a great choice. Measure the back of the light box and the base. That’s how long your backdrop should be.
Take the edge of the paper and slide it through the opening you made on the top. Then pull it until you reach the front of the box. Avoid making a crease where the back and the bottom of the box meet.
Then secure the backdrop with tape or clamps. Keep in mind that using tape will damage the box and the sweep, so you would have to change them regularly.
Step 7: Position the subject
Now that you have your DIY light box ready to use, it’s time to give it a try. Find the product you want to photograph and place it inside the box.
Make sure that it’s not too close to the opening of the light box or else it won’t receive any light in the front. Don’t place it too far back either, as you don’t want to cast shadows on the backdrop.
Step 8: Place the lights
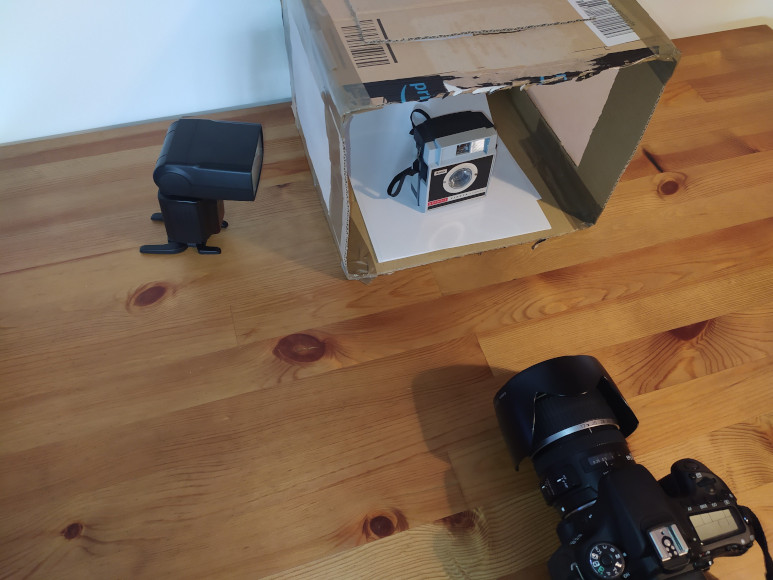
Now it’s time to light the box. Start by placing a light on each side of your DIY light box. This will light your subject evenly. The closer they are to the windows, the more focused they will be, so try moving them to find the distance where you find they look best.
Here are a few ways you can experiment with the positioning on the light box:
Change the light ratio: Some objects don’t benefit from such even lighting. This can make them look flat, so if you feel this is the case, try placing one of the lights closer to the box and the other a bit further away.
If this isn’t enough, you can use a different intensity of light on each side. This way you’ll have a main or key light and a fill light.
Shape the light: If you want to make a more interesting background without investing in any other modifiers, you can create a graded light using flags.
Remember how I mentioned that you should keep the cardboard rectangles you cut out to make the windows?
If you place them on both sides of the subject, either parallel to the background or in diagonal, you’ll be partially blocking the light that reaches the back. This way you can darken different areas.
Use top light: The door that you left on the top side of the box can be used to place a third light to create a nice reflection or complement your lighting setup.
It can work as the main light too. Try using it as the only light source with a black background (see guide) to create some interesting moody shots.
DIY Gels: You can replicate the effect of gels by adding translucent colored paper to your light box.
Step 9: Photo retouching

The finished image, prior to retouching.
Most commercial images have a little editing done in post-production. This is even more needed when you’re working with DIY equipment and non-professional gear.
There’s always some fine-tuning that will make your image look better. For example, you can tweak the white balance and exposure.
One of the most common problems is that the white background is not actually true white. This is very easy to fix using Photoshop (see our guide for other photo editing software here.)
Open your image and add a Curves adjustment layer. Using the white eyedropper click on the darkest part of the white background. This shouldn’t be very dark anyway because you used soft-light and already corrected the exposure.
This will tell Photoshop that those pixels should be the whitest whites in your image. Obviously, this will make the rest of the photo look overexposed, but don’t worry because you’re working on a separate layer, so it’s fixable.
You can try clicking on different points to find the exact tone of white that you want to use. When you’re happy with your background click OK. Don’t worry if the product doesn’t look good at this point.
The Curves adjustment layer created a layer mask, which is the white thumbnail you see in the layers panel.
In it, you can paint black anything that you don’t want to be modified by the new curve values. So, grab the brush tool and set the foreground color to black.
Then paint over the subject to reveal the original layer that has the correct exposure. You can use a low flow on the borders to make some shadows appear in the background.
This will make the product look realistic and not like it’s floating in white space. Now flatten the image and save it in the size and format of your preference.
DIY Light Box FAQ
What is a light box for photography?
The light box, aka lighting box or photography box, is a box with a plain background that you can put products inside in order to photograph them clearly and professionally. Because the box has semi-transparent sides, you can create product photos with good, soft lighting and no shadows.
Is a light box worth it?
If you take a lot of photos of products or objects, then yes – it’s worth having a DIY photo box or light box. If you don’t want to spend money to buy one, you can always make one yourself very cheaply following the steps in this guide.
How do you make a light box for food photography?
You can follow the same process, using a cardboard box, wax paper, poster board and tape. The instructions in this guide can be used to make a DIY light box for any kind of product photography, including food.
Final Words
That’s it – you now have a perfectly useful DIY lightbox for your product photography!
Needless to say that you can follow the same process with more sturdy materials if you want something more permanent. You should also follow our guide on how to make a DIY projector if you fancy another challenge ;-)
Let us know how you went with this tutorial and share your DIY light box examples in the comments below. We’d love to hear from you.

Check out these 8 essential tools to help you succeed as a professional photographer.
Includes limited-time discounts.


Ana Mireles is a Mexican researcher that specializes in photography and communications for the arts and culture sector.

👋 WELCOME TO SHOTKIT!

🔥 Popular NOW:
