Two Monoband Magnetic Loop Antennas
December 2, 2011 1 Comment
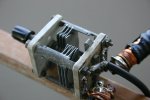
 I recently built two more magnetic loop antennas, both for single bands. I built the first one mostly in order to find a good use for a piece of Heliax (coax with a solid copper shield) that I found discarded. Copper tubing is an excellent material for small loop antennas, so building a loop seemed like a good idea. The Heliax was only 1.60m long, so it only made sense to build a loop for one of the higher HF bands. The main difficulty in building a small loop is to find a suitable capacitor to resonate the loop. I decided to try to build the loop using two capacitors in parallel: a piece of coax that will form a high-voltage fixed capacitor and a small butterfly air-variable capacitor that I had. The butterfly capacitor had too little capacitance to resonate the loop alone. The coax would serve as a fixed capacitor, but I would be able to easily rough-tune it to the band by trimming it.
 I decided to build the loop for the 21MHz band, because when I built it a couple of months ago, the higher bands were not open for significant periods of time (this changed later and I re-tuned the loop for the 28-29Mhz band). I soldered the ends of the Heliax to the butterfly capacitor and to a piece of RG-58 coax. This was not easy; I did not have a high-power soldering iron, and the excellent heat conduction of the Heliax’s shield made it difficult to heat it up enough to solder. I eventually managed to solder the capacitor, coax, and Heliax using short pieces of house wiring. It’s not pretty but it worked.
I trimmed the coax capacitor to the correct length using a borrowed antenna analyzer. I tuned earlier loops without one; it’s definitely easier with an analyzer. The coupling loop is the one I use with the coax loop. It’s larger than 1/5 the diameter of the Heliax loop, but it still resulted in impedance close to 50Ω. I set the air variable capacitor to maximum capacitance and trimmed the coax until the antenna resonated just below 21.000MHz. I could now resonate the antenna anywhere on the 21MHz band by tweaking the air variable. I made several contacts on 21MHz with the loop, but after a few days I re-trimmed the coax capacitor all the way to the 28MHz band, which was more active.
I noticed something strange in JT65, a mode that transmits for 50s at a time. I would tune the antenna low SWR and transmit. At 10W or below, everything was fine. But at 20W and up, the SWR would rise from near perfect to horrible after a few seconds of transmission. The rise in SWR was rapid but not sudden; it would take several seconds. This was very consistent and it happened on both 21MHz and 28MHz. I realized that the power was doing something bad to the antenna, so I went out to check. There was a slight odor, and the end of the coax stub was burned (and warm). The high voltage across the capacitor was causing current to leak between the inner and outer conductors of the RG-58 coax, and that current was heating up the coax, burning it, and changing its capacitance (which is what caused the antenna to de-tune and the SWR to rise). I replaced the RG-58 with a much more robust RG-213. I tuned it to the band but kept the inner conductor longer by about 1cm than the outer shield, to separate the two conductors even more. The antenna can now withstand high power. I made many contacts with it.
I hoped that the antenna would be better than my coax loop, which is made with LMR-400 coax and N-type connectors, thanks to the solid-copper outer conductor and thanks to the soldered connections between the loop and the tuning capacitor. But on the air, there didn’t seem to be a significant difference between the two. The coax loop is a little larger (80cm diameter vs. 52cm), so maybe that compensates for its disadvantages. The coax loop is more flexible, since with a large air variable and a vernier dial I can tune it all the way from 7MHz to 29MHz, so I don’t use new Heliax loop much any more.
It was still fun to see that I can have reliable SSB and FM contacts (not to mention PSK31 and JT65) using such a small antenna.
An Update: I’ve finally soldered the Heliax directly to the tuning capacitor. I did well with this antenna during a recent contest, in which I made quite a few SSB contacts including to Australia, China, Japan, and quite a few other countries. I’m pretty happy with the antenna now.
The second small loop I built is a PCB loop for 144MHz. I envisioned it as a way to build APRS trackers that are really small: that is, have a small antenna, perhaps in the same plastic enclosure containing the transmitter and the GPS receiver and antenna. Furthermore, if an effective VHF loop can be built on a PCB, the antenna could be etched by a commercial PCB manufacturer, making is relatively easy to duplicate. PCB antennas are very common on UHF. They are also common in RFID tags, some of which work at 13.56MHz (where they are very inefficient but still good enough for RFID). For APRS, the antenna can be fixed-tuned to 144.800MHz, so the tuning capacitor can be fixed rather than variable.
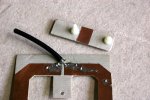
 I designed the loop to be a square with beveled edges. The square is 10cm-by-10cm, and the copper loop is 1.5cm wide, to make losses low. I am not actually sure that making the PCB conductor so wide would actually keep losses low, but it seems like a reasonable bet (if somebody can run simulations to determine this, I would be happy to read the results). I was hoping to tune the loop to resonance using a sliding capacitor that I would form from the two open ends of the loop itself and another piece of PCB material sitting on top of it, separated by either a small air gap or some polyethylene. I ended up, however, using a coax-stub capacitor, which you can see in the picture. I also used a gamma match to feed the loop, rather than a coupling loop.

The small piece of PCB was designed to form a tuning capacitor with the ends of the loop, when mouned on top of it
I had a lot of trouble tuning this loop. I started by installing the PCB air capacitor, which I fixed to the loop using nylon screws. My intention was to make slots in the PCB material that would allow me to slide the small piece of PCB up and down to change the capacitance, but initially I used simple holes that fixed the capacitor at maximum capacitance. I connected the loop to an antenna analyzer and tried to find the resonance point. I could not find any resonance point. I moved the gamma match up and down and tried again and again. I replaced the gamma match by a coupling loop. No resonance. I abandoned the project for a few days.
Prototyping the loop took quite a bit of work, to cut the PCB and to file away some of the copper using hand tools, so not being able to get it to work was frustrating. After a few days, I decided to use methods that worked for me on lower bands and to try again. I took apart the hand-made air variable capacitor and soldered a short RG-58 coax stub to the loop. And instead of the antenna analyzer, I used a receiver (in SSB mode) to search for a peak in the noise. I was able to find a weak peak below 144Mhz. I repeatedly shortened the stub and searched for the peak, which slowly rose toward 144MHz. Once it was near, I was able to transmit and to trim the coax to low SWR. The antenna is now tuned to 144.800MHz and gives acceptable SWR over a range of about 0.5Mhz.
I did some non-scientific comparisons of the loop and a short flexible handy-talkie whip, the 15cm-long Diamond SRH-815. There didn’t seem to be a lot of difference between the two antennas, which was a bit disappointing. So either I didn’t do the comparison properly (entirely possible), or this loop is not much more efficient than a short whip. For most uses a short whip is more practical, so right now I can’t really think of a good reason to use a small PCB loop on VHF. But I’m still happy I was able to get the antenna to work.


Pingback: A Lego Enclosure for an APRS Tracker with a Built-In Antenna « Eclectic Technical Experiences