Devin Devine, contractor based out of Blakeslee Pennsylvania, projects competed across the USA
contact devin@devineescapes.com
Yes, I still offer phone consultations
DIY hardscape/masonry/flagstone help rates:
$123.00 for one hour
$80 for a half hour
Monies are payable via Venmo, paypal or zelle.
Short answer: both are acceptable…but how much good stone do you want to bury? Usually, I do gravel–and also bury a course/bury half a course..
A dry stone wall is built without mortar and with no concrete foundation. As such, the wall is flexible, and can adjust itself as the ground swells and settles with the seasons. However, to ensure the longevity of your wall, your going to want to minimize movement of soil, and movement of your wall. The three most common foundation types for dry stone wall are a) right on top of the bare soil b) bury a course of stone and c) gravel foundation/crushed stone.
Dry stone walls built right on top of soil
I’ve seen walls like this fail. Many of the walls that I’ve investigated that were built with no foundation whatsoever are usually property borders, made from rough field stone, often small sized material, like fist-sized stones…and it’s usually more of a mound, less of a wall. Other walls that I’ve seen are basically built “on dirt” but are well built, with at least the topsoil/sod removed, and maybe half of a course buried.
Buried course foundation
I’ve seen walls built like this last (if well-built well-hearted, plenty of through stones and solid cap stone), and I’ve re-built walls like this as well. To date, I’ve never been able to bring myself to use this method. To make this method work, you generally want to use the largest stones available, for the first course (foundational course/footers), with a lot of surface area, to spread out and distribute the weight of the stone wall. And you want to bury the entire course, maybe 4 to 6 inches of wall stone–buried.
Gravel foundation for dry stone walls
So here’s what I do:
- Dig about 8″ down, removing all organic soil and roots, until I am building on mineral soil, clay, sand or stone.
- use a hand tamper to compact the excavated area
- spread out 4″ to 6″ road base type gravel. This will be crushed stone, 3/4″ in size, with quarry fines, aka 3/4″ minus, item number 6 (in New York) aka 2A modified gravel (in Pennsylvania and Delaware) or CR#6 in Maryland…..the names vary. In California they call it base rock. When I travel for work, I just go to the masonry supplier and look at their gravel in person, or verbally describe “3/4″ or 1″ angular crushed stone, with smaller bits, all the way down to stone flour”. Exact size of the aggregate may vary, I’ve used material that had 2″ chunks in there too, so long as it has smaller sizes and fines.
- Tamp the gravel. If it’s 6 inches or thicker, I’ll do it in lifts. Lay 3″ or 4″, tamp, then 3″ more and tamp. If the material is really dry, then slightly dampen the gravel before tamping. The stone dust is like a binder….like flour. Dampen it, because you can’t tamp dry dust, it’s like getting dry flour to stick together.
- Bury at least half of my first course, sometimes a full course. As the grade fluctuates, up to a course and a half my end up buried. Generally larger pieces are used for the first course, with more surface area.
Larger stones are still generally selected, for the buried course
When sorting out my wall material at the beginning of the job, I’ll selected generally large stones for the half buried course. Since the course is to be buried, the foundation stones may vary in thickness, and may be less flat on on the bottom side. This course will be leveling up using gravel, stone dust or soil, so it can tolerate a bit more irregularity as compared to the corner stones, caps and through stones–which will also be larger material, set aside at the beginning of the project.
The gravel, we assume, provides a bit of a buffer…..it won’t hold water and then expand and heave the way a clay soil will, in cold winter months, nor will it get soft and cause the wall to sink into the earth. Even if I were to bury a full course of wall stone…..I’d still prefer to put some gravel underneath that buried course, or at least have dug down to mineral soil.
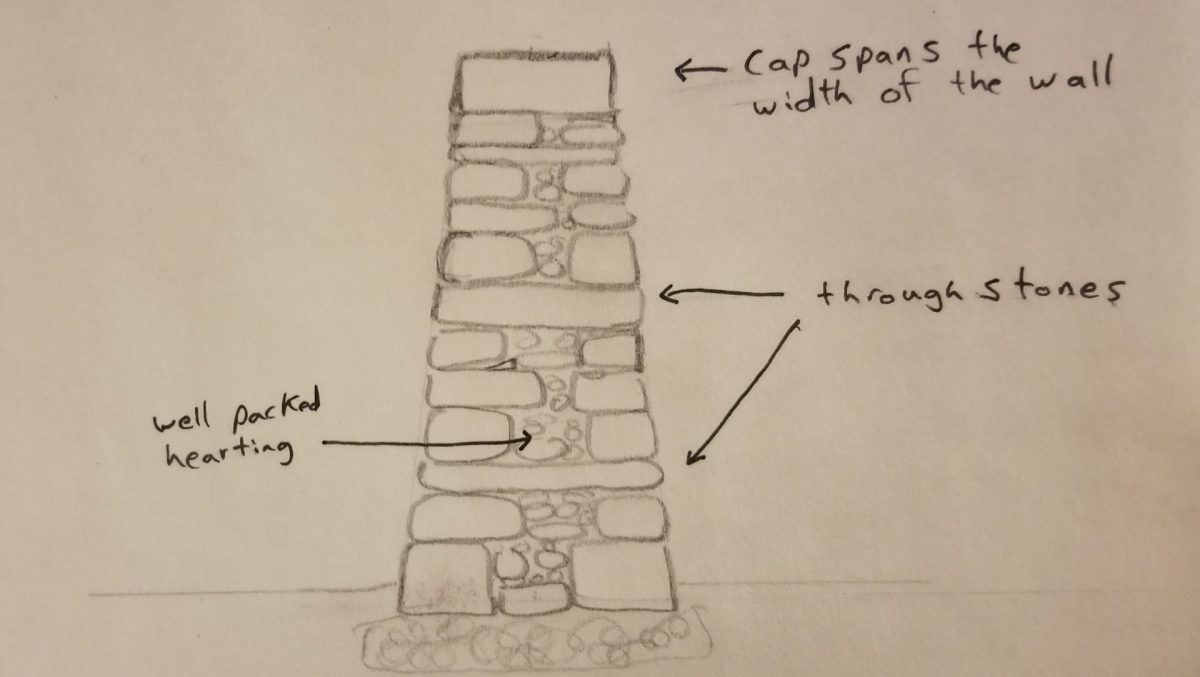
dry stone wall cross-section/diagram, showing approximately 6″ buried gravel and half a course of stone buried.
As you can see, the gravel foundation is wider than the base of the wall, for added stability. Same thing should ideally be done, if you’re going with the buried course option–the buried course should be wider than the base of the wall. So if the base of the wall is going to be 20″ wide, you might have a 28″ wide foundation.
Phone consultation services now available
DIY dry stone wall and Hardscape help
My rates for DIY consultations are as follows:
$80.00 for a half hour consultation
$119.00 for a full hour
Monies are payable via paypal, venmo or Zelle.
Related articles, DIY and hardscape how-to:
- how to build a dry stone wall
- how to split a boulder using feather and wedge
- DIY hardscape consultation services–professional guidance on “how to build your own flagstone patio”
- how to build a natural stone birdbath
- what to use for under flagstones, concrete, sand, gravel, or what?
- what to put between your flagstones, sand, mortar, polymeric sand…..or stone dust?
- should you seal your stone patio?
- replacing the cement between flagstones, re-pointing
I love your articles, you might be the most comprehensive source of information on landscaping with stone available online. A true gift to the diy inclined home owner attempting to do their own hardscapes. Like me! Oh and I’m happy that I don’t “have to” bury a full course of stone! The wall that I’m replacing was built right “on the dirt”. I’ll follow your advice and do a hand tamped gravel base for the new wall.
Thank you for your very good description on how to build a dry stone wall, I have found it very helpful.
As I am going to do a talk on the similarities of building this wall in comparison to being built into the body of Christ, and found it very encouraging and useful. As the stones used are all quite different, and need to be shaped and placed in the right place right from the beginning of the building. As a Christian, Christ is my foundation stone. which through life’s experiences of which some have misshaped my thinking and emotions, a bit like those different shapes and sizes of stone, then meeting with Jesus, that changed and He is now building me into the place that he wants me to be in His body, to be put among others that need to be built up and encouraged in and through some of their rough times, that May well be very similar to those that I myself went through.
And like that wall when the stones and us Christian people come together we are stronger, just like that wall, we all need to be in the right place for this to happen. It is amazing that there are so many similarities in the building of the wall and the building of Jesus body of people.
Bless you.
Stone wall building has been like this, for me, for a good decade and a half, or more. For some reason, the act of stone wall building and building with stone in general, just really lends itself to this sort of thinking–to metaphorical lessons in life. I think stone is special in this regard…I think stone wall building is particularly special in this regard and dry stone walls, to me, feels even more like this–more inclined to impart life lessons.
If you have a video or text of your talk I’d be interested to see or read it.
Hi
i have had a builder doing my dry stone wall. he has laid concrete foundations not gravel.
is this going to cause a problem.
In short: probably not, so long as they made the foundations strong and did the rest of the job well. Long answer: A dry stone wall is flexible. The ground heaves and settles, and the wall can move with it. There’s really no reason to do a concrete foundation. But what are the odds of it causing a problem? I can’t be certain! I don’t think the odds of a concrete foundation itself causing a big problem, are too high, so long as they do the rest of the wall “well”. The thing is, why are they doing a concrete foundation? For a dry stone wall? On the surface, it sounds dumb. Extra work, extra money, and totally unnecessary…..makes me worried that maybe they don’t know what they are doing.
But, to be fair, back in the day it was semi common practice to do concrete foundations for segmental block retaining walls–stuff like versalok or e.p henry, if you ever heard of them. The general consensus was that a concrete foundation was a waste of time, and a small added potential for failure, with no benefit added. Not dry stone walls, but sort of similar, in some ways, and for the life of me, I really can’t ever remember seeing a dry stone wall that was on a concrete footer, so the segmental block retaining walls is the closest example I can think of.
So I don’t know enough about how these guys build to say for sure if we should expect any problems–but I can say that ff they were to follow the guidelines set in this article –and if the concrete footer is solid, then I wouldn’t be worried.
This is very interesting. I’ve been thinking of redoing a backyard wood patio with brick or slate, and it already has enough gravel underneath that i could simply dig the trench for the wall and shovel it over into it.
If you don’t mind, any advice for sourcing stones? Or do you have an article I’ve missed about this?
Sourcing stone will depend on where you live. Usually, I source stones by checking out the local quarries and stone masonry supply places. Visit them, and see what they have. My preference is to work with larger stones. Actual size of stone I’ll be looking for will depend on how big the wall is….but 4 to 6″ wall stones are good. The wall will go up faster with 6″ (or thicker) stones.
Craigslist is often worth a look–often home owners will have stone to get rid of. Also, construction sites, when they excavate they sometimes pull out interesting and useful stone.Of course there’s different options for sourcing from nature, if you feel like going for a hike.
Hello Devin, you said you have done a few west coast projects on your projects page. How did you find the selection of stone out here in terms of quality and price? I’m under the impression that there are a lot more rocks just existing in the soil on the east coast – not great for farming, but i imagine great for wall building.
This appears to be proved out in the stone walls I see in Oregon. Far and few between, and often built out of thinner stones that lack the weight and traditional vibe of the walls on your website. What should I be looking for in stones that could make a wall to rival the ones I see visiting family in CT, and where might I find them? Thank you!
I’ve done jobs in San Francisco and Sebastopol. On average, the stone suppliers I’ve found in CA had better selection than most places on the East Coast.Most places in PA and NY are selling stone from a few quarries. In California I found suppliers that sold one maybe two types of local(ish) stone. Quartzite, small barely usable stuff–and then they’d also have stone from PA, NY, Idaho, Montana, Arizona, etc.
Prices, out west–were always a bit higher than east. Not just stone, but everything. Taxed, too. So lovely in Oregon and Cali. But how do you survive?
In San Francisco I built a patio–using Pennsylvania bluestone! It was (by far) the best flagstone I found available in the city. Later, I discovered American Soil and Stone, in Richmond CA https://www.americansoil.com/ They had a lot more selection of flagstone and wall stone, from all over, and so I purchased wall stone and flagging from them, for my project in Sebastopol.
I don’t know about Oregon though. I just googled building stone supplier in Oregon: and came up with Pacific Stonescape in Corvalis and Smith Rock inc in Milwaukee, both of them seem to have good wall stone, and more than one type that looks like I would build one of my style walls, with it.